Written byJanet BashorunUpdated on Dec 17, 2025
How to Clone Desktop Operating System to SSD for Optimal Performance
Approved byBen Lee
Brief introduction: To clone desktop operating system to SSD is one of the most effective ways to boost your computer's performance and responsiveness. Moving your operating system to a solid-state drive (SSD) not only speeds up your boot times but also enhances the overall user experience through quicker applications and file access. This comprehensive guide will walk you through the entire OS cloning process, ensuring a smooth transition and optimal performance with Tatasoft Disk Clone.
In this article
Benefits of Cloning Your Desktop Operating System to an SSD

- Increased Speed: SSDs provide much faster read and write speeds than traditional hard drives for your Windows desktop.
- Improved Boot Times: Booting from an SSD can reduce startup time by 50% or more.
- Better Reliability: SSDs are more durable and less prone to mechanical failure.
- Optimized Performance: Programs and applications load quicker, resulting in a smoother user experience.
- Energy Efficiency: SSDs consume less power than traditional hard drives, which can result in better battery life for laptops.
- Noise Reduction: SSDs operate silently, providing a quieter computing environment.
- Space Saving: SSDs are generally more compact than traditional hard drives, allowing for better optimization of space in your setup.
Step-by-Step Guide to Clone Desktop Operating System to SSD
Step 1: Prepare your SSD
Ensuring a successful OS migration process on your desktop starts here. Gather the necessary components:
- A new SSD that has sufficient capacity to accommodate your existing operating system and files.
- Backup important data on the target SSD to avoid any potential data loss during the process.
Step 2: Connect the SSD
Install your new SSD into your desktop. This can involve a physical installation inside your case or connecting it externally via a USB-to-SATA adapter. Ensure that your system recognizes the new SSD through Disk Management.
Step 3: Launch Tatasoft Disk Clone
Start Tatasoft Disk Clone for Windows on your computer. Designed for user-friendliness, it will guide you seamlessly through each stage of the OS cloning operation.
Step 4: Select the Source and Destination disks for cloning
Switch to 'Disk Clone', you will:
- Choose your current hard drive (source) containing the operating system.
- Select the SSD as the destination drive. The visual representation in Tatasoft will aid in easily identifying your disks.
- Check Sector by sector option if you need to copy data bit-by-bit at the sector level.

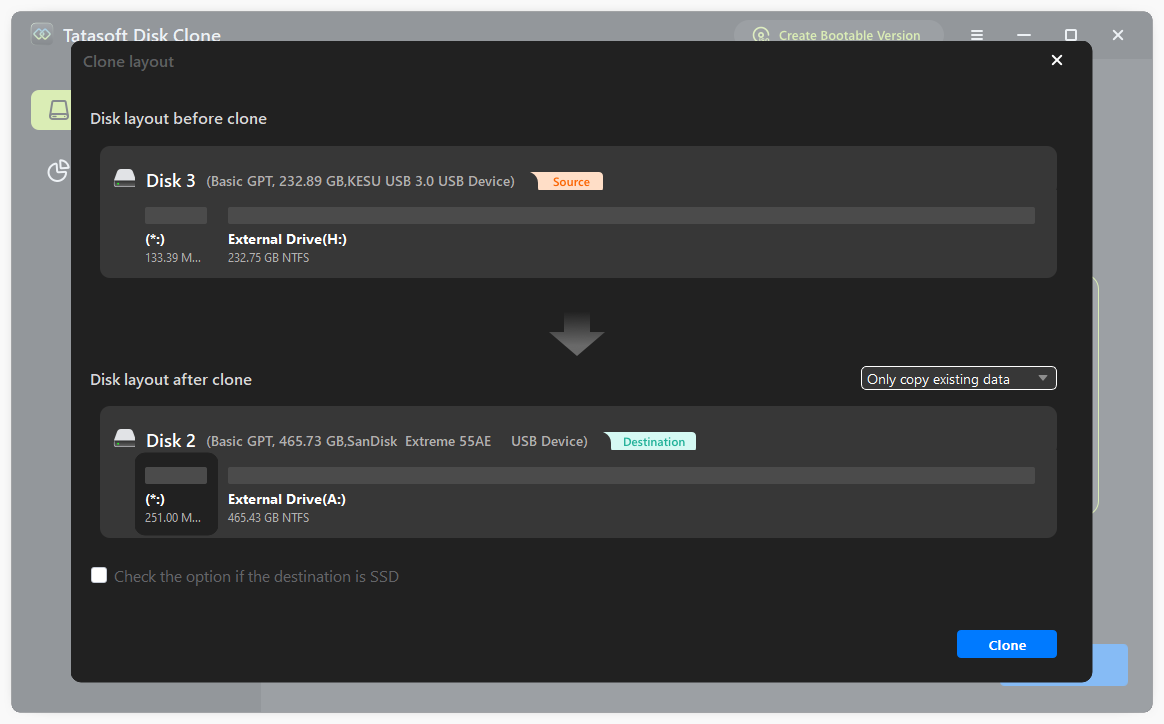
Step 5: Configure OS cloning settings
Tatasoft provides various options, allowing you to customize your OS cloning process:
- You can adjust the partition size on the target SSD after cloning according to your needs, or you can directly choose the same partition layout as the original disk.
- Check the SSD optimization option to maximize SSD performance.
- Click the Clone button to start cloning the system to the SSD
Step 6: Initiate the Cloning Process
Once all settings are confirmed, commence the system cloning process. The duration may vary depending on data size and drive speeds. Monitor the cloning progress in real-time through Tatasoft.

Step 7: Set your new SSD as the boot drive
After transferring the operating system to SSD, set the new SSD as the boot drive if necessary:
- Restart your computer and access BIOS/UEFI settings by repeatedly pressing the BIOS key (usually Del, F2, F10, or Esc, depending on your motherboard brand) during startup.
- Use arrow keys to select the "Boot" or "Startup" tab
- Adjust the boot order, prioritizing your new SSD by moving it to the top of the list using +/- keys or drag-and-drop (if supported).
- Save the changes and exit.
Preparing Your SSD: Initialization
When preparing to clone your desktop operating system to an SSD, it’s crucial to initializing the new SSD correctly:
Initializing New SSD
If the brand-new SSD has never been used before, it must be initialized using Windows Disk Management tool upon first connection. Follow these steps to Initialize your new SSD using Windows:
- Initialize the SSD: If it’s newly installed, Windows may prompt you to initialize the disk (selecting either GPT or MBR partition format). Choose GPT (GUID Partition Table) for modern systems to take advantage of UEFI firmware, especially when the drive capacity exceeds 2TB.
- Or if you skipped the initialization prompt, you can open Disk Management to initialize the disk: Right-click on the Start menu and select "Disk Management."
By properly initializing your SSD, you prepare it for an efficient and organized installation of your desktop operating system, enhancing performance and usability.
Cloning OS vs Freshly Installing on SSD
When transferring your operating system to an SSD on desktop, you generally have two options: cloning your existing setup or performing a fresh installation:
1. Cloning the Existing Operating System
Cloning involves creating an exact replica of your current operating system, applications, and files on the new SSD. Tools like Tatasoft Disk Clone is commonly used. The key benefits include:
- Time-Saving: Cloning is typically faster as it replicates existing configurations, applications, and files without the need for reinstallation.
Continuity: You retain all your settings and files, minimizing the disruption to your established workflows.
However, cloning may also carry drawbacks, particularly if your existing system has accumulated issues or clutter. Cloning an OS may transfer existing system issues such as HDD-related issues (fragmentation, redundant data) or malware to the SSD.
2. Performing a Fresh Installation
A fresh installation involves installing the operating system directly onto the SSD without any prior data being copied over. This method has its own set of benefits:
- Clean Slate: You eliminate old issues, bloatware, and unnecessary files, leading to better performance.
- Optimized Configuration: A fresh installation allows you to properly configure your operating system from the ground up, ensuring everything runs smoothly on the SSD.
The downside, however, is that you will need to reinstall all applications and transfer files manually, which can be time-consuming.
3. Making the Choice
Ultimately, the choice between system cloning and fresh installation depends on your specific needs:
- Choose cloning if you want to maintain your complex existing setup and save time, migrating from HDD to SSD quickly, or software testing, etc.
- Opt for a fresh installation if you are looking for a streamlined, optimized system with better performance.
By weighing these options carefully, you can select the best approach for cloning your desktop operating system to an SSD.
Troubleshooting Common Cloning Issues
- Drive Not Recognized: If the SSD isn't showing up, check your connections or any BIOS settings related to storage detection.
- Cloning Errors: If the cloning process fails, ensure you have sufficient space on the SSD and that your source drive is functioning correctly.
- Boot Issues: If issues arise after the clone, revisit BIOS settings or consider running repair tools from the OS installation media.
Post-Cloning Recommendations
- Retain the Original Drive: Keep your original hard drive until you are comfortable with the new system's functionality. This provides a fallback option in case you encounter unforeseen issues with the SSD.
- Schedule Regular Backups: Regular backups ensure your data remains secure and can be quickly restored if issues arise.
- Conduct Regular Maintenance: Monitor the health and performance of your new SSD using built-in diagnostic tools. Regular checks help in early identification of potential issues, thereby prolonging the SSD's lifespan.
Conclusion
Cloning your desktop operating system to an SSD unlocks transformative benefits that significantly enhance both performance and efficiency. By following the detailed steps outlined in this guide and utilizing Tatasoft's innovative cloning solutions, you can effortlessly move your system to SSD without reinstallation while enjoying improved speed, reliability, and overall user experience.
At Tatasoft, we help future-proof your computing with SSDs. Experience the speed difference in your daily tasks.
Related Articles
- Mar 04, 2026Essential Techniques for Cloning Your Hard Drive in Windows 11
- Mar 06, 2026How to Clone SSD to a Larger SSD?
- Dec 17, 2025How to Clone A Laptop Hard Drive without Data Loss in Windows 10/11?
- Feb 10, 2026How to Clone Windows 11 to a New SSD without reinstalling?
- Feb 04, 2026How to Clone C Drive to New SSD and Ensure a Bootable Result
- Feb 01, 2026Clone Your Hard Drive on Windows 7 with Two Quick and Easy Methods

A dedicated technical writer at Tatasoft with over four years of specialized expertise in computing technology. She crafts actionable, user-centric content for tech niches, specializing in disk cloning, data management, and video solutions for Windows and Mac.
Read full bio

This article has been approved by Ben Lee. Ben's dedication to excellence and his comprehensive knowledge of Windows and Mac technologies make him an essential part of any technical writing team. With a career marked by continuous learning and adaptation to new technologies, Ben remains at the forefront of the ever-evolving tech landscape.