Written byJanet BashorunUpdated on Mar 06, 2026
Brief introduction: Cloning SSD to larger SSD is a key storage upgrade method that preserves all the existing data, applications, and settings. As SSDs gain popularity for their speed and reliability, Users often need more space without sacrificing their current system setup. Tatasoft Disk Clone offers an easy solution. In this guide, we will delve into the process of cloning your SSD, benefits of upgrading to a larger SSD, and expert tips to ensure a successful SSD transition.
In this article
Why Clone SSD to Larger SSD?
Cloning your SSD to a larger one comes with numerous advantages that significantly enhance your computing experience:
1. Increased Storage Capacity: A larger SSD allows you to store more files, applications, and multimedia content without worrying about running out of space.
2. Improved Performance: Many larger SSDs come with better technology and faster read and write speeds, contributing to overall improved system performance.
3. Data Integrity: Cloning SSD allows you to retain all your data, settings, and applications without the need for manual transfers or installations, thereby reducing the chance of data loss during the transition.
4. Seamless SSD Migration: Cloning OS disk eliminates the hassle of reinstalling your operating system and software, providing a quick and efficient way to upgrade your storage.
When it comes to cloning SSD to larger SSD, Tatasoft Disk Clone stands out due to its comprehensive features and ease of use. The software enables fast cloning to minimize downtime, while its SSD optimization features enhance performance and longevity. Next, we will provide a detailed introduction on how to use the Tatasoft Disk Clone for Windows to clone an SSD to a larger one.
Step-by-Step Guide: How to Clone SSD to a Larger SSD
Step 1: Download and Install Tatasoft Disk Clone
- Download Tatasoft Disk Clone for Windows and follow the installation prompts to complete the setup.
Step 2: Prepare Your New Larger SSD
- Connect the Larger SSD: Use a SATA cable, USB adapter, or any other appropriate method to attach the larger SSD to your computer.
- Check Available Space: Ensure that the new SSD has sufficient space to accommodate all data from the existing SSD. If your current SSD is 500GB, for instance, your new one should be larger than this.
- Backup important data on the larger SSD if it has: Cloning will erase all the content on the destination disk.
Step 3: Launch Tatasoft Disk Clone and select Disk Clone
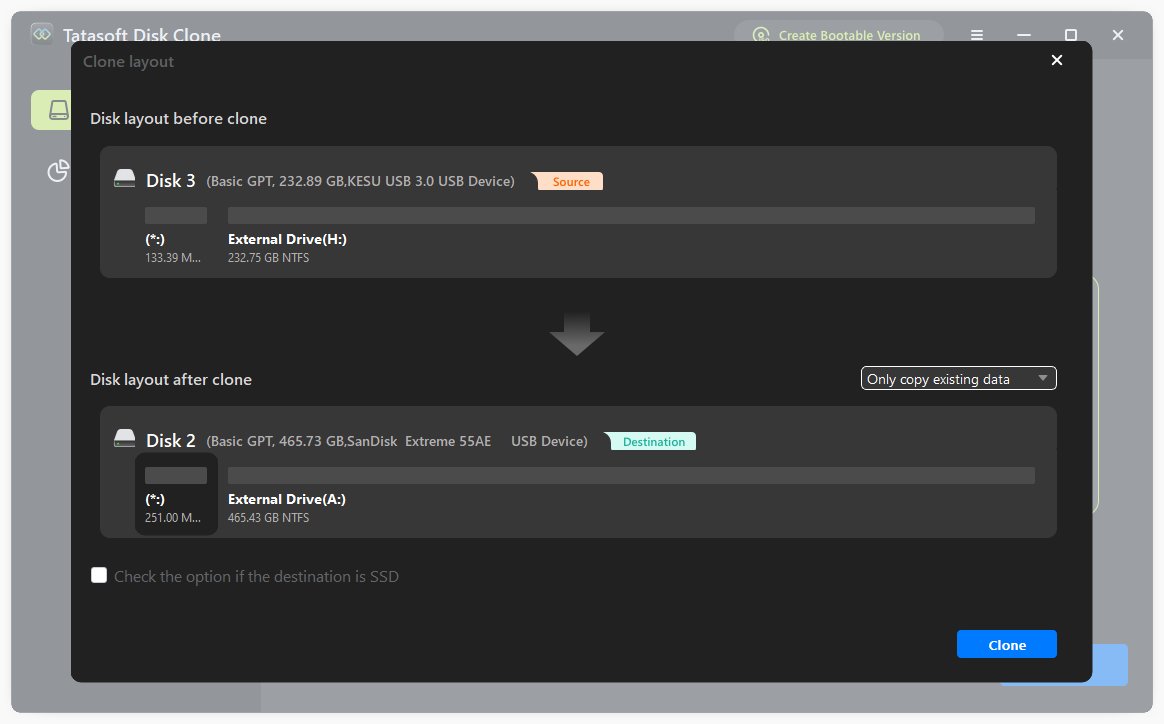
Step 4: Select source and destination SSD for cloning
- Choose Source Drive: Select your current SSD (the one you want to clone) as the source drive.
- Choose Destination Drive: Select the new larger SSD as the destination for the cloned data.

Step 5: Configure Cloning Preferences
You may have the option to adjust how the cloning will occur:
- Edit disk layout: Since the target SSD is larger, you can resize partitions on the target SSD as needed to utilize disk space effectively.
- Check the option if the destination is SSD: This enable 4K alignment and TRIM optimizations which boost SSD speed, efficiency, and lifespan by minimizing unnecessary writes and ensuring data is stored in the most efficient way possible.
Step 6: Start the SSD Cloning Process
- After confirming your source and destination drives, click "Clone" to initiate the SSD cloning process.
- Wait for the cloning process to complete. The time it takes will depend on the amount of data and the performance of your SSDs.

Once the cloning process is finished, verify the cloned SSD by browsing the new drive to ensure all files and settings have been accurately transferred.
Tips for a Successful SSD Cloning Experience
1. Close Running Applications: Ensure all applications are closed on your source SSD to prevent conflicts during the cloning process. If clone the system disk and the system is occupied during cloning, the software will automatically restart the computer and complete the cloning process in WinPE mode.
2. Backup Important Files: Although Tatasoft provides a secure process, it's always wise to back up essential data to ensure that you have a safety net in case something unexpected happens during the cloning.
3. Check Compatibility: Before proceeding, verify that the new larger SSD is compatible with your system. This includes checking connections, space, and supported formats.
4. Keep Software Updated: Use the latest version of Tatasoft Disk Clone to take advantage of performance improvements and enhanced security features.
Troubleshooting SSD Cloning Issues
While cloning SSD to larger SSD with Tatasoft Disk Clone is generally a smooth process, you may encounter some common issues:
1. System Fails to Boot After Cloning:
- Incorrect boot order settings - The BIOS may not recognize the cloned SSD as the primary boot device.
- BIOS boot mode mismatch (UEFI/Legacy) - A conflict between the source/target SSDs' partition tables (GPT/MBR) and the BIOS mode.
- SID (Security Identifier) issues - Cloning software may fail to properly handle Windows security identifiers, causing authentication failures.
2. Connection Problems: If you experience issues with the SSD not being recognized, double-check all connections and try different ports or cables.
3. Cloning Errors: Should you encounter an error during the cloning, note the error message, as it can help in troubleshooting through Tatasoft's support documentation or customer service.
Select the Right Cloning Technology for SSD Drives
For tech enthusiasts, the behind-the-scenes of cloning provides deeper insight into how Tatasoft Disk Clone operates:
- Sector-Level Cloning: This approach ensures a complete replica of the source HDD, including the system files and any hidden partitions. It's ideal for those who want an exact replica to ensure the system boots correctly.
- File-Level Cloning: This selective cloning method copies only the files and folders you specify. It’s an efficient option if you're looking to save time and space on the new SSD, especially if you have unnecessary files that you'd rather not transfer. If sector-level cloning is not selected during the cloning process, Tatasoft will default to file-level cloning.
Expert Insight:
To ensure optimal performance when cloning SSDs with Tatasoft Disk Clone, please skip the sector-level cloning method. SSDs are not compatible with sector-level cloning due to fundamental architectural differences from HDDs. While HDDs use magnetic platters with physical sectors, SSDs use flash memory chips managed by controllers, needing special cloning methods. Sector cloning misses important SSD features like 4K alignment and TRIM support, which hurts performance and wears out the SSD faster.
Conclusion
Cloning SSD to larger SSD is a crucial step when upgrading your storage capacity, allowing you to enhance system performance while retaining all your data and settings. Tatasoft Disk Clone for Windows simplifies the process for users of all skill levels. It also supports cloning hard drive to a smaller SSD if it can hold all the data on the source.
Don’t let limited storage hold you back! Download Tatasoft Disk Clone today and take control of your storage upgrade seamlessly in Windows 11/10/8/7/Vista. Enjoy increased space, improved performance, and a straightforward migration process that ensures your digital life remains uninterrupted and secure.
Related Articles
- Jan 28, 2026Ultimate Guide to Moving Your Windows 11 Installation to a New Drive
- Feb 27, 2026Complete Guide to Clone SSD to SSD Effortlessly
- Dec 17, 2025Don't Lose Your Data; Clone Drives with Bad Sectors Successfully
- Jan 28, 2026Upgrade Lenovo Legion 5 SSD for Better Performance
- Dec 24, 2025Clone Your Dell Laptop Hard Drive in Just 3 Steps
- Mar 08, 2026How to Clone ReFS Drive Safely on Windows?

A dedicated technical writer at Tatasoft with over four years of specialized expertise in computing technology. She crafts actionable, user-centric content for tech niches, specializing in disk cloning, data management, and video solutions for Windows and Mac.
Read full bio

This article has been approved by Ben Lee. Ben's dedication to excellence and his comprehensive knowledge of Windows and Mac technologies make him an essential part of any technical writing team. With a career marked by continuous learning and adaptation to new technologies, Ben remains at the forefront of the ever-evolving tech landscape.