Written byJanet BashorunUpdated on Jan 28, 2026
Ultimate Guide to Moving Your Windows 11 Installation to a New Drive
Approved byBen Lee
Brief introduction: Moving your Windows 11 installation to a new SSD/HDD boosts performance and storage, whether upgrading for speed or replacing a faulty drive. This guide will provide you with detailed, step-by-step instructions on how to move your Windows 11 installation without losing data, settings, or apps, focusing on the use of Tatasoft Disk Clone and covering each aspect of the process.
In this article
Why You Need to Move Windows Installation

Before we begin migrating your Windows 11 installation, let’s first understand the reasons why you might need to do so:
- Upgrading Storage: As applications and data grow, your current Windows 11 system drive may become insufficient. Upgrading to a larger SSD can provide more space and improved speed.
- System Performance: Switching to a faster drive, like upgrading to an NVMe SSD, can greatly improve boot times and application loading.
- Drive Failure: If your current drive is starting to fail (e.g., bad sectors, slow read/write speeds), it's crucial to transfer your installation and replace the failing drive to avoid data loss.
- Organizational Purposes: Reorganizing your drives can help streamline your workflow and improve system management.
- Enhanced Reliability: Newer drives often come with improved technologies that enhance reliability and data integrity.
Whatever your reason, the key goals are: preserving your Windows 11 OS, apps, files, and settings; ensuring the new drive boots correctly; and avoiding activation issues.
Preparing for Moving Windows 11 Installation
1: Backup Your Data
Before you proceed, it's essential to back up all important data on the destination drive (which will be formatted during the cloning process). Use an external hard drive or a cloud service to ensure your files are safe.
2: Choose the Right Drive
Select a new drive that meets your needs. SSDs are generally recommended for their speed and reliability. Ensure that the new drive has enough storage space for your current operating system and applications. Consider factors like:
- Type of Drive: SSD vs. HDD, with SSDs offering faster speeds.
- Capacity: Choose a drive that exceeds your current usage, typically at least 20% more.
- Speed: Look for SSDs with high read/write speeds, especially NVMe drives for maximum performance.
- New Drive Compatibility: Ensure the new drive (SSD/HDD) is compatible with your PC (check interface: SATA, NVMe, or M.2) and it fits in your computer case.
Additionally, Confirm that your power supply can handle the additional drive if applicable.
3. Necessary Tools:
- For Cloning (best for preserving everything): A SATA-to-USB cable, M.2 enclosure (if installing an internal drive externally), and a reliable Windows disk cloning software. In this guide, we used Tatasoft Disk Clone to move Windows 11 installation to the new drive.
- For clean install (best for performance): An 8GB+ USB flash drive (USB 2.0 or higher) to create Windows 11 installation media.
How to Move Windows 11 Installation to a New Drives?
Step 1: Connect the new drive to your system. Make sure the new drive is properly recognized by your computer.
Step 2: Download and install Tatasoft Disk Clone to your Windows 11 computer
Step 3: Launch it and choose Disk Clone
Step 4: Select the source and destination drive for cloning
- In Tatasoft, select your current drive (the one with Windows 11 installed) as the source.
- Select your new drive as the destination. Confirm that this drive is empty or that you have backed up any data you want to keep. Tatasoft will overwrite existing data on the destination drive.
Ensure you choose the correct drive to avoid data loss. Double-check the drive letters and sizes.

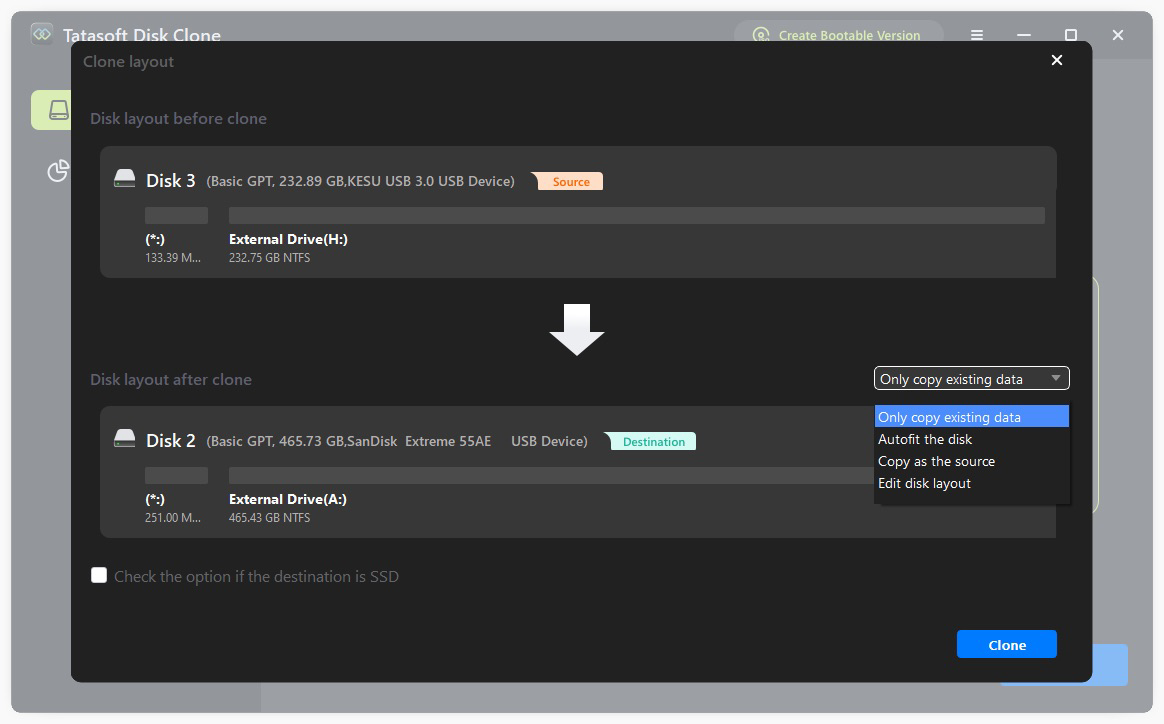
Step 5: Initiate the cloning process
- Select Edit disk layout to resize partitions on the destination disk if needed
- Check the option to enable SSD optimization if your destination disk is an SSD.
- Click on the “Clone” button to start the process.
Tatasoft will create a complete copy of your Windows 11 installation, including system files, applications, and settings. This may take some time depending on the amount of data. Be patient and do not interrupt the process. You can monitor the progress within the Tatasoft application. Once the cloning process is complete, Tatasoft will notify you. It’s crucial to verify that the clone was successful:
- Check that the new drive contains the Windows 11 installation and all your files.
- You can do this by browsing the new drive in File Explorer. Ensure that all folders and files are present.
Configuring Your Windows 11 to Boot from the New Drive
Step 1: Change Boot Order in BIOS
- Restart your computer and access the BIOS/UEFI settings by pressing the appropriate key during startup (usually F2, F12, or Del).
- Navigate to the boot order settings and set your new drive as the primary boot device.
- Save changes and exit BIOS. Your system will reboot.
Step 2: Boot into Windows 11
Your computer should now boot from the new drive. Ensure that Windows 11 loads correctly and that all your applications are functioning as expected. Take note of any initial setup prompts that may appear.
Post-Migration Tasks
Step 1: Check for Issues
- After booting up, monitor your system for any performance issues.
- Check that all applications are working and that your files are intact. Test key applications to confirm functionality.
Step 2: Update Drivers
After migrating to a new drive, it's a good idea to update your system drivers, especially for storage and graphics. Use Windows Update or visit the manufacturer’s website for the latest drivers.
Step 3: Format the Old Drive (Optional)
If you’re satisfied with the new setup, you may want to format the old drive to use it for additional storage.
- Open Disk Management by right-clicking on the Start button.
- Find your old drive, right-click, and select “Format.”
- Follow the prompts to complete the process. This will erase all data on the old drive, so ensure you have backed up everything important.
Adjusting Windows Settings
After moving to a new drive, consider adjusting the following settings for optimal performance:
- Storage Sense: This feature automatically frees up space by deleting unnecessary files. To enable it, go to Settings > System > Storage, turn on Storage Sense, and configure it according to your needs.
- Defragmentation: If you are using a traditional HDD, regularly defragmenting can help improve performance. For SSDs, Windows automatically manages this, but for HDDs, go to Settings > System > Storage > Optimize Drives and schedule regular defragmentation.
Performance Tuning
To maximize the performance of your new drive, consider these steps:
- Enable TRIM: This command helps SSDs manage unused data blocks, improving performance and lifespan. To enable TRIM, open Command Prompt as an administrator and run the command: `fsutil behavior set DisableDeleteNotify 0`.
- Over-provisioning: This involves reserving a portion of your SSD space for performance optimization. It can enhance the longevity and speed of your SSD. Consult your SSD's documentation for specific instructions on how to set this up.
Troubleshooting Common Issues
1. Boot Issues
If your system doesn’t boot from the new drive, double-check the boot order in BIOS. Ensure that the new drive is properly connected and recognized by the system.
2. Missing Files
If you notice missing files, ensure that you cloned the entire drive, not just specific partitions. Tatasoft should handle this automatically. If files are still missing, check the source drive for any issues.
3. Performance Problems
If the new drive is slower than expected, check that it is connected via the correct interface (e.g., SATA III or NVMe). Ensure that the drive is functioning properly by checking its health status with a diagnostic tool.
Conclusion
Moving Windows 11 installation to a new drive doesn’t have to be complicated. Cloning a Windows 11 disk is best for preserving everything quickly, while a clean install ensures a fresh, fast system. By adhering to the steps in this guide, you can achieve a seamless system transfer without loss, expand storage capacity, enhance performance, and enjoy a fully functional Windows 11 setup on your new drive.
To make the process even easier, consider utilizing Tatasoft Disk Clone, which simplifies every step of the OS migration, ensuring that your files and settings are transferred seamlessly. Don’t let a slow or failing drive hold you back—upgrade today!
Related Articles
- Dec 17, 2025How to Clone A Laptop Hard Drive without Data Loss in Windows 10/11?
- Dec 17, 2025How to Clone Your Old Computer to a New One: Step-by-Step Guide
- Jan 13, 2026A Simple Guide to Clone Bootable USB to Another Drive
- Feb 09, 2026Migrate Windows 11 to SSD with Ease - Boost Your PC Performance
- Dec 17, 2025How to Clone Desktop Operating System to SSD for Optimal Performance
- Feb 10, 2026How to Clone Windows 11 to a New SSD without reinstalling?

A dedicated technical writer at Tatasoft with over four years of specialized expertise in computing technology. She crafts actionable, user-centric content for tech niches, specializing in disk cloning, data management, and video solutions for Windows and Mac.
Read full bio

This article has been approved by Ben Lee. Ben's dedication to excellence and his comprehensive knowledge of Windows and Mac technologies make him an essential part of any technical writing team. With a career marked by continuous learning and adaptation to new technologies, Ben remains at the forefront of the ever-evolving tech landscape.