Written byJanet BashorunUpdated on Dec 17, 2025
Brief introduction: Cloning your hard drive is a crucial step for achieving seamless upgrades, reliable backups, and efficient system migrations. With Windows 11, the process has become more straightforward, especially with disk copy tools like Tatasoft that simplify the cloning experience. This guide provides essential techniques for cloning your hard drive with or without software, covering best practices, troubleshooting tips, and the many benefits of ensuring your data is secure and easily transferable.
In this article
- What is Hard Drive Cloning?
- Why Clone Your Hard Drive on Windows 11?
- Best Practices for Cloning Your Hard Disk on Windows 11
- How to Clone a Hard Disk on Windows 11?
- Method 1: Clone Windows 11 Disk Using Disk Clone Software
- Method 2: Clone Windows 11 Indirectly for Free via Built-in Utility
- Troubleshooting Common Cloning Issues
- Conclusion
What is Hard Drive Cloning?
Hard drive cloning is the process of creating an exact duplicate of your existing hard drive, including the operating system, applications, settings, and all files. Cloning Windows 11 allows you to boot from the cloned drive if necessary, making it particularly useful for upgrading to a larger or faster drive, such as an SSD.
Why Clone Your Hard Drive on Windows 11?
- Cloning Allows for Larger Storage Upgrades: Cloning your hard drive enables you to transition to a higher-capacity drive, providing more space for your data without the hassle of reinstalling software and transferring files manually.
- Cloning Ensures Data Security and Backup: Cloning your hard drive guarantees that you have an exact backup of your entire system. This solution is invaluable in case of hardware failure or data corruption, allowing for quick recovery.
- Cloning Facilitates Faster System Performance: Cloning your Windows 11 system from a traditional hard drive (HDD) to a solid-state drive (SSD) can significantly enhance performance. The cloning process ensures a smooth transition to a faster drive.
- Cloning Simplifies System Migration: Cloning your hard drive makes it easier to retain all your settings, applications, and files in Windows 11 when transitioning to a new computer, eliminating the need to start from scratch.
Best Practices for Cloning Your Hard Disk on Windows 11
- 1. Choose the Right Time for Cloning: Choosing a low-usage period for cloning your hard drive minimizes the risk of data changes during the process.
- 2. Always Backup Important Files Before Cloning: Backing up crucial data on the target disk to an external drive or cloud storage protects you from potential data loss during the cloning process.
- 3. Check Drive Health Before Cloning: Using tools like CHKDSK to check the health of your current hard drive ensures that you don’t transfer any existing issues to the new drive.
- 4. Clean up your Windows 11: Clean Windows system junk files (e.g., temp files, cache, and unused updates), uninstall unused apps before cloning to free up space and avoid transferring unnecessary data.
Expert Insight: After cloning a hard drive in Windows 11, it's crucial to verify data integrity. Check for the presence of files, and compare file sizes and modification dates. Tatasoft cloning software excels in this area, providing detailed reports that help identify any discrepancies. These practices ensure a reliable and thorough cloning process for Windows OS.
How to Clone a Hard Disk on Windows 11?
To clone a Windows 11 disk, you have two main options. First, professional disk copy tools like Tatasoft Disk Clone provide fast, direct copying with features like real-time progress tracking and partition alignment for a perfect duplicate. Alternatively, Windows' built-in Backup and Restore offers a free but slower method—it creates a system image backup, then restore to the new disk. The software method is easier and quicker, while the Windows approach saves money but needs extra steps.
Method 1: Clone Windows 11 disk using disk clone software
Step 1: Connect the New Hard Drive to Windows 11 computer
- ① Connect your new hard drive to the computer via USB or internally.
- ② Ensure that Windows 11 recognizes the target new drive.
Step 2: Launch Tatasoft Disk Clone for Window and select Disk Clone
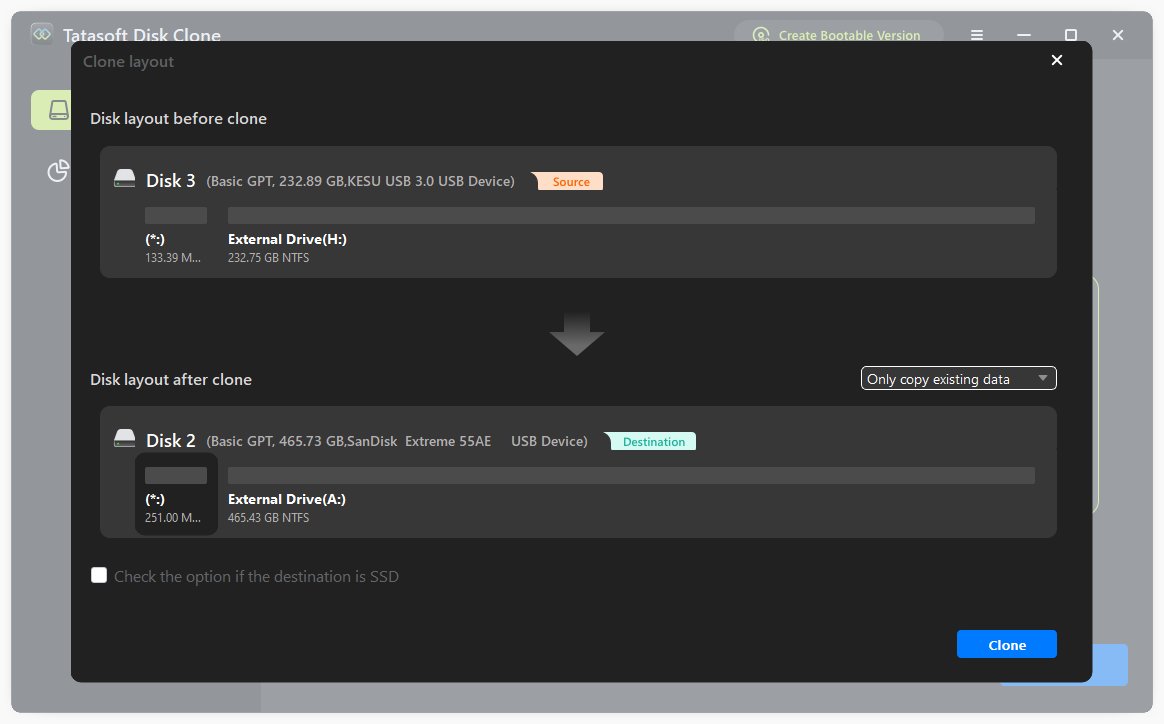
Step 3: Choose Source and Destination Drives to Clone
- ① Select the source drive (the one you want to clone).
- ② Choose the destination drive (the new drive to clone to) and confirm your selection.

Step 4: Edit Disk Layout on Target Disk and Start Cloning
- ① Edit the partition layout on the target disk according to your personal needs after cloning
- ② Click "Clone" to begin the process.
- ③ Monitor the progress; completion time will vary based on data size.
Method 2: Clone Windows 11 Indirectly for Free via Built-in Utility
Tatasoft disk cloning software is designed to simplify the hard disk cloning process on Windows 11. Here’s how to clone your hard drive in Windows effectively:
Step 1: Connect and initialize the New Drive to Clone to
- ① Connect the new disk (target) to your computer (internally via SATA or externally via USB enclosure/adapter).
- ② Right-click the new drive and select “Initialize Disk.”
- ③ Choose the appropriate partition style (MBR or GPT).
Step 2: Create a System Image (Source Disk)
- ① Navigate to Control Panel > System and Security > Backup and Restore (Windows 7).
- ② Select “Create a system image” and follow the prompts.
- ③ Choose where to save the backup: an external hard drive, network location, or DVDs. Ensure the destination has enough space for your entire source disk.
- ④ Select the disks to include (typically your system drive (C:) and essential recovery partitions).
- ⑤ Start the backup. This creates a complete snapshot (.vhdx files) of your selected drives.

Step 3: Restore System Image to Target Disk
- ① Boot your computer using Windows 11 Installation Media USB/DVD. Select your language/keyboard and click Repair your computer > Troubleshoot > Advanced options > System Image Recovery.
- ② Choose your Windows installation if prompted.
- ③ The utility will search for available system images. If it doesn't find yours automatically, select Select a system image and browse to your backup location.
- ④ On the Re-image your computer screen, choose the correct system image backup.
- ⑤ Crucial Step: On the Choose additional restore options screen, select Exclude disks > check the box next to your original source disk(s). This ensures the image is restored ONLY to your target disk, preventing overwriting your original system accidentally.
- ⑥ Click Next > Finish > Yes to confirm overwriting the target disk.
- ⑦ The restoration process copies the entire system image to the target disk, effectively cloning the structure and data from the source backup.
Compared to Tatasoft Disk Clone, it has the following shortcomings:
- Not a Direct Clone: This is a backup-and-restore process, not real-time sector-by-sector cloning.
- Partition Alignment The target disk partition layout will match the backup image, not necessarily the live source disk at clone time.
- Partition Style: MBR source must restore to MBR target; GPT source to GPT target. Mismatches cause boot failure.
- Source Disk Health: If the source disk has issues (bad sectors), the backup/restore might fail or propagate errors.
- Time-Consuming: Creating the initial image and performing the restore can take significant time, depending on data size and drive speeds.
Troubleshooting Common Cloning Issues
1. If the Drive is Not Detected
- Check connections and ensure the drive is powered.
- Use Disk Management to see if the drive appears as unallocated.
2. If Cloning Fails Mid-Process
- Ensure there’s enough space on the destination drive.
- Close other applications to free up system resources.
3. If Boot Issues Occur After Cloning
- Check BIOS settings to ensure the new drive is set as the primary boot device.
- Run startup repair from the Windows installation media.
Conclusion
Cloning your hard drive on Windows 11 has never been easier, and taking advantage of this process is crucial for anyone looking to manage their data effectively. By using Tatasoft Disk Clone for Windows, you benefit from a user-friendly interface and streamlined functionality that ensures a smooth Windows 11 disk-to-disk cloning experience. With Tatasoft, you can confidently upgrade your storage (especially for upgrading to an SSD), create secure backups, and migrate your system without the hassle on Windows 11.
Don’t hesitate to try Tatasoft for your next cloning project - it’s the reliable disk clone solution you need to safeguard your data and enhance your computing experience!
Related Articles
- Jan 05, 2026How to Clone Your Dynamic Disk to SSD to Boost Your PC Performance
- Feb 04, 2026How to Clone C Drive to New SSD and Ensure a Bootable Result
- Dec 17, 2025Speed Up Your PC in 3 Steps by Migrating Your OS to SSD
- Dec 17, 2025How to Clone SSD to a Larger SSD?
- Dec 17, 2025How to Successfully Copy Ext4 Partitions on Windows? 3 Methods to Try
- Jan 15, 2026How to Migrating Windows 10 to Smaller SSD?

A dedicated technical writer at Tatasoft with over four years of specialized expertise in computing technology. She crafts actionable, user-centric content for tech niches, specializing in disk cloning, data management, and video solutions for Windows and Mac.
Read full bio

This article has been approved by Ben Lee. Ben's dedication to excellence and his comprehensive knowledge of Windows and Mac technologies make him an essential part of any technical writing team. With a career marked by continuous learning and adaptation to new technologies, Ben remains at the forefront of the ever-evolving tech landscape.