Written byJanet BashorunUpdated on Feb 09, 2026
Migrate Windows 11 to SSD with Ease - Boost Your PC Performance
Approved byBen Lee
Brief introduction: Migrating your Windows 11 installation to a new SSD can dramatically improve your computer's speed and overall performance. Solid State Drives (SSDs) offer faster data access, reduced boot times, and enhanced responsiveness compared to traditional hard drives. In this article, we'll explore how to effectively migrate Windows 11 to a new SSD using Tatasoft Disk Clone, ensuring an efficient and seamless process.
In this article
Why Migrate Windows 11 to an SSD?
Before diving into the migration process, it’s essential to understand the benefits of upgrading your Windows 11 to an SSD:
- Speed: SSDs provide significantly faster read and write speeds, leading to quicker Windows 11 boot times and faster application launches (70% faster boot, 3–5x app speeds).
- Durability: With no moving parts, SSDs are more resilient to physical shock and wear over time.
- Energy Efficiency: SSDs consume 50% less power than HDDs, which can lead to longer battery life for laptops.
- Noise Reduction: SSDs operate silently, enhancing the overall user experience.
By cloning your Windows 11 to a new SSD, you can enjoy these advantages and breathe new life into your system, ensuring compatibility with Windows 11’s evolving hardware demands while revitalizing aging devices into productivity powerhouses.
Prerequisites for Windows 11 Migration
Before starting the Windows system migration process, ensure you have the following:
- A new SSD with enough capacity to hold your current Windows 11 installation and files.
- Tatasoft Disk Clone for Windows installed on your PC.
- A backup of your important data on the destination SSD to avoid any potential loss during migration.
Step-by-Step Guide to Migrate Windows 11 to New SSD
Step 1: Install Your New SSD to Your Windows 11 PC
- ① Power Down Your Computer: Turn off your computer and unplug it from the power source.
- ② Open the Computer Case: If you're using a desktop, remove the side panel. For laptops, connect the new SSD as an external drive at first. After cloning, refer to the manufacturer’s instructions to access the hard drive bay and install it to your laptop.
- ③ Install the SSD: Securely connect the SSD to the motherboard and power supply. Ensure all connections are firm and properly seated.
- ④ Close the Case: Replace the side panel (or laptop cover) and plug the computer back into the power source.
Step 2: Launch Tatasoft Disk Clone for Windows
- ① Open Tatasoft Disk Clone: Launch the Tatasoft Disk Clone software on your Windows 11 PC.
- ② Select the Disk Clone Option: Choose the option to clone a system disk. This will initiate the system migration process.
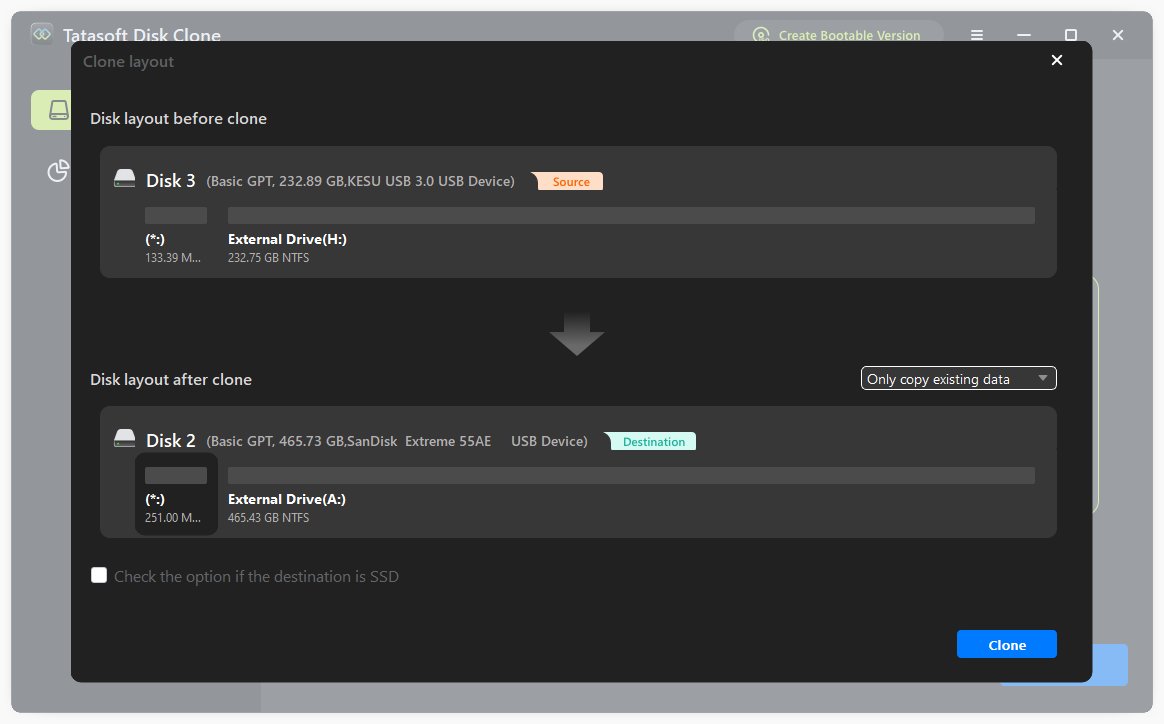
Step 3: Choose Source and Destination Drives in Windows 11
- ① Select Source Drive: In the Tatasoft interface, select your current system hard drive (the one with Windows 11) as the source drive.
- ② Select Destination Drive: Choose your newly installed SSD as the destination drive. Make sure you select the correct drive to avoid data loss.

Step 4: Configure Cloning Settings
- ① Adjust Partition Sizes (if necessary): Tatasoft allows you to modify partition sizes on the new SSD. Ensure that the partitions are set according to your needs after migrating Windows 11.
- ② Enable the option for Optimize for SSD: When cloning or migrating data to an SSD, check this box for alignment and TRIM optimizations to ensure optimal performance and longevity.
Step 5: Start the Windows 11 migration
- ① Begin Migrating: Click on the Clone button to start the migration process. Tatasoft will copy all data, including the Windows 11 installation, configuration, applications, and files, to the new SSD.
- ② Wait for the Process to Complete: The time taken will depend on the amount of data being transferred on your Windows 11 disk. Ensure you do not interrupt the process.

Step 6: Change the Boot Order in BIOS Settings to boot from the new SSD(if Necessary)
- ① Restart Your Computer: Once the cloning is complete, restart your computer.
- ② Enter BIOS/UEFI Settings: As your computer boots, press the designated key (usually F2, DEL, or ESC) to enter the BIOS/UEFI settings.
- ③ Set the SSD as the Primary Boot Device: Navigate to the boot options and set the new SSD as the primary boot device. Save the changes and exit.
Step 7: Boot from Your New SSD
- ① Start the Computer: Your computer should now boot from the new SSD. You will notice improved speed and performance immediately.
- ② Verify Installation: Once Windows 11 loads, check that all your files and applications are intact and functioning correctly.
Troubleshooting Common Issues of Cloning Windows 11 to SSD
- Drive Not Recognized: If your new SSD is not recognized, double-check all connections and ensure the SSD is properly installed.
- Cloning Errors: If you encounter errors during the cloning process, restart Tatasoft and try again. Ensure that no other disk-related tasks are running.
- Boot Issues: If your computer fails to boot from the SSD, re-enter the BIOS and confirm that the SSD is set as the primary boot device.
Ensuring Expertise and Authoritativeness
To ensure a successful Windows 11 migration, consider the following best practices:
- Research Tatasoft: Familiarize yourself with Tatasoft Disk Clone through official documentation and user reviews. Understanding its features and limitations will help you make informed decisions during the cloning process.
- Follow Manufacturer Guidelines: Each SSD may have specific installation instructions. Always consult the manufacturer's guidelines for your SSD to avoid compatibility issues.
- Seek Professional Help if Needed: If you are unsure about any step in the process, don’t hesitate to consult a professional. Whether it’s a friend with tech experience or a local repair shop, expert advice can save you time and frustration.
- Stay Updated: Keep your Tatasoft Disk Clone for Windows updated to the latest version. Software updates often include bug fixes, performance improvements, and new features that can enhance your migration experience.
Conclusion
Migrating Windows 11 installation to a new SSD using Tatasoft Disk Clone for Windows is a straightforward process that can significantly enhance your computer's performance. With faster speeds and improved reliability, an SSD upgrade is a worthwhile investment for any user.
Clone your Windows hard disk today using Tatasoft Disk Clone and unlock the full potential of your Windows 11 system.
Related Articles
- Feb 01, 2026Clone Your Hard Drive on Windows 7 with Two Quick and Easy Methods
- Jan 13, 2026A Simple Guide to Clone Bootable USB to Another Drive
- Feb 10, 2026How to Seamlessly Copy Your Windows Installation to an SSD
- Jan 28, 2026A Comprehensive Guide to Samsung Magician for Data Migration
- Jan 15, 2026A Complete Guide on How to Move Windows 10 to Another Drive Without Reinstalling
- Jan 20, 2026How to Copy Partition to Another Drive via CMD: A Complete Guide

A dedicated technical writer at Tatasoft with over four years of specialized expertise in computing technology. She crafts actionable, user-centric content for tech niches, specializing in disk cloning, data management, and video solutions for Windows and Mac.
Read full bio

This article has been approved by Ben Lee. Ben's dedication to excellence and his comprehensive knowledge of Windows and Mac technologies make him an essential part of any technical writing team. With a career marked by continuous learning and adaptation to new technologies, Ben remains at the forefront of the ever-evolving tech landscape.