Written byJanet BashorunUpdated on Jan 15, 2026
A Complete Guide on How to Move Windows 10 to Another Drive Without Reinstalling
Approved byBen Lee
Brief introduction: Moving Windows 10 to another drive (e.g., a larger SSD or replacement for a failing HDD) without reinstalling is a common user challenge. While it may seem daunting, this guide simplifies the Windows 10 migration process with effective methods - primarily Tatasoft Disk Clone for Windows, helping you keep data, apps and system setting intact.
In this article
Why Move Windows 10 to Another Drive?
Upgrading to a larger SSD, replacing a failing HDD, or boosting system performance often requires moving Windows 10 to another drive. The key reasons users choose this migration approach:
1. Upgrading Hardware
Upgrading to a faster drive, such as an SSD (like HDD to Samsung 870 EVO or Crucial P3 NVMe), can dramatically enhance system performance. SSDs offer faster boot times, quicker application launches, and improved overall responsiveness compared to traditional hard drives (HDDs).
2. Managing Storage Space
As you install more applications and accumulate files, your current drive may become insufficient in terms of storage space. Cloning Windows 10 to a larger drive can help manage this issue effectively.
3. Preventing Data Loss
If your current drive is showing signs of failure, such as unusual noises or frequent crashes, it’s crucial to migrate your Windows installation to a new drive to prevent data loss and maintain system stability.
4. Preserve System Stability
Reinstalling may lead to driver mismatches or missing dependencies. Cloning Window OS retains your existing system configuration, reducing post-setup issues.
5. Testing New Hardware
If you are testing a new drive for performance or compatibility, moving Windows 10 can help assess how well the new hardware performs without disrupting your existing setup.
Preparing for the Win 10 Move
Before you begin the migration process, it's essential to prepare adequately:
1. Backup Your Data
Backing up your important files on the destination drive is the first step to ensuring a safe migration. Use external storage devices or cloud storage solutions to secure your data.
2. Gather Necessary Tools
- Reliable disk cloning software: Tatasoft Disk Clone for Windows simplifies the Window 10 migration process by allowing you to clone your current boot drive to the new one.
- New Drive: Ensure the target drive (SSD/HDD) has enough capacity—aim for at least the same size as your current system drive’s used space, plus 20GB for future updates. For moving Win 10 to smaller SSDs, use remove unnecessary files and apps to free up space first.
- If your PC has only one drive slot, use a SATA-to-USB adapter or M.2 enclosure to connect the target drive externally.
3. Check Compatibility
Before proceeding, verify that your new drive is compatible with your system. For SSDs, ensure that your motherboard supports the drive type (e.g., SATA or NVMe). Check the specifications to avoid any compatibility issues.
How to Move Windows 10 to Another Drive Using Tatasoft
Step 1: Install Tatasoft Disk Clone for Windows on your Windows 10 PC
Step 2: Connect the new drive to computer
Step 3: Select the source and destination drives for OS migration
- Choose Source Drive: In the Disk Clone interface of Tatasoft, select your existing Windows 10 drive as the source. This is typically your primary hard drive.
- Choose Destination Drive: Select the new drive where you want to transfer Windows 10. Ensure this drive has enough space to accommodate the data being cloned.

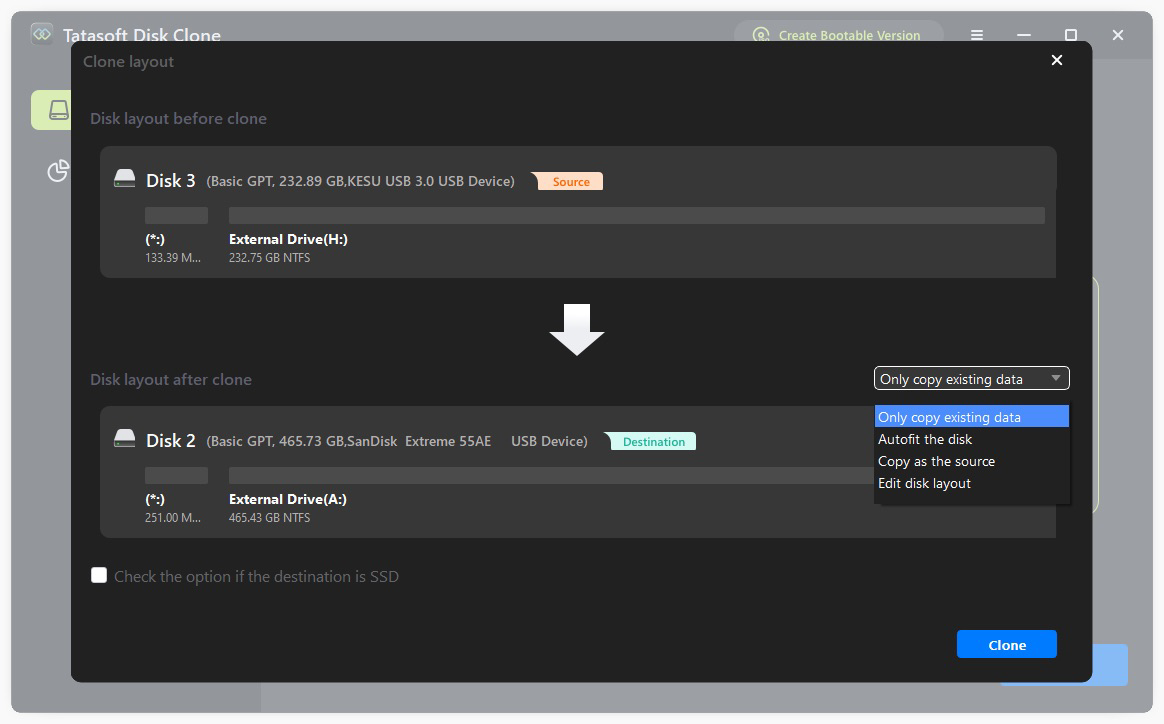
Step 4: Configure Cloning Options
- Clone Settings: Tatasoft allows you to adjust various settings, such as partition resizing or only copy existing data. Make adjustments based on your needs, ensuring that all important partitions are included.
- Enable "SSD Alignment by checking the option if the destination is SSD.
- Data Verification: Before proceeding, double-check that the data to be cloned is accurately represented. This step ensures that you don't miss any critical files or configurations.
Step 5: Start the Windows 10 Cloning Process
- Begin Cloning: Click the “Clone” button to initiate the process. The duration will depend on the amount of data being transferred and the speed of both the source and destination drives.
- Monitor Progress: Keep an eye on the cloning progress. Tatasoft will provide updates on the status of the cloning process.

Once the cloning is complete, Tatasoft will notify you. Review any logs or messages for potential issues or errors. You can format the old drive for extra storage or backup. Power off your computer and disconnect the old drive if necessary.
Boot Windows 10 from the New Drive
- Change Boot Order: Access your BIOS/UEFI settings by pressing the designated key (commonly F2, F10, or Delete) during startup. Adjust the boot order in Boot menu to prioritize the new drive.
- Reboot Your System: Start your computer, and Windows 10 should boot from the new drive without any issues.
Troubleshooting Common Win 10 Moving Issues
1. Drive Not Recognized
If the new drive is not recognized after cloning, consider the following:
- Ensure the drive is properly connected to your system.
- Confirm that the drive is initialized and formatted. You can do this via the Disk Management tool in Windows.
2. Boot Issues
If Windows doesn’t boot from the new drive, you may need to:
- Recheck the boot order in the BIOS/UEFI settings to ensure the correct drive is prioritized.
- Use Windows Recovery to repair startup issues, which can often resolve boot-related problems.
3. Data Loss Concerns
If you encounter data loss during the process, ensure you have a backup in place. Tatasoft allows you to clone specific partitions, minimizing the risk of losing important files.
Best Practices for a Smooth Win 10 Migration
1. Check for Updates
Before starting the migration, ensure that Windows 10 and Tatasoft Disk Clone are both up to date. This can help prevent compatibility issues that may arise during the cloning process.
2. Disable Security Software
Temporarily disable any antivirus or security software during the cloning process. These programs can sometimes interfere with the operation of cloning software, leading to errors or incomplete transfers.
3. Monitor the Cloning Process
Keep an eye on the cloning process for any unexpected errors or alerts. Address any issues immediately to prevent complications that could affect the migration.
4. Validate Data Integrity Post-Migration
After successfully moving Windows 10, check that all your files, settings, and applications are intact. Open important files and applications to ensure they function properly.
Conclusion
Moving Windows 10 to another drive without reinstalling is a straightforward process when equipped with the right tools and knowledge. Utilizing Tatasoft Disk Clone for Windows simplifies the migration, ensuring that your operating system, applications, and files are transferred seamlessly. Whether you’re upgrading your storage or replacing failing hardware, following the steps outlined in this guide will help you achieve a successful transition. This method saves time, preserves data, and maintains system stability—empowering you to enjoy faster performance without the hassle of reinstallation.
Take the next step in optimizing your system—Get Tatasoft today for a hassle-free Windows 10 or 11 migration experience!
Related Articles
- Dec 17, 20253 Steps to Clone System to New Hard Drive
- Dec 17, 2025Speed Up Your PC in 3 Steps by Migrating Your OS to SSD
- Feb 08, 2026Top 8 Disk Cloning Software in 2026: Free & Paid
- Jan 06, 2026Top 5 Partition Copy Software of 2026
- Dec 17, 2025How to Clone A Laptop Hard Drive without Data Loss in Windows 10/11?
- Jan 08, 2026Maximize Your HP Laptop's Potential by Upgrading to an SSD

A dedicated technical writer at Tatasoft with over four years of specialized expertise in computing technology. She crafts actionable, user-centric content for tech niches, specializing in disk cloning, data management, and video solutions for Windows and Mac.
Read full bio

This article has been approved by Ben Lee. Ben's dedication to excellence and his comprehensive knowledge of Windows and Mac technologies make him an essential part of any technical writing team. With a career marked by continuous learning and adaptation to new technologies, Ben remains at the forefront of the ever-evolving tech landscape.