Written byJanet BashorunUpdated on Dec 17, 2025
Brief introduction: Cloning a disk to a larger disk provides the easiest storage upgrade solution, enabling full system migration, including OS, applications, and personal files without reinstallation. Whether you need faster SSD performance, expanded capacity for growing data, or seamless drive replacement, disk cloning ensures zero downtime transition. In this article, we’ll explore the benefits of cloning your disk, provide a detailed step-by-step guide using Tatasoft Disk Clone, and share essential tips for a successful upgrade to larger drives.
In this article
The Advantages of Cloning a Disk to Larger Disk
1. Enhanced Storage Capacity
Transitioning to a larger disk gives you the room needed to store more applications, pictures, videos, and files without fear of running out of space. With data sizes continually growing, this upgrade is often essential.
2. Improved Performance
A larger disk often goes hand-in-hand with newer technology, such as upgrading to a lager SSD, which provides faster read and write speeds. This means quicker boot times and improved performance for your applications.
3. Data Preservation
Cloning OS disk keeps your current operating system, settings, and files intact. The result? A hassle-free experience where there's no need to reinstall software or redo your personalized settings.
4. Time-Saving Efficiency
Cloning your disk allows you to transfer everything in one go. Rather than spending hours reinstalling programs and transferring files manually, you can have everything ready on your new disk in significantly less time.
Preparing for the Disk Cloning Process
Essential Pre-Cloning Checklist Before diving into the cloning process, it’s vital to properly prepare:
- Backup Your Data: Always back up your essential files on the target larger drive if it has, for cloning will erase the target disk. Use an external hard drive or utilize cloud storage solutions. This is a precaution against data loss.
- Disk Compatibility: Verify that the new, larger disk is compatible with your computer's hardware and connections. This includes checking for proper interfaces such as SATA or NVMe.
- Necessary Tools: Ensure you have Tatasoft Disk Clone for Windows installed, as well as any additional tools needed depending on your system configuration.
- Remove unnecessary files: Cleaning up unnecessary files and programs can avoid cloning unwanted content, reduce cloning time, and save storage space on the new drive.
Step-by-Step Guide to Clone Your Disk to Lager One
Step 1: Connect the New Larger Disk to your PC
- Plug in your new disk. If it’s an internal disk, physically mount it inside your computer. If it’s external, connect it via USB, Thunderbolt or eSATA.
Step 2: Launch Tatasoft Disk Clone and Select Disk Clone
- The user-friendly interface will help guide you through the various options available for disk cloning or partition cloning. Opt to clone the entire disk or select specific partitions if needed. Ensure that the destination disk has enough space to accommodate all selected data.
Step 3: Select Source and Target Drives to Clone
- ① Source Drive: Choose the disk you want to clone, typically your current operating system drive.
- ② Target Drive: Select the larger disk where your files will be copied to.

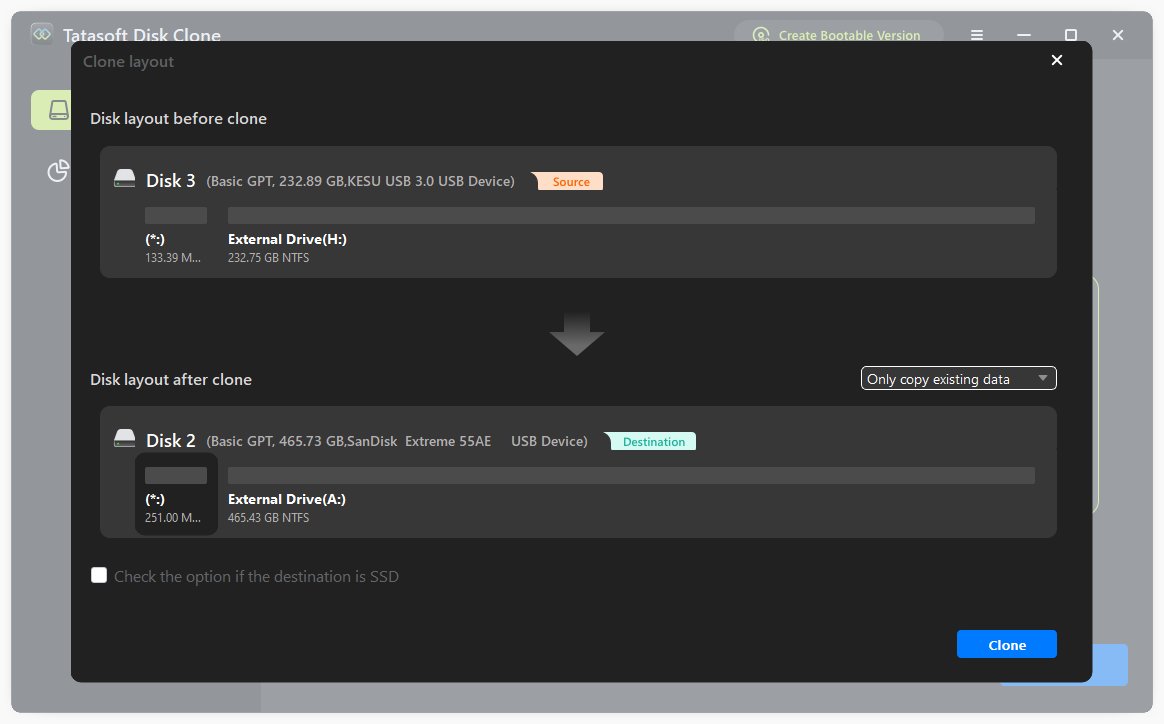
Step 4: Configure Disk Cloning Settings
- ① Partition Layout Configuration: You can either select the default option to set the partition layout on the target larger disk, or manually adjust the partition sizes as needed to better utilize disk space.
- ② Check the box if the target disk is SSD.
Step 5: Start the Cloning Process
- Click the "Clone" button to initiate the cloning process. Tatasoft will display progress updates, allowing you to monitor the operation closely.
Step 6: Set Your System to Boot from the New Disk
If you are cloning hard drive with OS, to make the larger disk your primary drive:
- ① Restart your computer.
- ② Enter BIOS/UEFI settings (typically done by pressing F2, F10, or Del during startup).
- ③ Set your new disk as the primary boot option using arrow keys in the Boot menu. In UEFI drag devices to reorder or use +/- keys.
- ④ Press F10 to save changes. The computer will restart with the new boot order.
Step 7: Validate Operation
- Once booted into your system, ensure that all programs and files are operational. Check for any missed files or system settings to verify a successful transfer.
Expert Insight: To successfully clone a disk to a larger one, prioritize data integrity and security. First, check files and system settings, and run diagnostics to identify potential source drive issues. Using reliable disk cloning software like Tatasoft Disk Clone, which offers automatic data verification - ensures accurate file replication, reduces corruption risks, and provides a smooth transition to larger storage.
Post-Cloning Recommendations
1. Optimize Your New Disk
After cloning, consider optimizing your new and larger disk for enhanced performance. If using an SSD, ensure TRIM is enabled for efficient data management or remember to check the option if the destination is SSD.
2. Regular Backups
Even with a new disk, maintaining regular backups is key. Actively backup your data to avoid future losses.
3. Keep Software Updated
Ensure that your Tatasoft disk cloning software is regularly updated. This ensures you benefit from enhancements, improved algorithms, and security updates that enhance the cloning process and protect your data.
Quick Fixes for Cloning Errors to Larger Disks
Despite careful preparations, you may encounter challenges while cloning your smaller disk to a lager one. Here are some common issues and solutions:
1. Insufficient Space on Target Disk
If you receive notifications about insufficient space:
- Double-check the size of the data on the source disk. Check source disk's used space (not total capacity) and ensure target disk has at least that much free space.
- Consider deleting unnecessary files or applications from the source disk to free up space before cloning.
- Resizing partitions during the cloning process to better utilize larger target disks.
2. Cloning Errors or Failures
If the cloning process fails or encounters errors:
- Confirm that both source and target disks are properly connected.
- Run diagnostics on the source disk for errors using built-in tools in your operating system.
3. System Fails to Boot from New Disk
If your system does not boot from the new larger disk:
- Reenter BIOS/UEFI settings and ensure that the boot order lists the new disk as the first option.
- Check the physical connections to ensure that the new disk is properly seated.
- Fix boot records:
For MBR disks: Use bootrec /fixmbr and bootrec /fixboot commands in Windows Recovery Environment10.
For GPT disks: Use bootrec /fixboot and bootrec /rebuildbcd. - Use DiskPart utility to mark the system partition as active
Tips and Best Practices for Successful Disk Cloning
- Choose Quality Hardware: Invest in a reliable and high-performing larger disk. Opt for SSDs over HDDs when possible, to benefit from faster read/write speeds and improved performance.
- Backup Essential Data: Always maintain regular backups of important files on target disk before the cloning process. Even when cloning, having an additional backup prevents data loss due to unforeseen issues.
- Thorough Testing: After the cloning process, rigorously test the new disk by running applications and accessing various files. This helps ensure everything operates smoothly after the transition.
- Optimize Data Management: Once your new setup is functional, evaluate your file organization and data management practices. Implementing effective strategies for data storage will help maintain system performance.
- Document Your Process: If you frequently upgrade disks, keeping detailed records of each process, including software used and configuration changes - can save time and effort for future upgrades.
Conclusion
Cloning your disk to a larger disk can significantly improve your system's functionality, offering not just extra space but enhanced speed and performance. By following the steps outlined in this guide and leveraging Tatasoft Disk Clone, you can ensure a smooth transition to your new storage solution. Remember, the process not only secures your current data but also positions you for future growth in your digital storage needs. Regular maintenance and backups will further protect your investment, allowing you to enjoy the increased capabilities without worry.
Unlock your system's full potential and ensure your data is secure by downloading Tatasoft Disk Clone today. Additionally, it also clones hard drive to a smaller SSD, as long as the SSD can accommodate all the data from the source disk. Experience the simplicity and effectiveness of disk cloning with Tatasoft's reliable solutions. Happy cloning!
Related Articles
- Jan 05, 2026How to Clone Your Dynamic Disk to SSD to Boost Your PC Performance
- Dec 24, 2025Clone Your Dell Laptop Hard Drive in Just 3 Steps
- Jan 08, 2026Maximize Your HP Laptop's Potential by Upgrading to an SSD
- Mar 03, 2026Three Simple Steps to Clone Hard Drive to SSD with Operating System
- Feb 10, 2026Expert Tips for Cloning Your Hard Drive for Free Using Command Prompt (CMD)
- Feb 07, 2026Replace Hard Drive Without Reinstalling Windows: Step-by-Step Guide

A dedicated technical writer at Tatasoft with over four years of specialized expertise in computing technology. She crafts actionable, user-centric content for tech niches, specializing in disk cloning, data management, and video solutions for Windows and Mac.
Read full bio

This article has been approved by Ben Lee. Ben's dedication to excellence and his comprehensive knowledge of Windows and Mac technologies make him an essential part of any technical writing team. With a career marked by continuous learning and adaptation to new technologies, Ben remains at the forefront of the ever-evolving tech landscape.