Written byJanet BashorunUpdated on Dec 17, 2025
Brief introduction: Cloning your system to a new hard drive ensures a seamless transition of all valuable data, programs and settings to a more efficient storage solution. Whether you're upgrading from a traditional hard drive to an SSD or simply replacing an old drive, cloning system provides a reliable method to keep everything intact. In this guide, we’ll walk you through how to clone system with Tatasoft Disk Clone, and essential tips for a hassle-free experience.
In this article
Why Clone Your System?
Cloning creates an exact copy of your source drive, including the OS, installed programs, and personal files. Unlike simple file copying, cloning ensures all data, settings, and the operating system transfer seamlessly to the new drive. Cloning your system to a new hard drive offers several advantages:
- Faster than reinstalling: No need to reinstall Windows or applications and maintains your custom configurations.
- Improved Performance: Upgrading to a new hard drive, especially an SSD, can significantly enhance your system's speed and responsiveness.
- Easy OS Migration: Cloning simplifies the process of migrating your operating system and files to new hard drive, minimizing downtime.
- Backup Solution: A cloned drive serves as a reliable backup, safeguarding your data against potential hardware failures.
System Cloning Prerequisites
1. Prepare Your New Hard Drive
Before starting to clone the boot disk, ensure that your new hard drive is properly connected to your computer. This may involve:
- ① Ensure the new hard drive has equal or greater capacity than the source drive (used space).
- ② Installing the new hard drive into your computer internally (SATA/M.2).
- ③ Connecting it via USB if you’re using an external drive.
2. Choose the Right System Copy Software and Install
When it comes to cloning your system, selecting the right disk copy software is crucial. Tatasoft Disk Clone stands out for its user-friendly interface and robust features. It allows you to clone your entire disk or specific partitions, making it a versatile choice for both beginners and advanced users.
3. Prepare for Cloning
- ① Close all unnecessary applications to avoid file locks.
- ② Clean up system disk junk to avoid copying unnecessary files, save space, and improve cloning efficiency.
3 Steps to Clone Your System to a New Hard Drive
Step 1: Launch Tatasoft Disk Clone and Choose Disk Clone
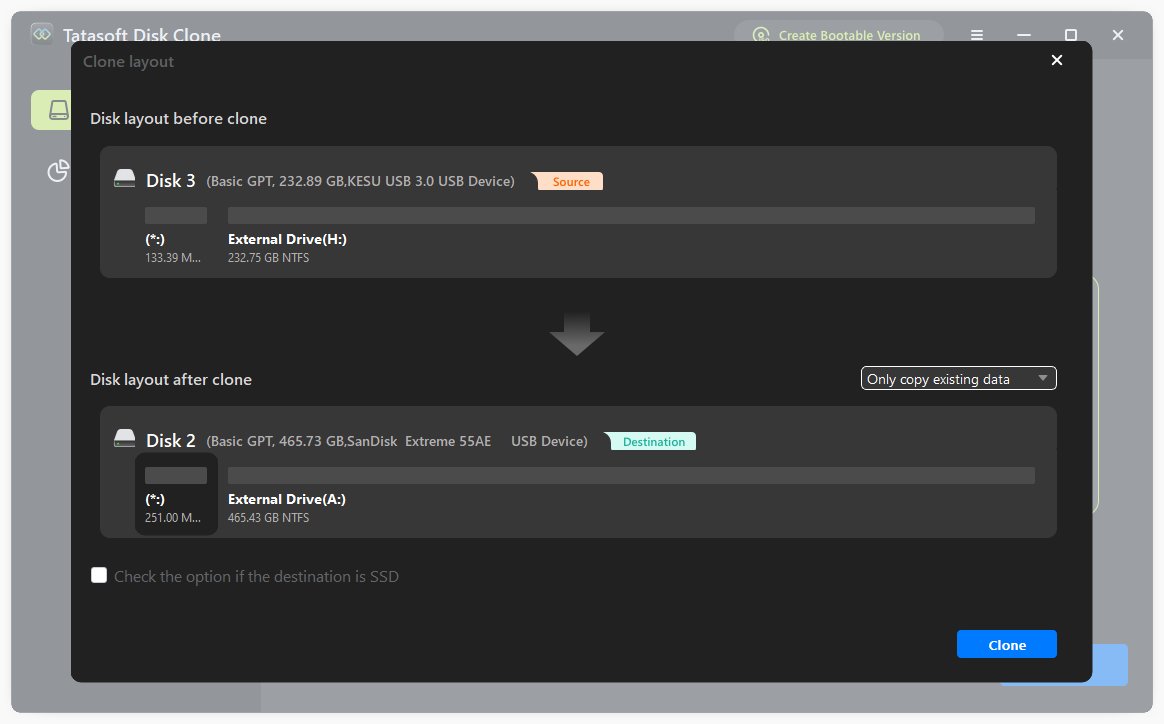
Step 2: Select the Source and Destination Drives for System Cloning
- ① Source Drive: This is your current hard drive that contains the operating system and data.
- ② Destination Drive: Select the new hard drive where you want to clone your system.
- ③ Tick the box for sector-by-sector clone to perform a bit-by-bit copy, guaranteeing absolute data integrity.

Step 3: Start the OS Cloning Process
- ① Adjust partition sizes on the destination disk according to your needs
- ② Enable SSD optimization (if the destination hard drive is SSD)
- ③ Review your selections to ensure accuracy and click "Clone" to start the system cloning process
- ④ Wait for the software to complete the system cloning operation. This may take some time, depending on the amount of data being transferred.
Change to Boot from the New Hard Drive after Cloning
Once the system cloning process is complete, it’s essential to verify that everything has been transferred correctly and make sure the cloned drive is bootable. Enter the BIOS/UEFI settings and change the boot order to prioritize the new hard drive:
- ① Restart your computer.
- ② As your computer starts up, press the designated key to enter BIOS/UEFI settings. Common keys include F2, F10, Delete, or Esc. The exact key may vary by manufacturer and is often displayed briefly during the boot process.
- ③ Use the arrow keys to navigate through the BIOS/UEFI interface. Look for a tab or section labeled Boot or Boot Order.
- ④ In the Boot menu, you’ll see a list of devices. Find your new hard drive in the list.
- ③ Use the designated keys (often + or -) to move the new hard drive to the top of the list, which prioritizes it as the primary boot device.
- ③ Save the changes and exit.
After booting from the new hard drive, ensure that all your files, applications, and settings are intact. Check for any issues and confirm that your system runs smoothly.
Common Issues During OS Cloning
Cloning can sometimes encounter issues. Here are a few common problems and solutions:
- Insufficient Space: Ensure that the new hard drive has enough space to accommodate your data. For sector-level cloning, ensure the target disk has at least 10% extra space compared to the original.
- Drive Recognition Issues: If the software does not recognize the new drive, check the physical connections and compatibility.
- Software Crashes: Ensure that you have the latest version of Tatasoft Disk Clone and that your system meets its requirements.
Best Practices for System Cloning
- Regular Backups: Even after cloning, maintain regular backups of your data. This protects against data loss due to unforeseen issues.
- Disk Cleanup: Before cloning, perform a disk cleanup to remove unnecessary files and optimize the process. This can speed up the cloning operation and ensure that only essential data is transferred.
- Use the Right File System: Ensure that the new hard drive is formatted properly to match your system requirements, whether it’s NTFS, FAT32, or another file system.
Expert Insight: Regular system cloning should be part of your routine maintenance, not a one-time task. Experts advise cloning every few months, especially before major updates, to ensure a current backup and reduce data loss risk. Reliable software like Tatasoft makes this process quick and efficient, minimizing workflow disruption. By doing so, you protect your data and improve system reliability.
Conclusion
Cloning your system to a new hard drive is a fast, reliable way to upgrade or replace your storage without reinstalling everything. By following the steps outlined in this guide, you can ensure a seamless OS transition to your new hard drive, keeping your data safe and easily accessible. For best results, use Tatasoft Disk Clone and always test the cloned drive before decommissioning the old one.
Related Articles
- Jan 06, 2026Top 5 Partition Copy Software of 2026
- Feb 10, 2026How to Seamlessly Copy Your Windows Installation to an SSD
- Mar 03, 2026Three Simple Steps to Clone Hard Drive to SSD with Operating System
- Mar 09, 2026Seamlessly Clone Windows OS to a Smaller SSD
- Mar 05, 2026How to Clone Your Boot Drive Without Reinstalling?
- Jan 28, 2026Upgrade Lenovo Legion 5 SSD for Better Performance

A dedicated technical writer at Tatasoft with over four years of specialized expertise in computing technology. She crafts actionable, user-centric content for tech niches, specializing in disk cloning, data management, and video solutions for Windows and Mac.
Read full bio

This article has been approved by Ben Lee. Ben's dedication to excellence and his comprehensive knowledge of Windows and Mac technologies make him an essential part of any technical writing team. With a career marked by continuous learning and adaptation to new technologies, Ben remains at the forefront of the ever-evolving tech landscape.