Written byJanet BashorunUpdated on Dec 17, 2025
Brief introduction: Cloning your boot drive is crucial for improving computer performance or securing data. It allows you to create an exact replica of your operating system, boot info, applications, and files, making upgrades or replacements easier without reinstalling everything. In this guide, we will walk you through the process using Tatasoft Disk Clone to clone boot disk for successful cloning and proper booting.
In this article
Why Clone Your Boot Drive?
Cloning your boot drive offers following benefits:
- System Backup and Recovery: A cloned boot drive serves as a reliable backup. In case of system failure or data corruption, you can quickly restore your system to its previous state.
- Upgrading to a New Drive: If you're upgrading from an HDD to an SSD or simply to a larger drive, cloning allows for an easy OS transition without the need for a fresh installation.
- Reduced Downtime: Cloning minimizes the time your system is offline. Once the cloning process is complete, you can boot from the new drive and continue working immediately.
- Data Integrity: Boot drive cloning software like Tatasoft Disk Clone ensures that your data is copied accurately, maintaining the integrity of your files and settings.
Prerequisites for Cloning Your Boot Drive
Before you start the cloning process, ensure you have the following:
- Tatasoft Disk Clone: Download and install the latest version of Tatasoft Disk Clone for Windows from their official website.
- New Drive: Have your target drive ready (to clone the boot disk to), whether it's an SSD or another HDD.
- Cables and Adapters: Ensure you have the necessary cables to connect the new drive to your computer.
- Backup: Always back up your important files on the target drive before beginning the cloning process ad it will be erased.
- System Cleanup: Removing unnecessary junk files and software before cloning can improve cloning efficiency and save the disk space.
Step-by-Step Guide to Clone Your Boot Drive
Step 1: Install or connect the new drive to your computer
- Install the New Drive: Power off your computer -> Open your computer case -> connect the new drive using the appropriate cables. Ensure it’s securely mounted.
- Connect to your PC as an external hard drive: Select a compatible external hard drive enclosure -> Open the enclosure, insert the hard drive, and secure it (screws or clips may be required) -> Use a USB, Thunderbolt, or other interface cable to link the enclosure/adapter to your computer.
Step 2: Launch Tatasoft Disk Clone and select Disk Clone
- Cloning a Boot Drive: It is recommended to clone the entire disk to ensure all boot information is copied to the new disk, guaranteeing a successful boot.
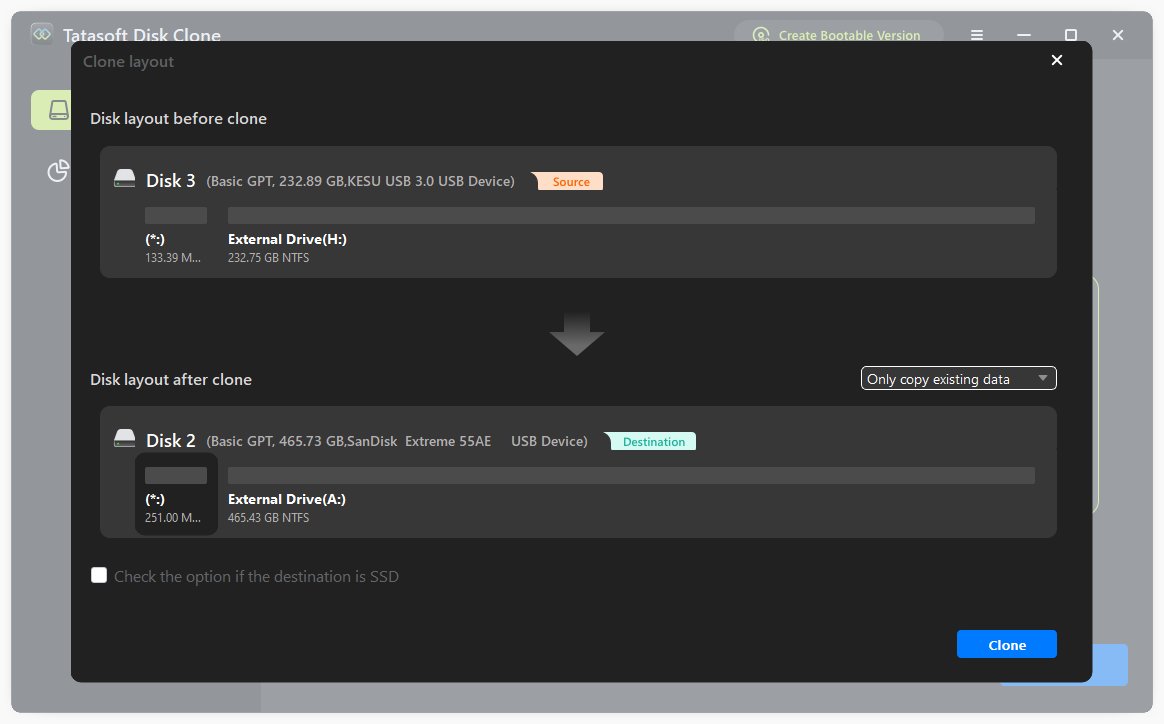
Step 3: Select the source boot disk and destination drives
- ① Choose the Source Drive: Select your current boot drive (the one you want to clone).
- ② Choose the Destination Drive: Select the new drive you connected as the target for the clone.
- ③ Sector-by-sector cloning: If you want to create an exact duplicate of the source disk, check the "Sector by sector clone" option. Otherwise, file-level cloning will be performed by default.

Step 4: Configure Cloning Options and Start the Cloning Process
- ① Partition Layout Configuration: You can either select the default option to set the partition layout on the target disk, or manually adjust the partition sizes as needed.
- ② Check the box if the target disk is SSD.
- ③Monitor Progress: Click Clone to start and Tatasoft will display the cloning progress. Once completed, you will receive a confirmation message.
Step 5: Boot from the New Drive
- ① Access BIOS/UEFI Settings: To change the boot order, restart your computer and enter the BIOS or UEFI settings. This is usually done by pressing a specific key during startup, such as F2, F10, DEL, or ESC (the exact key may vary by manufacturer).
- ② Navigate to Boot Options: Once in the BIOS/UEFI menu, use the arrow keys to navigate to the "Boot" or "Boot Order" tab. This section allows you to prioritize which drive your computer boots from first.
- ③ Set the New Drive as Primary: Find the listing for your new drive (it may be labeled by its model number or "SSD" or "HDD"). Use the designated keys (often indicated on the screen) to move the new drive to the top of the boot order list. This ensures that your system attempts to boot from the new drive first.
- ④ Save Changes: After adjusting the boot order, navigate to the "Save & Exit" option. Confirm any prompts to save your changes and exit the BIOS/UEFI setup.
- ⑤ Reboot Your Computer: Save the changes and restart your computer. It should boot from the new drive seamlessly.
If you plan to replace the old drive and use the new drive as your boot drive, you can disconnect the old drive and use it as a system backup or format it and reuse as secondary storage to store files.
Troubleshooting Common Issues
1. Boot Issues After Cloning
If you encounter boot issues after cloning:
- Check Connections: Ensure that the new drive is correctly connected.
- BIOS Settings: Verify that the boot order in the BIOS is set correctly.
- Secure Boot: Disable Secure Boot temporarily to see if it resolves the issue.
2. Data Integrity Problems
If you suspect data integrity issues:
- Re-run Verification: Check Tatasoft's log files to see if there are any data errors in the cloning process.
- Consider Re-cloning: If issues persist, you may need to repeat the cloning process.
Expert Insight: When selecting the boot drive cloning software, opt for solutions that offer intuitive interfaces and advanced features. For instance, Tatasoft stands out with its sector-by-sector cloning option, which ensures a complete and accurate copy of your drive. Take advantage of its ability to clone while the operating system is running, minimizing downtime. Exploring these functionalities can enhance your cloning experience and ensure a smooth OS transition to your new drive.
Best Practices for Cloning Your Boot Drive
1. Use SSDs for Improved Performance
If upgrading, consider moving to an SSD for faster boot times and improved overall system performance.
2. Educate Yourself on SSD Maintenance
After cloning to an SSD, familiarize yourself with features like TRIM to maintain performance. Or don't forget to check the option to optimize SSD during the cloning process
3. Keep the Old Drive as Backup
If you're not sure about the cloning process, keep the old drive connected until you’re confident the new drive is working properly.
Conclusion
Cloning your boot drive is a valuable skill that can save your time and enable rapid restoration when system failures occur, preserving all operating system configurations and installed applications without requiring reinstallation. By using reliable disk cloning software like Tatasoft Disk Clone, you can simplify the process and ensure data integrity throughout. Whether you’re upgrading your hardware or creating a backup, Tatasoft provides the tools you need for a smooth Windows system migration.
Common Questions About Cloning Boot Drives
Tatasoft Disk Clone is highly recommended for its user-friendly interface and reliability, making it an excellent choice to clone the boot disk for both novices and experienced users.
It's best to clone a boot drive when the system is not actively using it. If the system is occupied during the cloning process, the cloning operation will restart the computer to proceed. Consider using a live USB or booting into a WinPE environment if your system failed to boot.
The time required to clone a boot drive depends on the size of the drive and the cloning method chosen. It can take anywhere from a few minutes to several hours.
Related Articles
- Dec 17, 2025How to Clone Your Old Computer to a New One: Step-by-Step Guide
- Dec 17, 2025Step-by-Step Guide to Clone System HDD to SSD for Maximum Performance
- Dec 17, 2025How to Clone Desktop Operating System to SSD for Optimal Performance
- Dec 17, 2025Speed Up Your PC in 3 Steps by Migrating Your OS to SSD
- Dec 17, 2025How to Clone A Laptop Hard Drive without Data Loss in Windows 10/11?
- Feb 12, 2026Step-by-Step Guide to Cloning a Hard Drive to a Smaller SSD

A dedicated technical writer at Tatasoft with over four years of specialized expertise in computing technology. She crafts actionable, user-centric content for tech niches, specializing in disk cloning, data management, and video solutions for Windows and Mac.
Read full bio

This article has been approved by Ben Lee. Ben's dedication to excellence and his comprehensive knowledge of Windows and Mac technologies make him an essential part of any technical writing team. With a career marked by continuous learning and adaptation to new technologies, Ben remains at the forefront of the ever-evolving tech landscape.