Written byJanet BashorunUpdated on Jan 02, 2026
Easily Clone a Crucial Hard Drive to an SSD for Improved Computer Performance
Approved byBen Lee
Brief introduction: Clone a Crucial hard drive to an SSD to significantly enhance your computer's performance, leveraging the SSD’s superior read/write speeds for faster boot times and smoother system responsiveness. In this guide, we will walk you through the step-by-step process of cloning your Crucial hard drive to an SSD using Tatasoft Disk Clone for Windows, ensuring a smooth transition that retains all your files and settings.
In this article
Why Clone from a Crucial Hard Drive to an SSD?
Crucial hard drives offer a range of durable storage solutions designed to meet diverse computing demands. Cloning a Crucial hard disk creates an exact copy of your entire system, including the operating system, applications, settings, and personal files, onto the new SSD. Before diving into cloning a Crucial hard drive to an SSD, it’s essential to understand the advantages:
- Performance: SSDs provide faster data access speeds, which leads to quicker load times for applications and files.
- Reliability: SSDs contain no moving parts and are less prone to mechanical failure, making them a more reliable storage solution.
- Energy Efficiency: SSDs consume less power than traditional hard drives, improving battery life in laptops.
- Ease of Use: Cloning boot disk is straightforward without reinstalling Windows OS and software, allowing for a hassle-free HDD upgrade.
What You'll Need to Clone a Crucial hard drive
To clone a Crucial hard drive to an SSD, you will need the following:
- A Crucial hard drive that you want to clone.
- A compatible SSD with sufficient storage capacity to accommodate the data from your Crucial hard drive.
- A computer with a reliable disk cloning software like Tatasoft Disk Clone for Windows installed.
- A SATA-to-USB adapter (for laptops or when the SSD cannot be internally installed), or a SATA data cable (for desktops with available SATA ports).
- A power cale and an external drive enclosure (if your SSD is not installed internally).
Step-by-Step Guide to Clone a Crucial Hard Drive to an SSD
Step 1: Backup Your Data
Before starting the cloning process, it's crucial to back up any important data on your destination SSD. While it will be formatted during the cloning process
Step 2: Connect Your SSD
- ① Internal Connection: If you are comfortable, open your computer case and install the SSD directly into a free SATA slot.
- ② External Connection: If you prefer, connect the SSD using a SATA-to-USB adapter or place it in an external enclosure.
Step 3: Launch Tatasoft Disk Clone and switch to "Disk Clone"
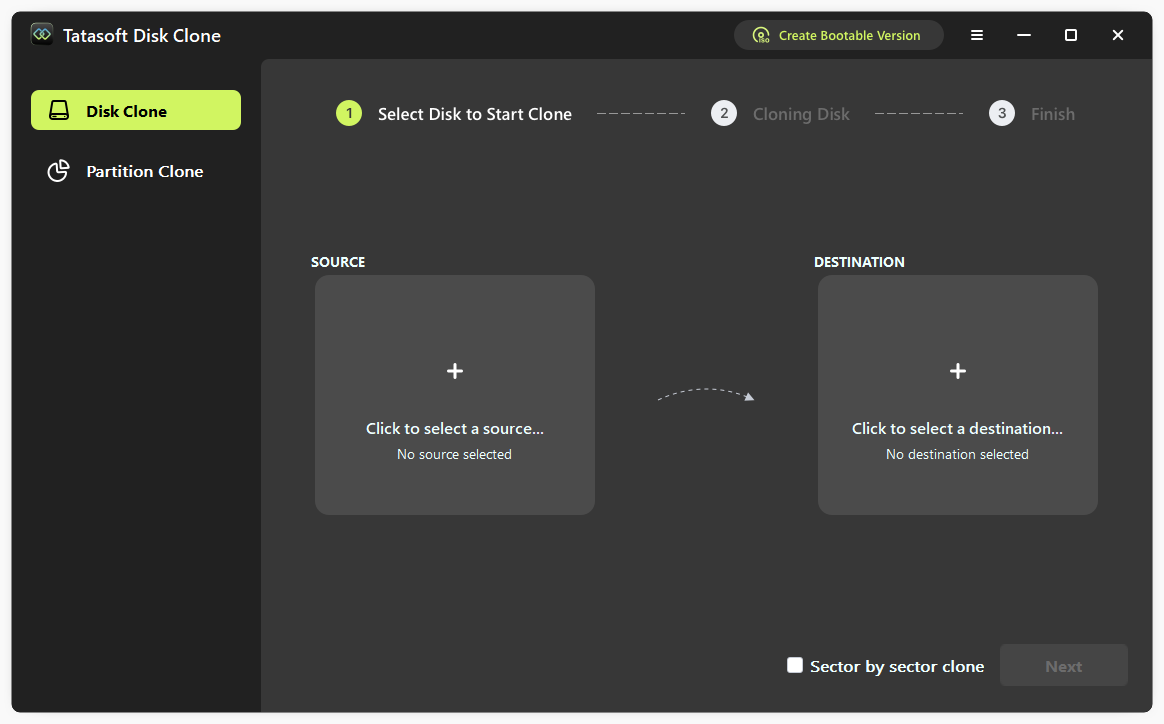
Step 4: Select your source and destination drives for cloning
- ① Choose the Crucial hard drive as your source drive by clicking + on the lest side. This is the drive from which you will be copying data.
- ② Select the SSD as the destination drive where the data will be cloned. Ensure it is empty or contains no important data, as the cloning process will overwrite any existing files.

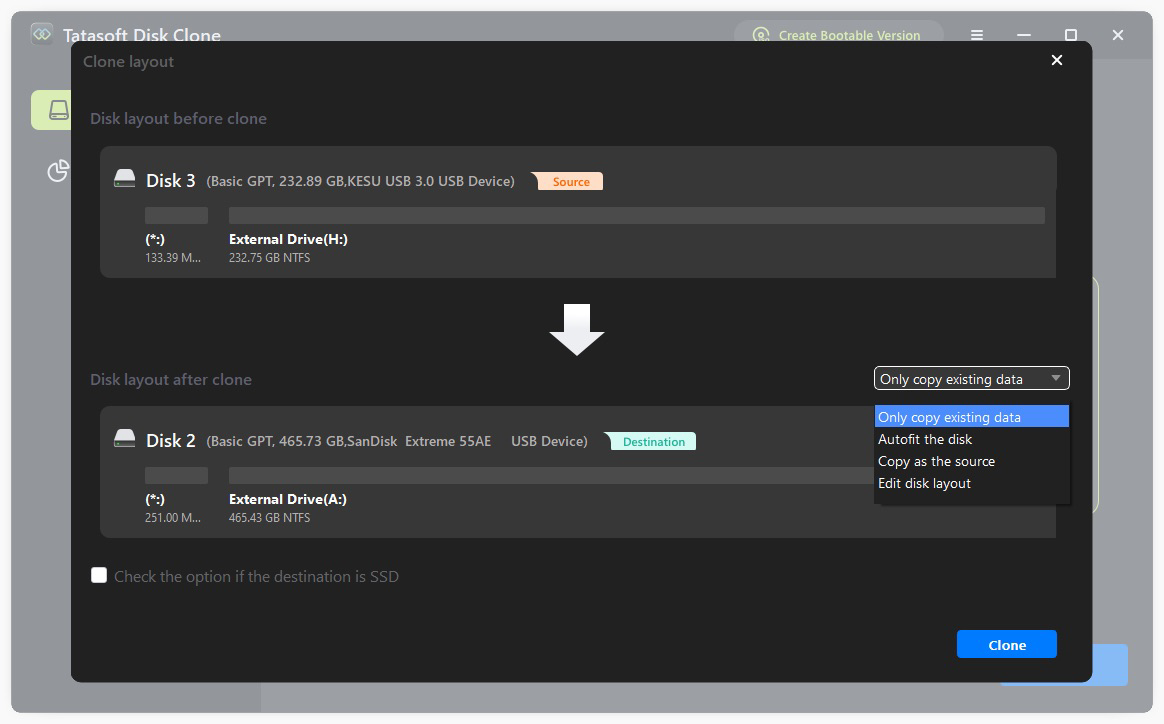
Step 5: Start cloning crucial hard drive to an SSD
- ① Resize partitions: Customize the partition configuration on the target SSD according to your needs.
- ② Check the option if destination is SSD: Enabling this feature optimizes the SSD for peak performance post-cloning.
- ③ Click on the Clone button to begin the cloning process. This may take some time, depending on how much data you have on your Crucial hard drive.
Finalize the Upgrade (if necessary)
- Boot from the SSD: Restart your computer and enter the BIOS settings to change the boot order, allowing your system to boot from the new SSD.
- Check Your Data: Ensure all your applications, files, and settings have been transferred correctly.
- Disconnect the Source Drive: After cloning, you can disconnect or remove the Crucial hard drive.
Next Steps after Cloning Crucial HDD to SSD
- Format the Original Crucial Hard Drive: Once you are confident that the SSD is functioning properly, you can format the original Crucial hard drive to clear its data, allowing you to use it for additional storage or backups.
- Optimize SSD Performance: After cloning, ensure that your SSD is operating optimally by checking for firmware updates on the manufacturer's website. Keeping your SSD firmware up to date can help enhance performance and stability.
- Enable TRIM: Make sure that TRIM is enabled on your SSD or check the SSD optimization option during the cloning process. TRIM helps improve SSD longevity and performance by allowing the operating system to inform the SSD which blocks of data are no longer in use and can be wiped.
- Install SSD Monitoring Tools: Consider using software that allows you to monitor the health and performance of your SSD. This can help you catch any potential issues early before they lead to data loss.
Conclusion
Cloning a Crucial hard drive to an SSD is a powerful upgrade that can dramatically improve your system's speed and efficiency. By following the step-by-step instructions in this guide, along with the capabilities offered by Tatasoft Disk Clone, the process becomes straightforward and accessible for users of all skill levels. It supports to clone Crucial hard disk in Windows 11, 10, 8, 7, Vista.
With this upgrade, you’ll experience the benefits of faster load times, improved reliability, and enhanced overall performance for your computer. Whether you are upgrading your laptop or desktop, cloning your Crucial hard drive to an SSD is a decision that will enhance your computing experience for years to come.
Frequently Asked Questions
Yes, cloning processes are generally safe, particularly when using reliable disk cloning software like Tatasoft Disk Clone. However, it’s always wise to back up your important data on the destination disk before starting.
Yes, Tatasoft Disk Clone can help you clone hard drive to a smaller SSD but you will need to ensure that the total data on the hard drive does not exceed the capacity of the SSD. You might need to delete unnecessary files or applications beforehand.
Yes. If the SSD is empty or contains no important data, cloning will overwrite it. Ensure the SSD is prepared for this process.
The time required to clone a drive depends on the amount of data being transferred and the speed of both the hard drive and the SSD. Generally, it could take anywhere from 30 minutes to a few hours.
If the cloning process fails, review the error messages provided by Tatasoft, check connections, and ensure both drives are functioning correctly. You may also consider formatting the SSD before attempting the cloning process again.
Related Articles
- Jan 20, 2026How to Copy Partition to Another Drive via CMD: A Complete Guide
- Jan 08, 2026Maximize Your HP Laptop's Potential by Upgrading to an SSD
- Dec 17, 2025How to Clone SSD to a Larger SSD?
- Feb 10, 2026How to Clone Windows 11 to a New SSD without reinstalling?
- Feb 12, 2026Step-by-Step Guide to Cloning a Hard Drive to a Smaller SSD
- Dec 16, 2025The Complete Guide on How to Install a New Hard Disk for Desktops and Laptops

A dedicated technical writer at Tatasoft with over four years of specialized expertise in computing technology. She crafts actionable, user-centric content for tech niches, specializing in disk cloning, data management, and video solutions for Windows and Mac.
Read full bio

This article has been approved by Ben Lee. Ben's dedication to excellence and his comprehensive knowledge of Windows and Mac technologies make him an essential part of any technical writing team. With a career marked by continuous learning and adaptation to new technologies, Ben remains at the forefront of the ever-evolving tech landscape.