Written byJanet BashorunUpdated on Mar 06, 2026
The Complete Guide on How to Install a New Hard Disk for Desktops and Laptops
Approved byBen Lee
Brief introduction: Learning to install new hard drive is crucial for anyone looking to expand their storage or replace an old hard drive. Whether upgrading to a larger HDD or switching to an SSD, the process may seem challenging but can be seamless with proper tools and guidance. In this article, we will explore how to install a new hard disk in both desktop and laptop computers, including how to migrate data to the new drive with Tatasoft Disk Clone while preserving files and settings.
In this article
Why Install a New Hard Disk?
Before diving into the installation process, let’s explore the reasons why you might want to upgrade your hard disk:
1. Increased Storage Capacity: As applications, files, and multimedia content accumulate, you may reach a storage limit. Installing a new hard disk allows you to store more data without the worry of running out of space.
2. Improved Performance: Upgrading to a newer, faster HDD or SSD can significantly enhance your system’s performance, leading to quicker boot times and faster file access.
3. Data Security: Upgrading your hard disk can provide you with the opportunity to improve your data security features, ensuring your files are safe from corruption or loss.
4. Alternative Storage Solutions: As demands for gaming and high-resolution media increase, having an additional or upgraded hard disk can be essential for maintaining smooth performance.
How to Install a New Hard Disk in a Desktop Computer
Installing a new hard disk in a desktop computer is usually a straightforward process. Here's how to do it:
Step 1: Gather your tools to install a new hard drive
Before you begin, make sure you have the following items:
- ① A new hard disk (HDD or SSD)
- ② A screwdriver (usually Phillips-head)
- ③ An anti-static wrist strap (optional but recommended)
- ④ Tatasoft Disk Clone for data migration (optional)
Step 2: Power down and unplug the computer
- ① Shut down your computer: Ensure that it is completely powered off.
- ② Unplug all cables: Disconnecting the power cable and other peripherals, such as the keyboard and mouse.
Step 3: Open the computer case
- ① Remove the screws: Unscrew the side panel of the case to gain access.
- ② Remove the side panel: Gently slide or lift off the panel to expose the internal components.
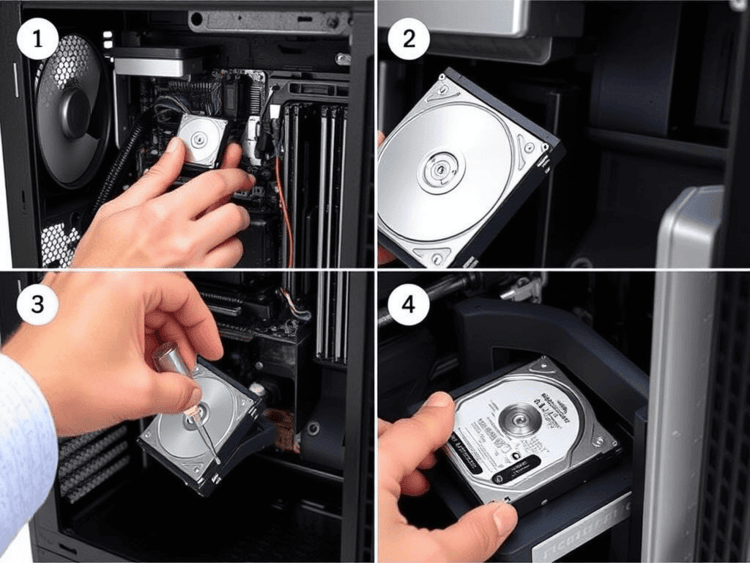
Step 4: Locate the drive bays
- ① Identify free drive bays: Find the empty bays where the hard disk will be installed.
- ② Review connections: Ensure there are available SATA power and data cables.
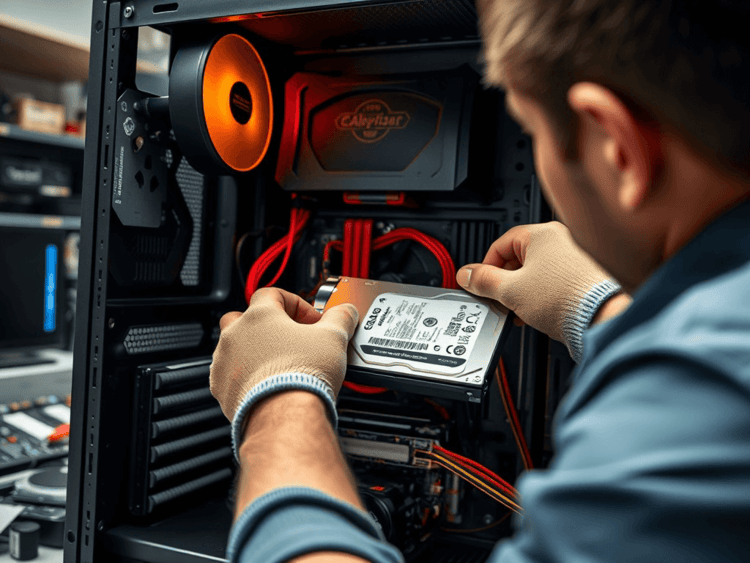
Step 5: Install the new hard disk
- ① Mount the hard disk: Slide the new hard disk into the bay and align it with the screw holes.
- ② Secure the drive: Use screws to fasten it in place.
Step 6: Connect the hard disk
- ① Plug in the SATA data cable: Connect one end to the hard disk and the other end to the motherboard.
- ② Connect the SATA power cable: Plug it into the hard disk’s power port.
Step 7: Close the computer case
- ① Replace the side panel: Slide or push it back into place.
- ② Screw it in: Use screws to secure the side panel.
Step 8: Reconnect and power on
- ① Reconnect all cables: Plug in your power cable and peripherals.
- ② Power on the computer: Start your computer and enter the BIOS/UEFI settings to ensure the new hard disk is recognized.
How to Install a New Hard Disk in a Laptop

Installing a new hard disk in a laptop can be slightly different due to space constraints. Follow these steps:
Step 1: The tools needed for laptop hard disk installation
- ① A new hard disk (HDD or SSD)
- ② A screwdriver
- ③ An anti-static wrist strap (optional)
Step 2: Power down and unplug the Laptop
- ① Shut down your laptop: Ensure it is completely off.
- ② Unplug the power adapter: Disconnect all power sources.
Step 3: Remove the battery (if applicable)
- ① If your laptop has a removable battery, take it out. This will prevent accidental power while you work on the device.
Step 4: Open the Laptop case
- ① Locate the hard disk compartment: Many laptops have a dedicated panel for easy access to the hard disk. Look for screws securing it.
- ② Unscrew the panel: Use a screwdriver to remove the screws and then gently pry off the panel.
Step 5: Remove the old hard disk from Laptop
- ① Disconnect the hard disk: If an old hard disk is present, carefully disconnect any cables attached to it.
- ② Remove the hard disk: Unscrew or unclip the old hard disk from the mounting bracket, then slide it out.
Step 6: Install the new hard disk
- ① Insert the new hard disk: Align it with the connectors and slide it into place.
- ② Secure the new drive: Use screws or clips to fasten it to the mounting bracket.
Step 7: Close the laptop case
- ① Reattach the panel: Once the new hard disk is securely in place, position the access panel back onto the laptop.
- ② Screw in the panel: Tighten the screws to secure the panel.
Step 8: Reinstall the battery (if applicable)
- ① If you removed the battery, place it back into its compartment and ensure it is securely connected.
Step 9: Power on the laptop
- ① Reconnect the power adapter: Plug in the laptop and any other peripherals.
- ② Turn on the laptop: Start your machine and enter the BIOS/UEFI settings to check if the new hard disk is recognized.
How to Migrating Data to the New Hard Disk
Once the new hard disk is installed, you may want to migrate your operating system or data from the old hard disk to the new one without reinstalling. Here’s a brief overview of how to use Tatasoft Disk Clone to clone your old hard disk:
Step 1: Download and Install Tatasoft: If you haven’t done so yet, install Tatasoft Disk Clone on your computer.
Step 2: Launch Tatasoft and select "Disk Clone".
Step 3: Select Source and destination disk for cloning: Choose the old hard disk as the source and the new hard disk as the destination.
Step 4: Initiate Disk Cloning: Follow the prompts to resize the partitions on the new hard disk and click Clone to start the cloning process. This may take some time, depending on the amount of data.
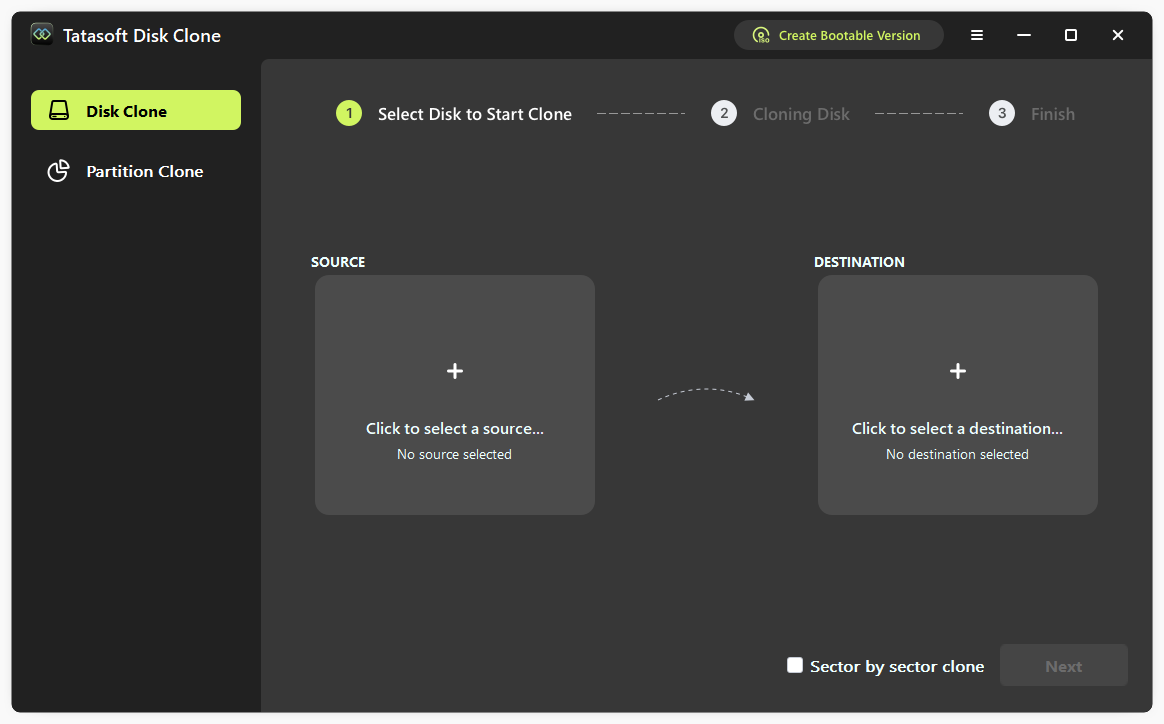
Once the disk cloning is complete, Tatasoft will notify you. You may now shut down your computer and remove the old hard disk if necessary.
Conclusion
Knowing how to install a new hard disk not only provides greater flexibility in managing your storage needs but also significantly enhances your system's overall performance. Whether you're replacing old hard drive or upgrade to SSD; in a desktop or a laptop, this comprehensive guide ensures that you can execute the installation smoothly and confidently. By using Tatasoft Disk Clone, you can effortlessly migrate your data to the new hard drive, preserving your files and settings without hassle.
Related Articles
- Feb 08, 2026Top 8 Disk Cloning Software in 2026: Free & Paid
- Feb 02, 2026How to Clone HDD to USB Drive on Windows?
- Jan 20, 2026How to Copy Partition to Another Drive via CMD: A Complete Guide
- Jan 13, 2026A Simple Guide to Clone Bootable USB to Another Drive
- Feb 12, 2026Step-by-Step Guide to Cloning a Hard Drive to a Smaller SSD
- Mar 06, 2026Your Go-To Alternative to Clonezilla for Disk Cloning

A dedicated technical writer at Tatasoft with over four years of specialized expertise in computing technology. She crafts actionable, user-centric content for tech niches, specializing in disk cloning, data management, and video solutions for Windows and Mac.
Read full bio

This article has been approved by Ben Lee. Ben's dedication to excellence and his comprehensive knowledge of Windows and Mac technologies make him an essential part of any technical writing team. With a career marked by continuous learning and adaptation to new technologies, Ben remains at the forefront of the ever-evolving tech landscape.