Written byJanet BashorunUpdated on Feb 16, 2026
A Step-by-Step Guide to Clone Your Mac Hard Drive Using Disk Utility
Approved byBen Lee
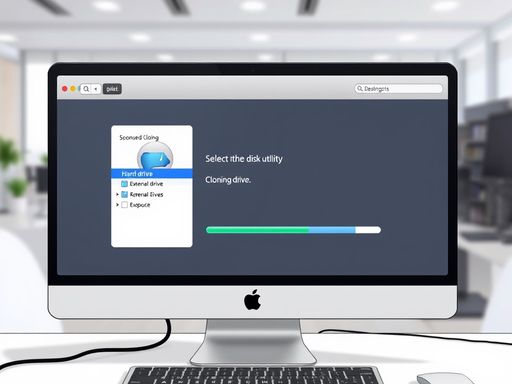
Brief introduction: Cloning a Mac hard drive using Disk Utility is an essential skill for Mac users aiming to back up their data or migrate to a new drive. This process allows you to create an exact copy of your hard drive, preserving everything from files to apps. In this guide, we’ll walk you through the step-by-step process of cloning with Disk Utility and introduce Tatasoft Disk Clone as an alternative tool, highlighting efficient methods to enhance your experience.
In this article
Why Clone a Mac Hard Drive?
Before diving into the cloning process using Disk Utility, it’s vital to understand why you might want to clone your Mac hard drive.
1. Data Security
Creating a clone serves as a robust backup solution. In the event of hardware failure or accidental deletion, having a complete copy of your data can save you from significant loss.
2. System Upgrades
If you’re upgrading to a new SSD or larger hard drive, cloning your existing drive allows for a seamless transfer of all your applications and settings.
3. Testing and Development
For developers, cloning a hard drive can create a safe environment to test new software without affecting the primary system.
Preparing Your Mac for Cloning
To ensure a smooth cloning process, certain preparations are necessary.
1. Backup Important Data
Before starting, back up crucial files using Time Machine or another backup method to prevent data loss.
2. Choose the Right External Drive
Select an external hard drive that is reliable and has sufficient storage capacity to hold the entire contents of your Mac hard drive. Ideally, it should be formatted as Mac OS Extended (Journaled) or APFS.
3. Clean your Mac
Removing system junk and unnecessary programs/files can improve cloning efficiency and save target disk space.
Steps to Clone Your Mac Hard Drive Using Disk Utility
Here’s a detailed guide on how to clone your hard drive effectively:
Step 1: Connect Your External Drive
Plug in your external hard drive to your Mac. Ensure it is recognized by Disk Utility.
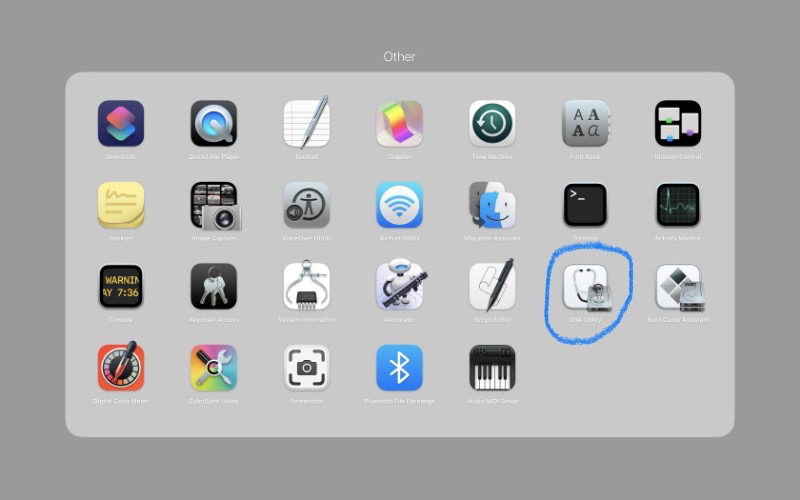
Step 2: Access Disk Utility
Open Finder and navigate to Applications > Utilities > Disk Utility.
Step 3:Select the Source Drive
In Disk Utility, locate your Mac hard drive in the left sidebar and select it (This is the drive you want to clone).
Step 4:Choose the Restore Option
Click the Restore button at the top of Disk Utility or click on the Edit > Restore.
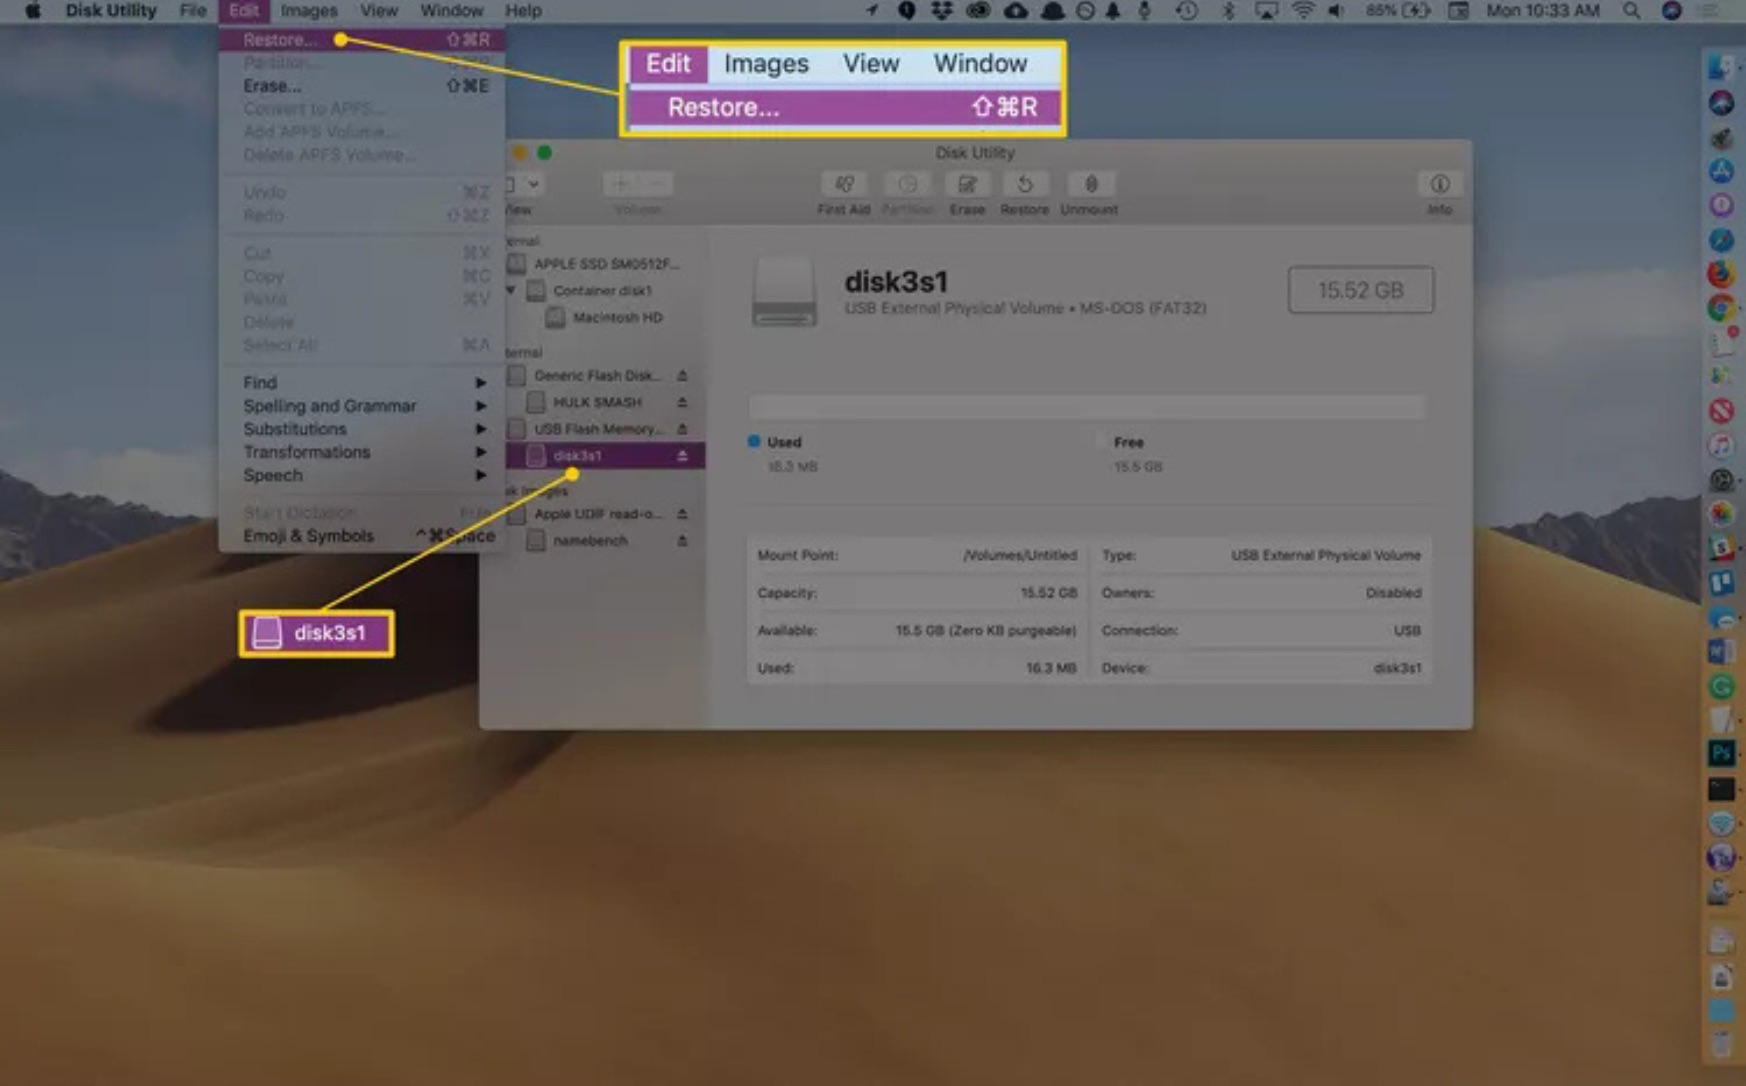
Step 5: Choose the Source and Destination Drive
A dialog will appear with two fields:
- Source: Select your Mac's internal drive (or another source drive if needed).
- Destination: Select your external drive volume (target drive).
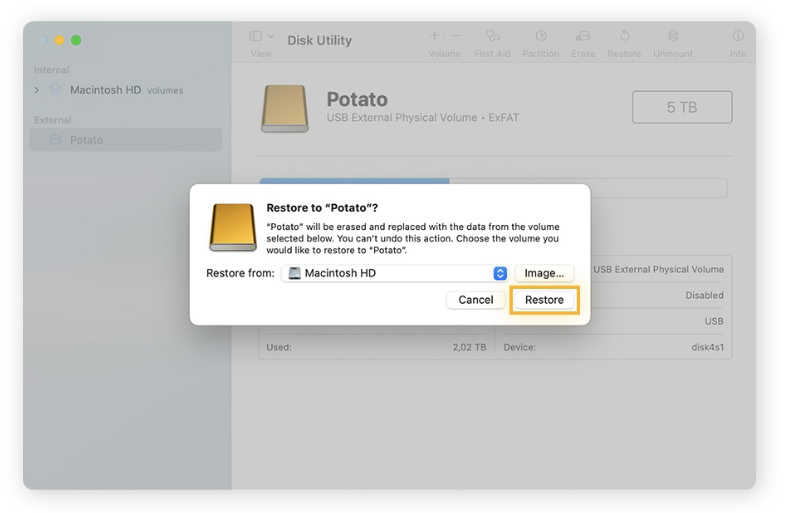
Step 6: Initiate the Cloning Process
- Double-check the selections, as this process will overwrite the destination drive.
- Click Restore and enter your administrator password if prompted.
- Wait for the cloning process to complete.
Step 7: Monitor Hard Drive Cloning Progress
Disk Utility will display a progress bar. The duration of this process will depend on the size of your data.
After the cloning process is complete, safely eject your external hard drive by right-clicking on its icon in Finder and selecting Eject.
Verifying the Cloned Data
Once you have cloned your Mac hard drive, it’s crucial to verify that the data was copied correctly.
1. Open the External Drive
- Connect your external hard drive and open it in Finder. Check that all files and folders are present.
2. Boot from the Cloned Drive (if necessary)
Apple Silicon Macs (M1/M2/M3/M4/M5):
1) Restart your Mac.
2) Press and hold the power button until "Loading Startup Options" appear.
3) Select Options (gear icon) > External Drive.
Intel Macs
1) Restart while holding Option (⌥) to open Startup Manager.
2) Select the cloned external drive to boot.
Utilizing Cloned Data for System Recovery
Cloning your hard drive offers the advantage of easy recovery in case of system issues.
1. Restoring from Clone Using Disk Utility
If your primary drive fails, you can restore your system by booting from the cloned external drive using Disk Utility to transfer data back to an internal drive.
- ① Ensure your cloned external drive is properly connected to your Mac via USB, Thunderbolt, or other compatible ports.
- ② Go to Applications > Utilities > Disk Utility (or search for "Disk Utility" using Spotlight).
- ③ In Disk Utility, locate your external drive under External or Volumes in the left sidebar.
- ④ Click on the external drive that contains the cloned data.
- ⑤ Click the Restore button at the top of Disk Utility.
- ⑥ Select your external drive volume (cloned drive) as source and your Mac's internal drive as destination
- ⑦ Click Restore and enter your administrator password if prompted.
- ⑧ Wait for the process to complete.
2. Testing New Configurations
Use the cloned drive to test new software installations or system settings without risking your primary setup.
Alternative Mac Hard Drive Cloning
Need a reliable mac hard disk copy alternative to Disk Utility? Tatasoft Disk Clone for Mac delivers intuitive macOS cloning with:
- One-Click Simplicity: Beginner-friendly interface for quick disk copy.
- Time-Saving Efficiency: 30% faster than Disk Utility.
- Flexibility: Clone entire systems or select files to disk images (DMG or ZIP available).
- Customer Support: Priority assistance for troubleshooting.
3 Steps to clone your Mac hard disk with Tatasoft Disk Clone for Mac:
- ① Launch Tatasoft Disk Clone for Mac and switch to OS Clone
- ② Choose your prepared external hard drive as the destination for the clone.
- ③ Click the Clone Now button to begin the cloning process.

Troubleshooting Common Issues
If you encounter problems while cloning your Mac hard drive, consider these tips:
1. Restore button grayed out
Ensure source/destination are properly assigned (volumes, not physical drives).
2. External Hard Drive Not Mounting
Ensure the external drive is properly connected. You may need to reformat it using Disk Utility if it's not recognized.
Label your external drives clearly to avoid confusion and ensure you know which drive contains the latest clone.
3. Insufficient Space
Check that the external drive has enough space to accommodate all data from the source drive.
4. Cloning Errors
If Disk Utility reports errors during cloning, consider running First Aid on the source drive to fix any underlying issues. Disk Utility may take too long for it uses block-level copying.
5. Avoid Interruptions
Do not use your Mac or disconnect any drives during the cloning process to prevent data corruption.
Conclusion
Cloning your Mac hard drive using Disk Utility is a straightforward and effective way to protect your data and facilitate system upgrades. By following the steps outlined in this guide, you'll ensure a smooth cloning experience while safeguarding your valuable information. This guide ensures a seamless cloning process, safeguarding your entire system - including applications, settings, and files - while creating a bootable backup of Mac on your external drive.
If you are seeking a superior Disk Utility alternative for cloning your Mac disk, Tatasoft Disk Clone for Mac is your top choice. As a high-performance Mac disk cloning solution, it delivers a superior boot success rate that far exceeds the capabilities of standard utilities like Disk Utility. Start the process today and keep your Mac running at its best!
Related Articles
- Feb 25, 2026How to Create a Bootable Clone of Your Mac
- Mar 04, 2026How to Clone macOS to SSD for Ultimate Performance
- Feb 18, 2026How to Create a Bootable Backup of macOS Sequoia in 3 Ways?
- Mar 03, 2026A Step-by-Step Guide on How to Clone Mac Hard Drive to USB Flash Drive
- Feb 23, 20263 Methods to Clone a Mac OS Drive
- Feb 20, 20264 Methods to Clone an External Hard Drive to Another on Mac

A dedicated technical writer at Tatasoft with over four years of specialized expertise in computing technology. She crafts actionable, user-centric content for tech niches, specializing in disk cloning, data management, and video solutions for Windows and Mac.
Read full bio

This article has been approved by Ben Lee. Ben's dedication to excellence and his comprehensive knowledge of Windows and Mac technologies make him an essential part of any technical writing team. With a career marked by continuous learning and adaptation to new technologies, Ben remains at the forefront of the ever-evolving tech landscape.