Written byJanet BashorunUpdated on Feb 23, 2026
Brief introduction: To clone a Mac OS drive effectively is essential for users seeking to enhance performance, create backups, or migrate to a new machine. Cloning allows you to replicate your entire macOS, apps, and files, ensuring a smooth transition without data loss. In this guide, we will delve into 3 free and paid methods for cloning your Mac OS drive, including the use of Tatasoft Disk Clone and built-in macOS tools like Disk Utility and Migration Assistant.
In this article
Mac OS Drive Cloning Basics You Should Know
Cloning a Mac OS drive involves creating an exact copy of your Mac hard drive, encompassing the operating system, applications, and all personal files. Unlike simple file transfers, cloning preserves the entire disk structure, including hidden system files and permissions, enabling the cloned drive to be fully bootable on your device. This process is crucial for ensuring that all configurations and settings remain intact. Primary reasons to clone your Mac drive include:
- System Upgrades: When upgrading to a new SSD or larger hard drive, cloning allows you to transfer your entire macOS without the hassle of reinstalling OS and reconfiguring settings.
- Backup Solution: Cloning serves as a comprehensive backup method. Should your original drive fail, you can quickly restore your system to its previous state using the cloned drive.
- Improved Performance: Upgrading to a faster SSD can significantly enhance your Mac's performance. Cloning ensures that the transition is smooth, ensuring all your data and applications are intact.
- System Testing: Test new software or macOS updates on a clone without risking your main drive.
Preparing for the Mac OS Drive Cloning Process
1. Assessing Drive Compatibility
Before you begin, ensure that your new drive is compatible with your Mac. Check the specifications of both your Mac and the new drive to confirm that they will work together seamlessly. Cross-check specifications including file system support - macOS natively reads NTFS drives but requires third-party tools for full write access.
2. Backing Up Important Data
It's always advisable to back up essential files on the destination drive separately as it will be completely erased. Use an external hard drive or cloud storage to keep your data secure before starting the cloning process.
3. Clean up your macOS
Remove unnecessary files and apps to optimize disk space and ensure a clean migration.
4. Tools Required for Cloning
- Install Mac disk clone software: Download and install Tatasoft Disk Clone for Mac for a user-friendly cloning experience.
- External SSD or Hard Drive: Ensure you have a compatible drive with enough storage capacity.
- Connection Cables: Depending on your setup, you may need USB or Thunderbolt cables.
3 Methods to Clone a Mac OS Drive
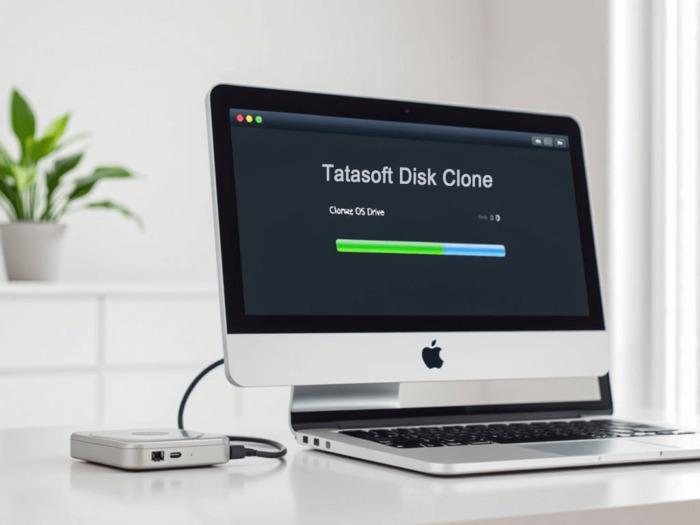
Method 1: Clone Mac OS Drive Using Tatasoft Disk Clone
Tatasoft Disk Clone for Mac is reliable Mac disk cloning software that boasts a user-friendly interface and efficient cloning process, making it an excellent choice for users of all skill levels. Its dedicated macOS cloning algorithm delivers a superior boot success rate for cloned hard drives compared to alternative solutions on the market.
Step 1: Connect the new drive to Mac
- Use a USB or Thunderbolt cable to connect your new SSD or hard drive as external hard drive.
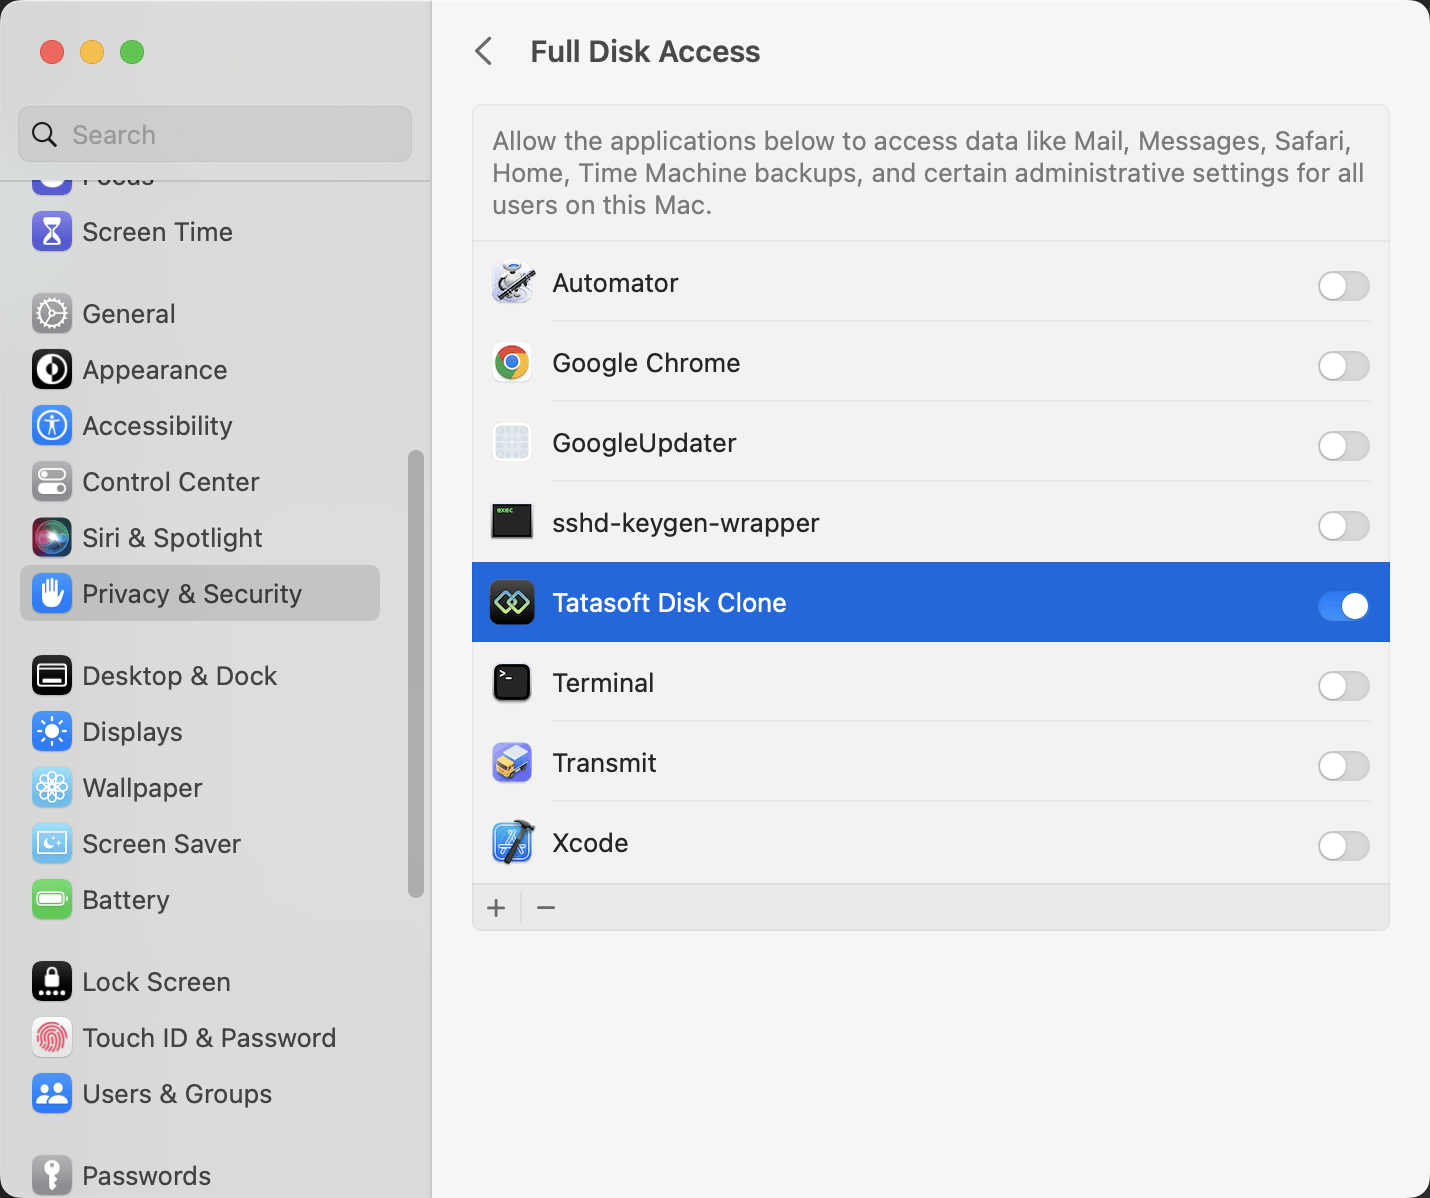
Step 2: Launch Tatasoft Disk Clone and enable Full Disk Access when you open it for the first time
Step 3: Switch to OS Clone and choose drive
- Switch to OS Clone. In this mode, the Mac OS disk will be automatically set as the source.
- Select the Destination Drive: Choose your prepared external SSD as the destination for the clone.

Step 4: Confirm and start cloning the Mac OS drive
- Review your selections, click “Clone Now” and confirm to format the destination drive in the pop up window to begin the process.

Once the cloning process is complete, Tatasoft will prompt you to verify the success of the operation.
Tips:
1. When you boot the cloned macOS from external hard drive for the first time, log in to the system and wait about 20 to 30 minutes before using it.
2. Try to keep Ventura or Sonoma booted on the original computer after cloning.
Method 2: Clone a Mac OS Drive for Free Using Disk Utility
Disk Utility is a free built-in macOS tool that allows you to clone your Mac hard drive its 'Restore' function.
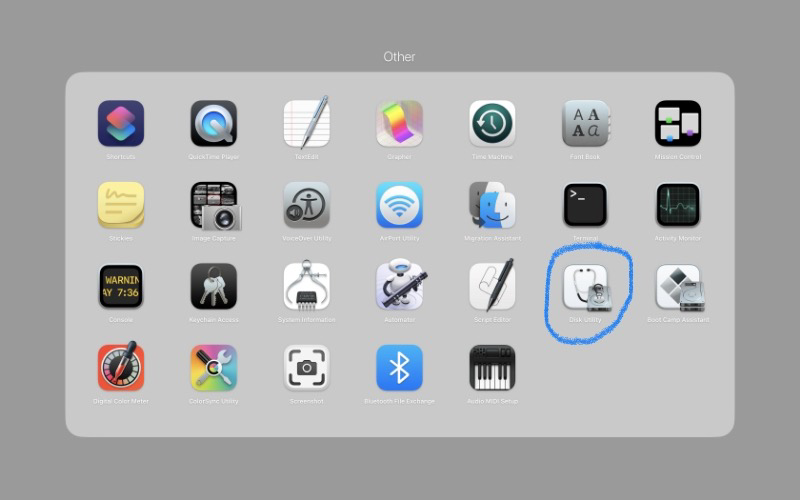
Step 1: Open Disk Utility
You can find it in Applications > Utilities > Disk Utility.
Step 2: Show all devices
on the top-left corner of the window, click the View > Show All Devices. This allows you to see the actual hardware drives rather than just the volumes.
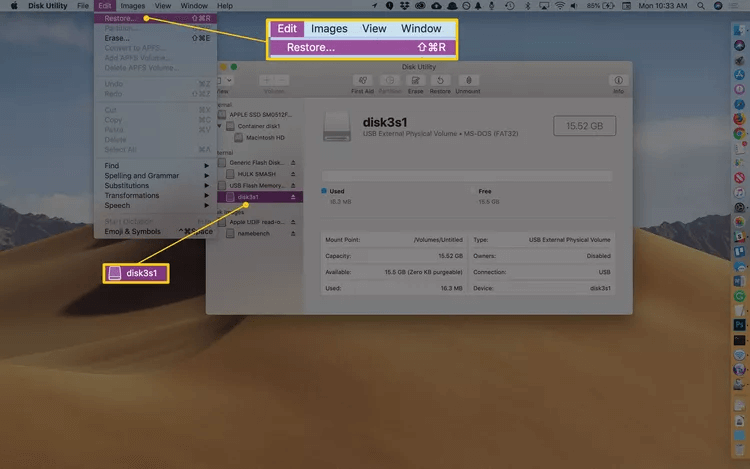
Step 3: Select the target drive and click Restore
Choose the external drive you want to clone the Mac OS drive to in the sidebar.
Click the Restore button in the top toolbar or Edit > Restore.
Step 4: Restore
In the drop-down menu, select your Source Drive (the Mac OS drive you want to copy).
Click Restore.
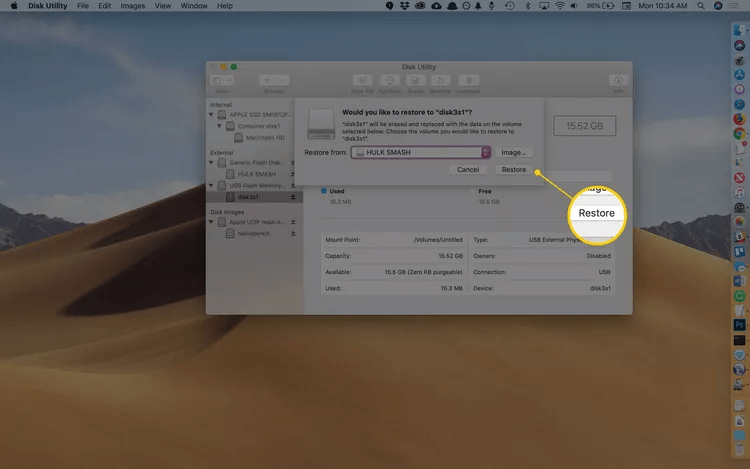
Monitor the progress bar. Once the process is complete, you will see a confirmation message. Cloning hard drive with Disk Utility can take anywhere from a few minutes to several hours depending on the amount of data and the speed of your drives.
Tips: Due to Apple's Signed System Volume (SSV) security, simply "restoring" a system drive via Disk Utility on macOS 11 Big Sur and later sometimes creates a data-only clone that isn't bootable. If your goal is to create a Mac bootable external backup, I recommend using specialized tools like Tatasoft Disk Clone for Mac.
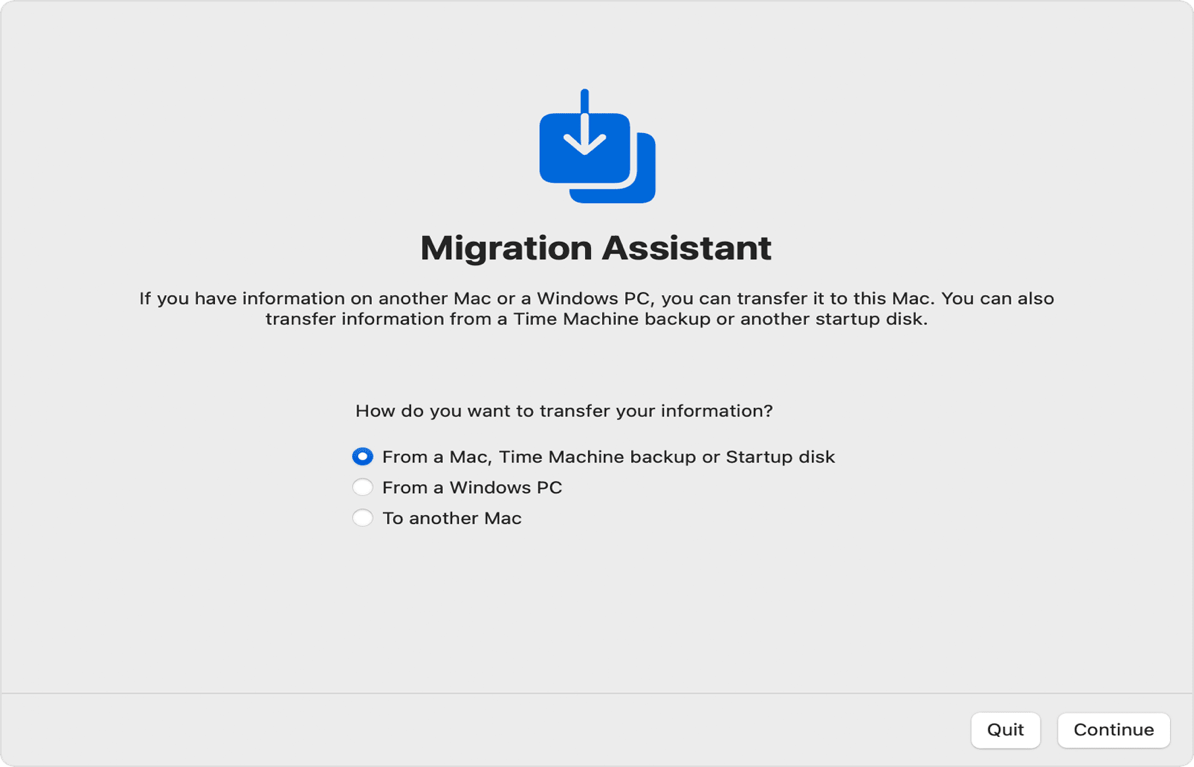
Method 3: Clone macOS Drive Using Migration Assistant
Migration Assistant is another built-in tool designed for transferring data between Macs but can also be used to clone a drive. It is important to note that unlike "cloning" (which makes a bit-for-bit copy of the entire drive), Migration Assistant installs your apps, files, and settings onto a freshly installed macOS.
Step 1: Connect Devices
Ensure both Macs are on the same Wi-Fi network, or connect them directly with a cable (faster transfer).
Step 2: Open Migration Assistant
On your New Mac: Go to Applications > Utilities > Migration Assistant. Click Continue.
On your Old Mac/Source: Do the same: Open Migration Assistant and click Continue.
Step 3: Select Transfer Method
On the New Mac: When asked how you want to transfer information, select "From a Mac, Time Machine backup, or startup disk" and click Continue.
On the Old Mac: Select "To another Mac" and click Continue.
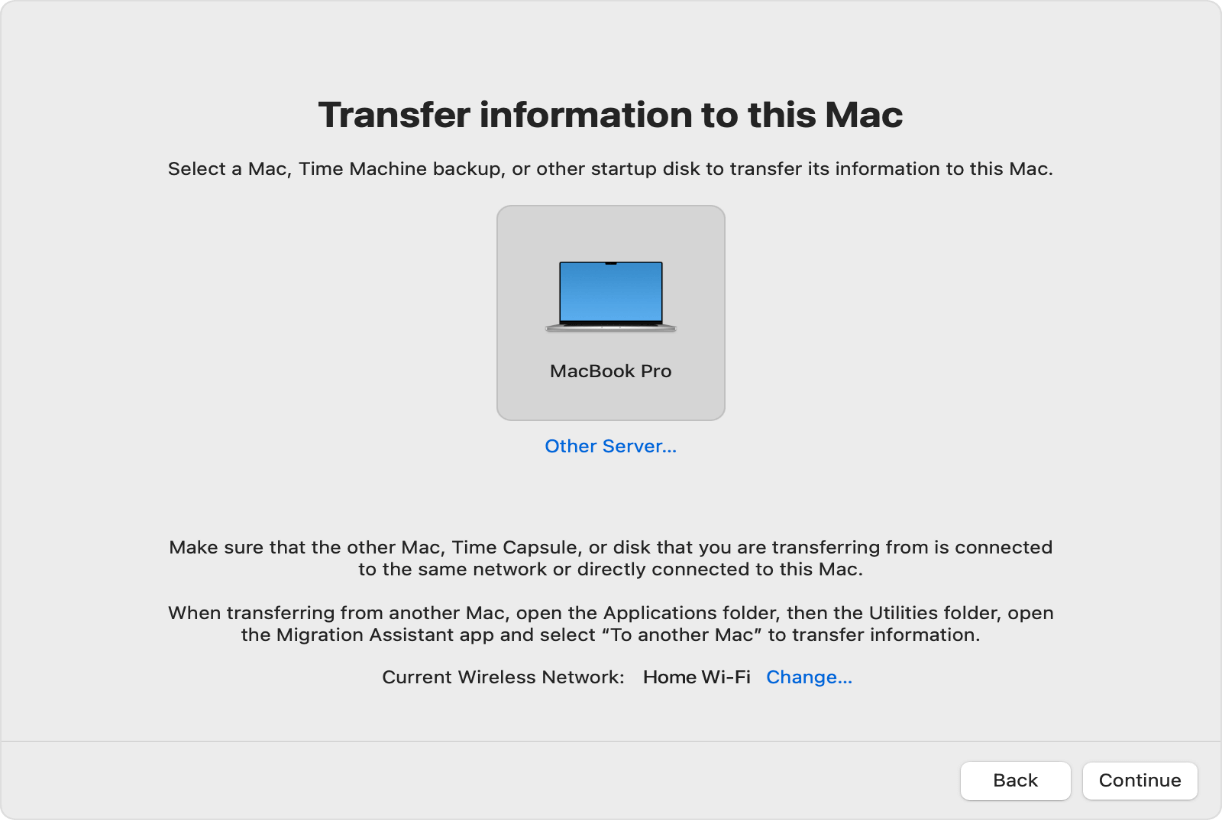
Step 4: Pair the devices
On the New Mac: You should see an icon for your old Mac (or the external drive/backup). Select it and click Continue.
Verify the Code: A security code will appear on both screens. Confirm they match and click Continue on the old Mac.
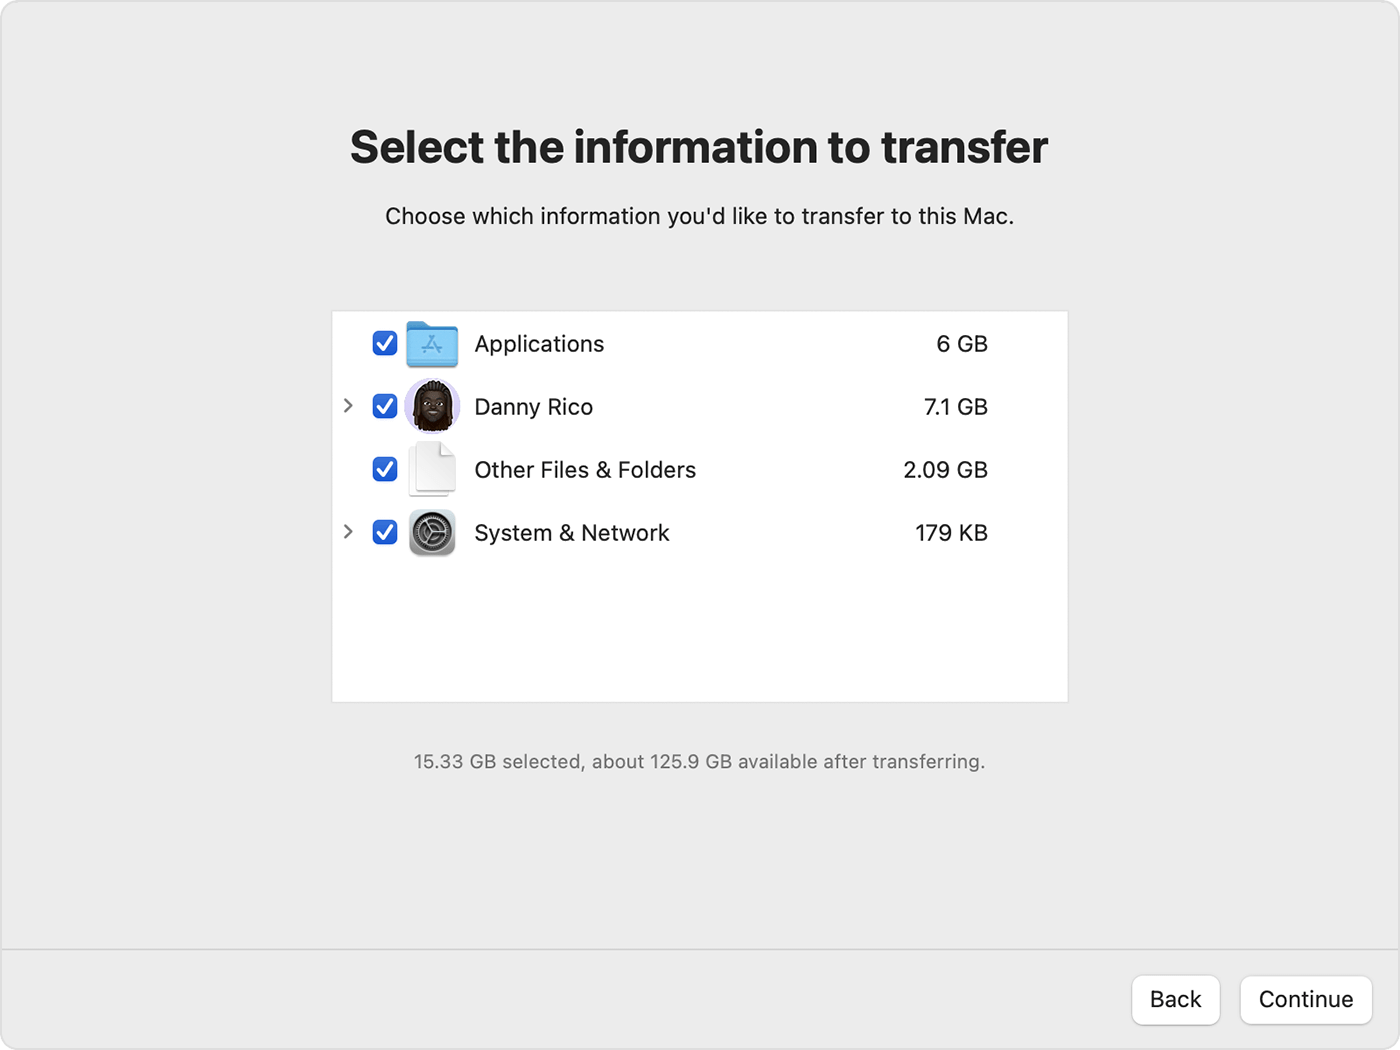
Step 5: Choose Data to Transfer
You will see various options for data transfer, such as applications, user accounts (documents, desktop, and settings), Other Files & Folders and System & Network (Wi-Fi passwords, printer settings,etc). Select what you want to clone.
Step 6: Follow Prompts
- Click Continue to begin the transfer. This can take anywhere from 30 minutes to several hours depending on the amount of data and connection speed.
While Migration Assistant is Apple's recommended way to move macOS data, it is not a "perfect clone" and comes with several limitations:
1. Unlike Disk Utility or third-party cloning software, Migration Assistant only moves apps, data and settings. It does not copy the macOS operating system itself.
2. You usually cannot migrate data from a Mac running a newer version of macOS (e.g., macOS 15) to a Mac running an older version (e.g., macOS 14). The target Mac must be on the same or a newer version of the OS.
3. If you use Wi-Fi, the process can be extremely slow and prone to disconnection. If the connection drops halfway through, you often have to wipe the target Mac and restart the entire process from the beginning to avoid corrupted data.
Common Issues and Troubleshooting
1. Cloning Errors
If you encounter errors during the cloning process:
- Check Connections: Ensure all cables are securely connected.
- Drive Compatibility: Verify that the destination drive is formatted correctly for Mac OS.
2. Boot Issues After Cloning
If your Mac doesn’t boot from the new drive:
- Reset NVRAM:
On Apple Silicon Macs (M1, M2, M3, M4, M5)
You do not need to manually reset NVRAM. These Macs test the NVRAM during every startup. If the system detects an issue, it automatically resets it. You can simply shut down your Mac and turn it back on.
On Intel-based Macs
- ① Shut down your Mac.
- ② Locate the following keys: Option (⌥), Command (⌘), P, and R.
- ③ Turn on your Mac and immediately press and hold all four keys simultaneously.
- ④ Keep holding them for about 20 seconds.
- ⑤ Release the keys after you hear a second startup chime or see the Apple logo appear and disappear for the second time.
- Repair Disk: Use Disk Utility to repair the new drive if necessary.
- Apple Silicon Macs: If you want to boot an M1/M2/M3/M4/M5 Mac from an external clone, you may need to change the Startup Security Utility settings in Recovery Mode to "Allow booting from external media."
Conclusion
Cloning your Mac drive doesn't have to be stressful. With Tatasoft Disk Clone for Mac, the process becomes straightforward and efficient, allowing for a seamless transition to new storage. While built-in tools like Disk Utility and Migration Assistant offer free ways to copy a Mac hard drive, Tatasoft delivers a far more user-friendly experience for users of all skill levels, along with a notably higher success rate when creating bootable clones of Mac devices.
By following the steps outlined in this guide, you can confidently migrate your macOS or create a reliable backup. For MacBook Pro users, you can refer to How to Clone Your MacBook Pro Hard Drive. Don’t compromise on your data's safety—take control of your Mac's performance today. Start cloning your Mac OS drive to an external SSD and ensure a smooth, hassle-free experience!
Related Articles
- Jan 23, 2026How to Clone macOS 26 Tahoe to an External Hard Drive and Make it Bootable
- Jan 27, 2026The Effective Solution for Cloning NTFS Drives on Mac
- Feb 16, 2026A Step-by-Step Guide to Clone Your Mac Hard Drive Using Disk Utility
- Jan 21, 2026The Ultimate Guide to Clone Mac HDD to SSD
- Feb 06, 2026A Step-by-Step Guide on How to Clone Mac Hard Drive to USB Flash Drive
- Feb 20, 2026Top 5 Mac Disk Clone Software

A dedicated technical writer at Tatasoft with over four years of specialized expertise in computing technology. She crafts actionable, user-centric content for tech niches, specializing in disk cloning, data management, and video solutions for Windows and Mac.
Read full bio

This article has been approved by Ben Lee. Ben's dedication to excellence and his comprehensive knowledge of Windows and Mac technologies make him an essential part of any technical writing team. With a career marked by continuous learning and adaptation to new technologies, Ben remains at the forefront of the ever-evolving tech landscape.