Written byJanet BashorunUpdated on Jan 29, 2026
Brief introduction: Cloning your MacBook Pro hard drive effectively is essential for anyone looking to upgrade storage, create backups, or ensure data security. A true clone captures everything—the macOS, apps, and personal files—allowing for a seamless transition to a new drive or quick recovery in case of hardware failure. In this guide, we will explore the most reliable methods to clone a MacBook Pro hard drive, focusing on achieving a 100% bootable result using Tatasoft Disk Clone for Mac.
In this article
Benefits of Cloning Your MacBook Pro Hard Drive

1. Data Protection
Cloning creates an exact replica of your hard drive, safeguarding your important files against loss caused by hardware failure or accidental deletion. This is particularly crucial for professionals and students who rely on their MacBooks for critical tasks.
2. Simplified Upgrades
If you are looking to clone a Mac hard drive to an external SSD, cloning avoids the hassle of reinstalling macOS and all your applications. This saves both time and effort.
3. Quick Disaster Recovery
In the event of a system crash or other issues, a cloned drive allows you to restore your system to its previous state instantly, minimizing downtime.
Essential Tools for a Successful MacBook Clone
- Tatasoft Disk Clone for Mac: While Apple’s Disk Utility exists, it often fails to create bootable replicas on newer macOS versions. Tatasoft Disk Clone is specifically designed to create a bootable clone of Mac systems with high success rates.
- External SSD/HDD: Ensure the destination drive has enough capacity to hold all data from your original drive.
- Connection Cable: A high-speed USB-C, Thunderbolt, or USB 3.0 cable.
Step-by-Step Guide to Clone Your MacBook Pro Hard Drive
Method 1: Clone MacBook Pro Using Tatasoft Disk Clone (Recommended)
Step 1: Prepare for Cloning
- Backup: Always keep a secondary backup of critical files before performing disk operations.
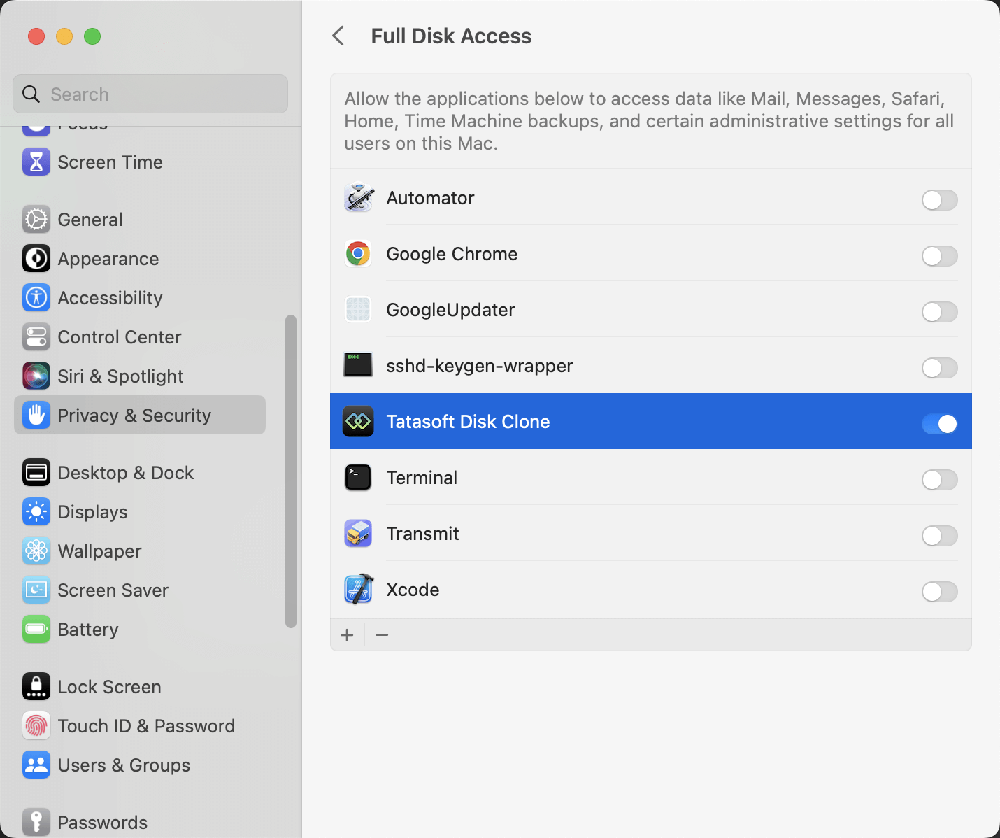
- Install Software: Download and install Tatasoft Disk Clone for Mac. Note: You may need to grant "Full Disk Access" in System Settings > Privacy & Security to allow the software to read your system drive.
Step 2: Connect your external SSD or HDD to your MacBook Pro.
Step 3: Configure the MacBook Pro Clone
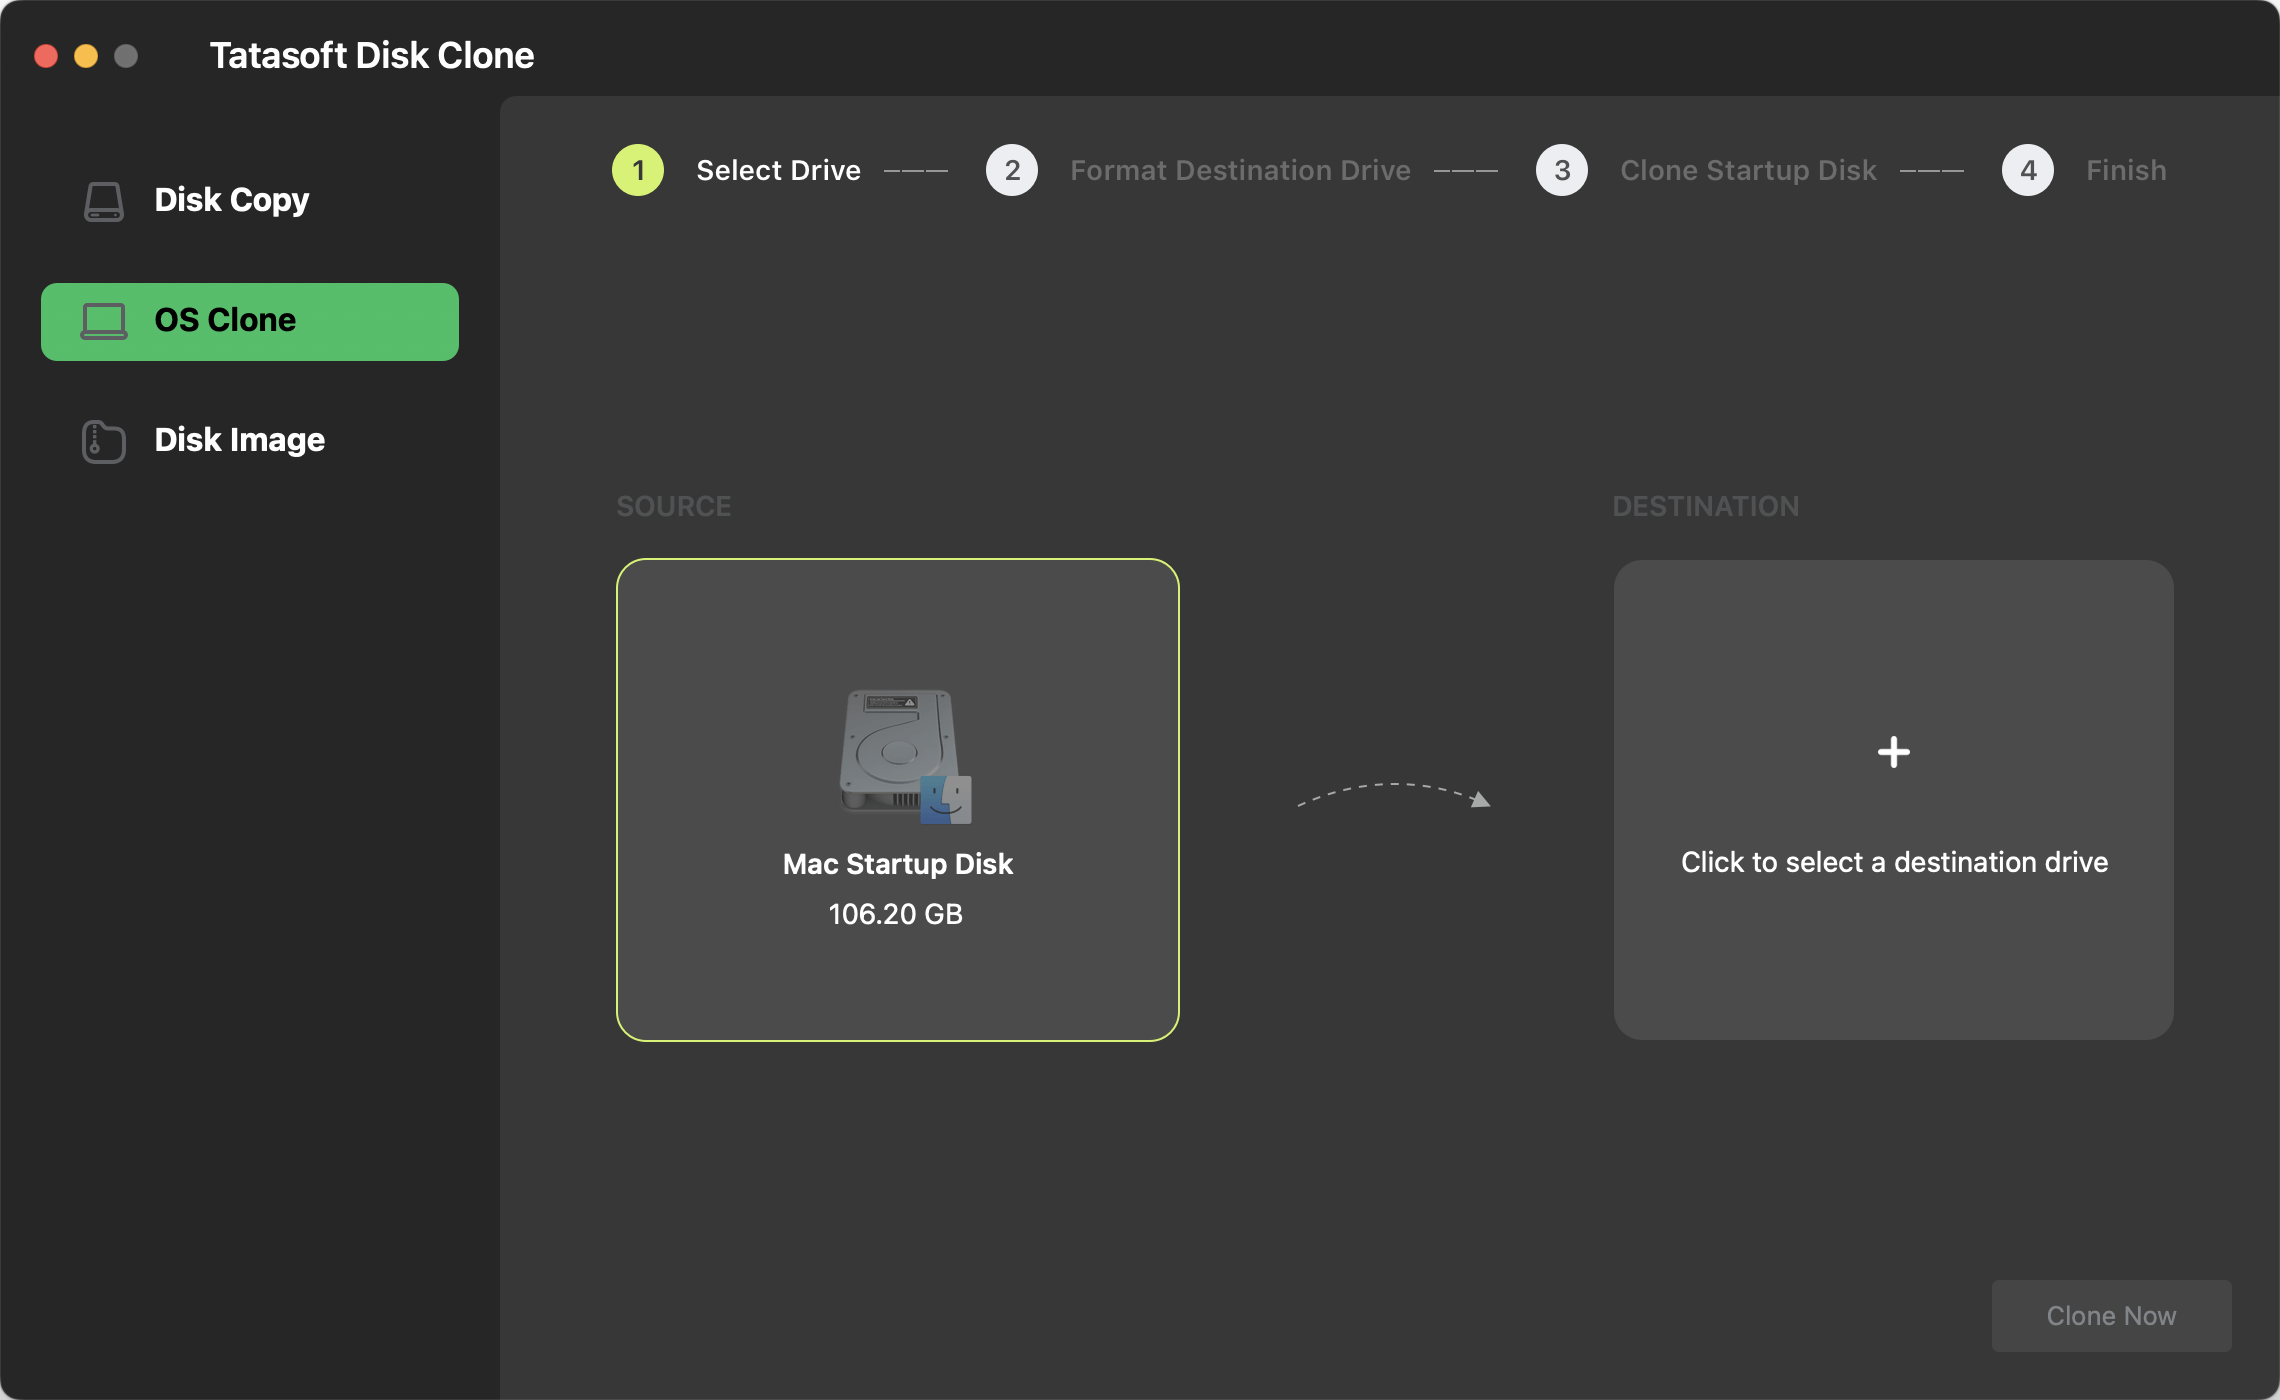
- Launch Tatasoft Disk Clone and select the "OS Clone" mode.
- Source: your MacBook Pro’s internal startup disk will be automatically selected.
- Destination: Select your connected external drive.
- Click Clone Now to continue.
Step 4: Start the Cloning Process
- Click "Clone Now" to confirm erasing the destination drive and start the process.
- Once complete, restart your MacBook and select the external drive to verify it boots into your desktop perfectly. This is the best way to clone macOS 26 Tahoe to an external hard drive or other modern macOS versions. To boot your MacBook Pro from a cloned external drive:
1. Apple Silicon MacBook Pro (M1, M2, M3, M4, M5)
Apple Silicon Macs use a "Startup Manager" that is accessed via the power button.
- Shut down the MacBook Pro.
- Press and hold the Power button until "Loading startup options" appears.
- Select your external drive and click Continue.
2. Intel MacBook Pro (2018–2020, with T2 Security Chip)
Note: These models require permission to boot from external drives.
Step 1: Enable External Booting
- Restart and hold Command (⌘) + R to enter Recovery Mode.
- Go to Utilities > Startup Security Utility.
- Select "Allow booting from external or removable media."
- Restart the Mac.
Step 2: Select the Drive
- Restart and hold the Option (⌥) key.
- Select your external drive icon and press Enter.
3. Intel MacBook Pro (2017 or older, without T2 Chip)
- Connect your cloned drive.
- Restart and immediately hold the Option (⌥) key.
- Select the external drive and press Enter.
Method 2: Using Disk Utility (Alternative)
Disk Utility is free and built-in but is generally less reliable for creating bootable system copies.
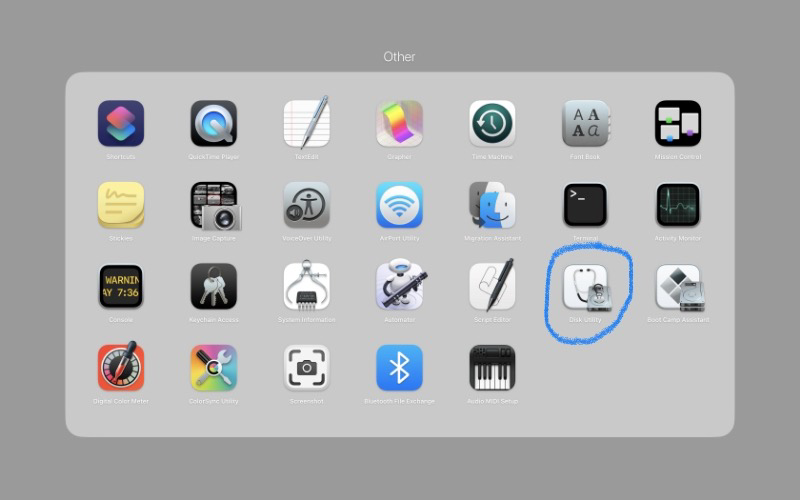
Step 1. Open Disk Utility: Found in Applications > Utilities.
Step 2. Select Destination: Choose the external drive in the sidebar and click the "Restore" button.
Step 3. Choose Source: In the "Restore from" dropdown, select your internal hard drive.
Step 4. Execute: Click "Restore". Warning: This erases all data on the destination drive.
Troubleshooting Boot Issues
If your MacBook Pro won't boot from the cloned drive:
- Check Startup Security: For Macs with T2 or Apple Silicon chips, you may need to enable "Allow booting from external media" in macOS Recovery.
- Reset NVRAM/PRAM: Restart and hold Command + Option + P + R.
- Set Startup Disk: Go to System Settings > General > Startup Disk to officially designate the new drive.
- When booting your cloned macOS from an external drive for the first time using Tatasoft Disk Clone, please log in and allow the system to stabilize for 20 to 30 minutes before active use.
Conclusion
Cloning your MacBook Pro hard drive is essential for protecting your data and ensuring smooth upgrades. It doesn't have to be a gamble. While basic tools like Disk Utility exist, they often struggle with the complex security protocols of modern Mac systems. Choosing a professional mac disk clone software like Tatasoft Disk Clone for Mac ensures a 100% bootable result by creating an exact, bit-for-bit replica of your entire environment.
Tatasoft stands out for its superior compatibility, working seamlessly across different MacBook Pro generations—from older Intel-based models to the latest Apple Silicon (M1 – M5) chips. Don't wait for a hardware failure or data loss to catch you off guard. Download Tatasoft Disk Clone today and follow our comprehensive guide to secure your data and enhance your productivity.
Related Articles
- Feb 18, 2026How to Create a Bootable Backup of macOS Sequoia in 3 Ways?
- Jan 21, 2026The Ultimate Guide to Clone Mac HDD to SSD
- Mar 04, 2026How to Clone macOS to SSD for Ultimate Performance
- Feb 25, 2026How to Create a Bootable Clone of Your Mac
- Feb 16, 2026A Step-by-Step Guide to Clone Your Mac Hard Drive Using Disk Utility
- Feb 26, 2026How to Clone macOS 26 Tahoe to an External Hard Drive and Make it Bootable

A dedicated technical writer at Tatasoft with over four years of specialized expertise in computing technology. She crafts actionable, user-centric content for tech niches, specializing in disk cloning, data management, and video solutions for Windows and Mac.
Read full bio

This article has been approved by Ben Lee. Ben's dedication to excellence and his comprehensive knowledge of Windows and Mac technologies make him an essential part of any technical writing team. With a career marked by continuous learning and adaptation to new technologies, Ben remains at the forefront of the ever-evolving tech landscape.