Written byJanet BashorunUpdated on Feb 18, 2026
How to Create a Bootable Backup of macOS Sequoia in 3 Ways?
Approved byBen Lee
Brief introduction: Creating a bootable backup of macOS Sequoia is a proactive step to protect your data. A bootable backup not only protects your files but also allows for quick macOS restoration if needed. Follow this guide to learn how to use both Tatasoft Disk Clone for Mac and the free built-in Disk Utility tool, ensuring your macOS Sequoia remains secure and accessible.
In this article
Understanding Bootable Backups of macOS
A bootable backup of macOS Sequoia is a complete copy of your macOS startup disk that can be used to start your Mac without relying on the internal hard drive. This feature is especially helpful for users who want a fast recovery option if the original fails. Unlike regular backups, a bootable backup of Mac includes:
- The macOS Sequoia system and all system files
- Your installed applications and settings
- Personal files and user data
- The ability to boot directly from the backup drive
This type of backup is crucial for system recovery after catastrophic failures, malware infections, or when upgrading hardware. For macOS 26 Tahoe users, you can refer to our detailed guide at Clone macOS 26 Tahoe to an External Hard Drive.
Benefits of making a Bootable Backup of macOS 15:
- Rapid Recovery: In the event of a system failure, you can boot from your backup and resume work immediately.
- Ease of Use: Bootable backups are simple to create and manage, allowing for straightforward restoration.
- Data Security: backups help protect against data loss due to corruption or malware.
Preparing for Cloning macOS Sequoia
1. Required Tools
Before you start the backup process, gather the following:
- macOS 15 Sequoia installed (version 15.1 or later recommended for best results)
- An external hard drive or SSD (at least equal to your Mac's storage).
- Tatasoft Disk Clone for Mac installed on your Mac (or use built-in macOS Disk Utility tools).
- A reliable internet connection to download any necessary updates.
2. Initial Setup
- Connect Your External Drive: Ensure it’s properly connected and recognized by your Mac.
- Optimize your macOS 15 Sequoia system by removing unnecessary files and applications before cloning.
Step-by-Step Process to Create a Sequoia Bootable Backup
Method 1: Using Tatasoft Disk Clone for Mac to clone your macOS 15
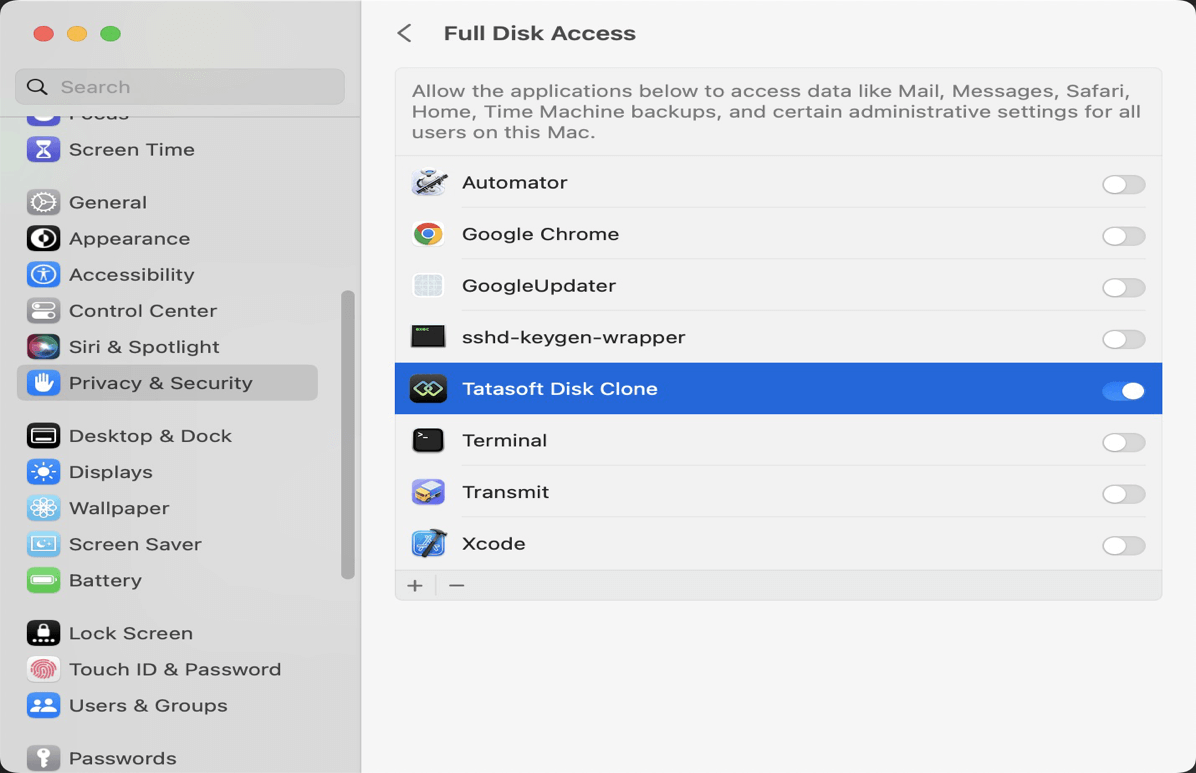
Step 1: Launch Tatasoft Disk Clone for Mac and grant necessary permissions
- When running the app for the first time, follow the instructions to grant Full Disk Access in Privacy & Security.
Step 2: Choose Your Destination
- Switch to OS Clone: The startup disk for macOS 15 Sequoia will be set to the source disk by default.
- Select Destination Disk: Click + to select your external drive as the destination. Please backup your important data on the destination disk before cloning as it will be formatted.
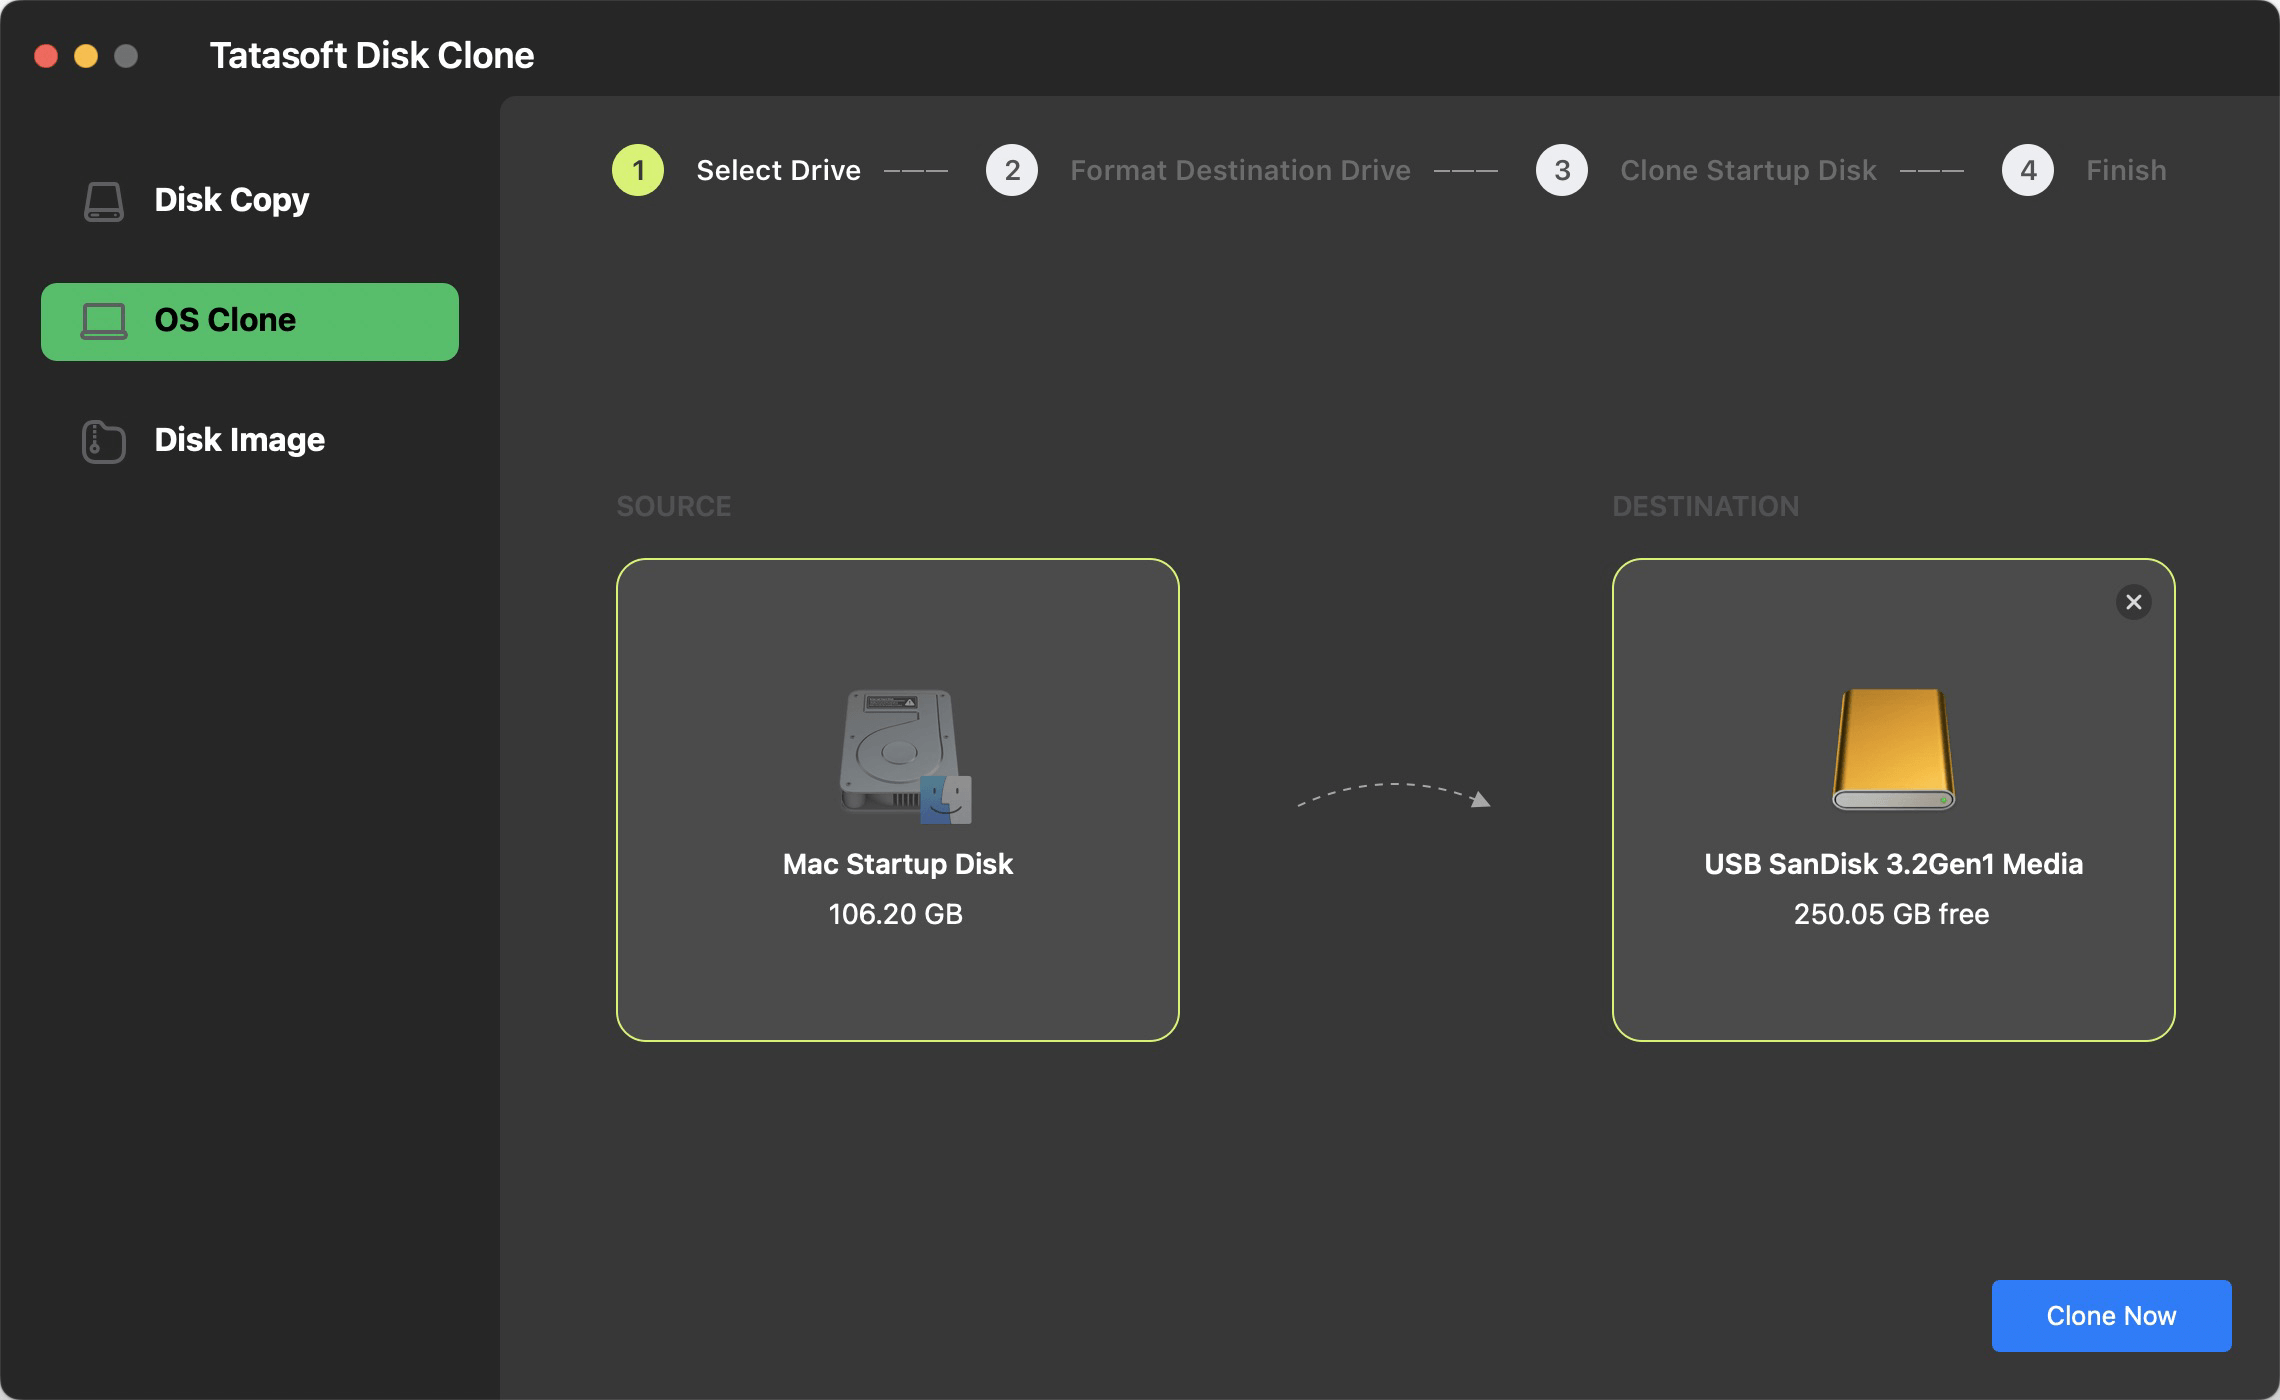
Step 3: Start the maOS 15 Cloning Process
- Begin Cloning: Click the ‘Clone Now’ button to initiate the process.
- Confirm Format: Click ‘Clone Now’ on the pop-up to start erase your destination drive.
- Monitor Progress: This may take some time, depending on the size of your data. Keep an eye on the progress bar to ensure everything is functioning correctly.

Once Tatasoft indicates that the process is complete, you can disconnect your external drive. You can also test booting from the cloned drive: Restart your Mac while holding the `Option` key. Select the external drive to confirm that it boots successfully.
Tips: When you boot the cloned macOS 15 from external hard drive for the first time, log in to the system and wait about 20 to 30 minutes before using it.
Method 2: Using Free Built-in macOS Tool - Disk Utility
Here’s a detailed guide on how to clone your hard drive using Disk Utility effectively on macOS Sequoia:
Step 1: Connect Your External Drive
Plug in your external hard drive to your Mac. Ensure it is recognized by Disk Utility.
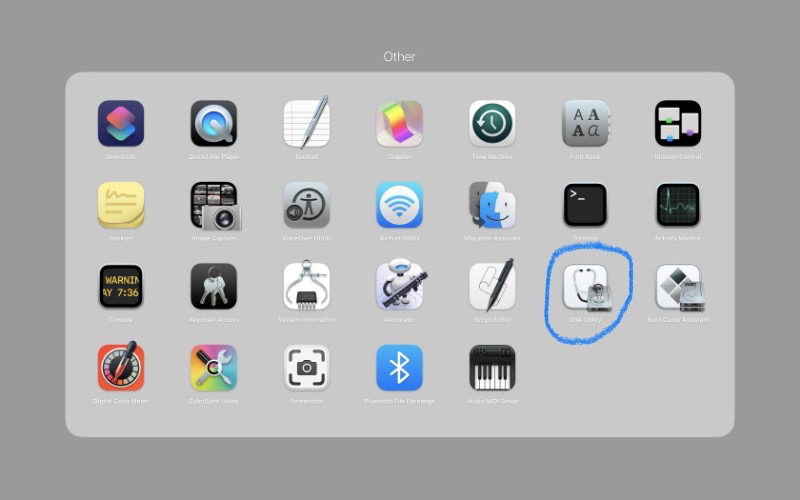
Step 2: Access Disk Utility
Open Finder and navigate to Applications > Utilities > Disk Utility.
Step 3:Select the Source Drive
In Disk Utility, locate your Mac hard drive in the left sidebar and select it (This is the drive you want to clone).
Step 4:Choose the Restore Option
Click the Restore button at the top of Disk Utility or click on the Edit > Restore.
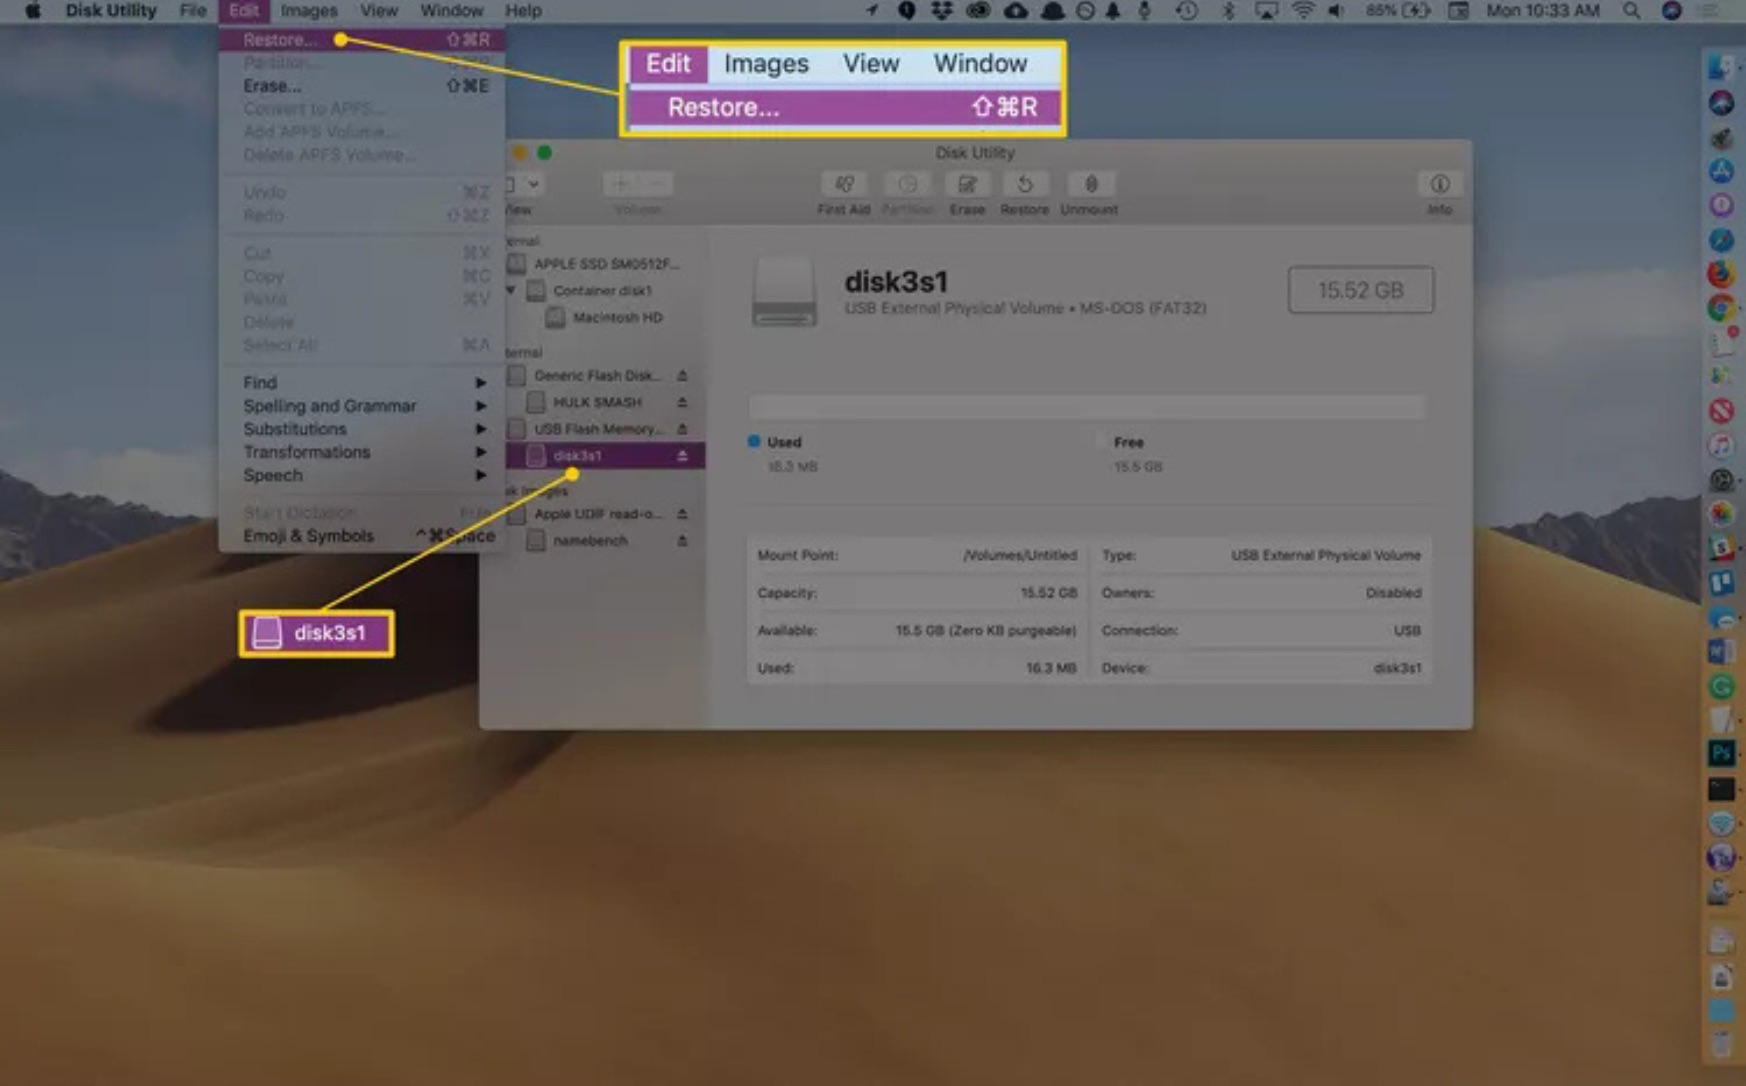
Step 5: Choose the Source and Destination Drive
A dialog will appear with two fields:
- Source: Select your Mac's internal drive (or another source drive if needed).
- Destination: Select your external drive volume (target drive).
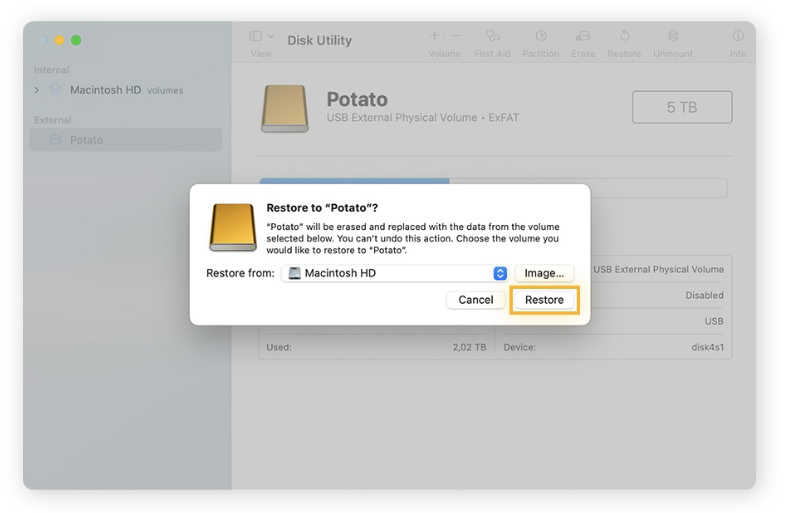
Step 6: Initiate the Cloning Process
- Double-check the selections, as this process will overwrite the destination drive.
- Click Restore and enter your administrator password if prompted.
- Wait for the cloning process to complete.
Step 7: Monitor Hard Drive Cloning Progress
Disk Utility will display a progress bar. The duration of this process will depend on the size of your data.
After the cloning process is complete, safely eject your external hard drive by right-clicking on its icon in Finder and selecting Eject.
Method 3: Use Terminal to Clone the macOS 15 Sequoia
- Open Terminal: Find it in Applications > Utilities.
- Use the `asr` Command:
- Enter the following command:
sudo asr -source /Volumes/YourSourceDrive -target /Volumes/YourTargetDrive --erase
- Replace `YourSourceDrive` with the name of your internal drive and `YourTargetDrive` with the name of your external drive.
- Authenticate: Enter your administrator password when prompted.
- Wait for Completion: The cloning process may take some time.
After cloning, verify the bootable backup by changing to boot your Mac from the external hard drive.
Expert Insight:
According to user feedback, cloning a macOS 15 Sequoia using Disk Utility or Terminal often fails to boot from the external drive. It's recommended to use professional cloning software like TataSoft, which includes post-cloning boot repair to ensure proper startup.
Troubleshooting Common Issues
1. Drive Not Recognized
If your external drive isn’t showing up, ensure that it’s correctly formatted and connected. You may also need to restart Tatasoft or your Mac.
2. Cloning Errors
If you encounter s during the cloning process, ensure you have enough space on the destination drive and that no other applications are interfering.
Conclusion
Creating a bootable backup of macOS Sequoia is a straightforward process using reliable Mac disk cloning software like Tatasoft Disk Clone, free built-in Disk Utility tool or Terminal. By following this guide, you can ensure that your macOS 15 Sequoia is protected against data loss and system failures, providing peace of mind and quick recovery options when needed in an increasingly digital world.
Related Articles
- Feb 23, 20263 Methods to Clone a Mac OS Drive
- Feb 27, 2026The Effective Solution for Cloning NTFS Drives on Mac
- Feb 16, 2026A Step-by-Step Guide to Clone Your Mac Hard Drive Using Disk Utility
- Feb 20, 2026Top 5 Mac Disk Clone Software
- Mar 04, 2026How to Clone macOS to SSD for Ultimate Performance
- Jan 21, 2026The Ultimate Guide to Clone Mac HDD to SSD

A dedicated technical writer at Tatasoft with over four years of specialized expertise in computing technology. She crafts actionable, user-centric content for tech niches, specializing in disk cloning, data management, and video solutions for Windows and Mac.
Read full bio

This article has been approved by Ben Lee. Ben's dedication to excellence and his comprehensive knowledge of Windows and Mac technologies make him an essential part of any technical writing team. With a career marked by continuous learning and adaptation to new technologies, Ben remains at the forefront of the ever-evolving tech landscape.