Written byJanet BashorunUpdated on Feb 25, 2026
Brief introduction: To give your Mac a second life, cloning your macOS to an SSD is the most impactful upgrade you can perform. Whether you're tired of the "spinning beachball" on an old HDD or need a high-speed external boot drive, this guide provides a roadmap to a faster, more responsive system. I’ll share my personal experience using Tatasoft Disk Clone and native tool – Disk Utility to ensure a seamless macOS transition without losing a single file.
In this article
Why I Finally Switched: Benefits of Cloning macOS to SSD
We’ve all been there: the dreaded "spinning beachball" appearing while trying to open a simple PDF. After years of frustration with my sluggish internal drive, I finally decided to create a bootable clone of my Mac on a high-speed external SSD. The difference wasn't just noticeable—it was transformative.
Traditional hard drives (HDDs) rely on moving parts that slow down over time, but SSDs use flash memory to boot your Mac in seconds and load applications almost instantaneously. Beyond the raw speed and improved system responsiveness, I wanted the reliability and durability that only an SSD provides, as they are far less prone to mechanical failures. This switch allowed me to unlock significant performance enhancements and gain a larger storage capacity in a much smaller physical footprint. In this guide, I’ll share the exact steps I used to clone a Mac HDD to SSD, focusing on a "set it and forget it" software approach and a manual recovery method.
Preparing Your Mac for Cloning
- Backup Your Data: Use Time Machine or another solution to secure your files on the destination SSD-before starting.
- Selecting the Right SSD: Choose a compatible SSD from brands like Samsung or Crucial, considering speed and warranty. macOS works best with NVMe drives for APFS, though SATA SSDs are also compatible.
- Clean House: A leaner source drive makes for a faster cloning process.
Step-by-Step Process to Clone macOS to SSD
Method 1: Using Tatasoft Disk Clone for Mac for a seamless macOS migration
If you value your time, using a dedicated Mac disk clone software is the way to go. I used Tatasoft Disk Clone for Mac because its user-friendly interface makes it suitable for all skill levels, and it efficiently copies all necessary files and system data.
Step 1: Connect your SSD
Use a USB or Thunderbolt cable to connect the drive.
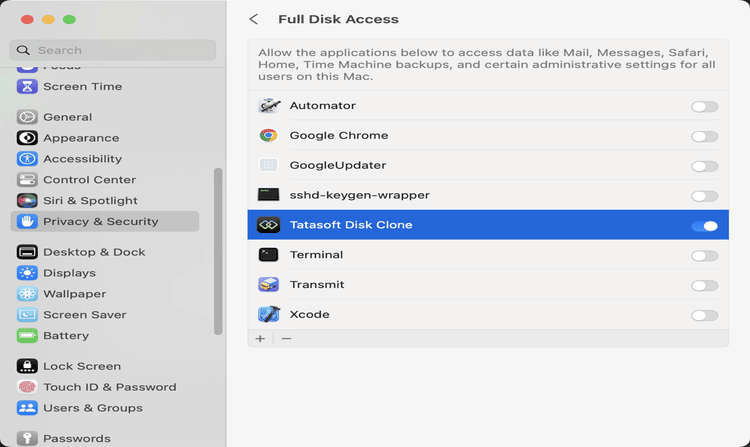
Step 2: Launch & Permissions
Open Tatasoft Disk Clone for Mac. On your first launch, you must go to System Settings > Privacy & Security > Full Disk Access and toggle the switch for Tatasoft. Without this, macOS security prevents the software from reading the system files needed for cloning.
Step 3: Select Destination Drive
Switch to OS Clone and simply select your external SSD as the destination. Your internal Mac system drive is selected as the source by default, so you don't have to worry about picking the wrong volume.
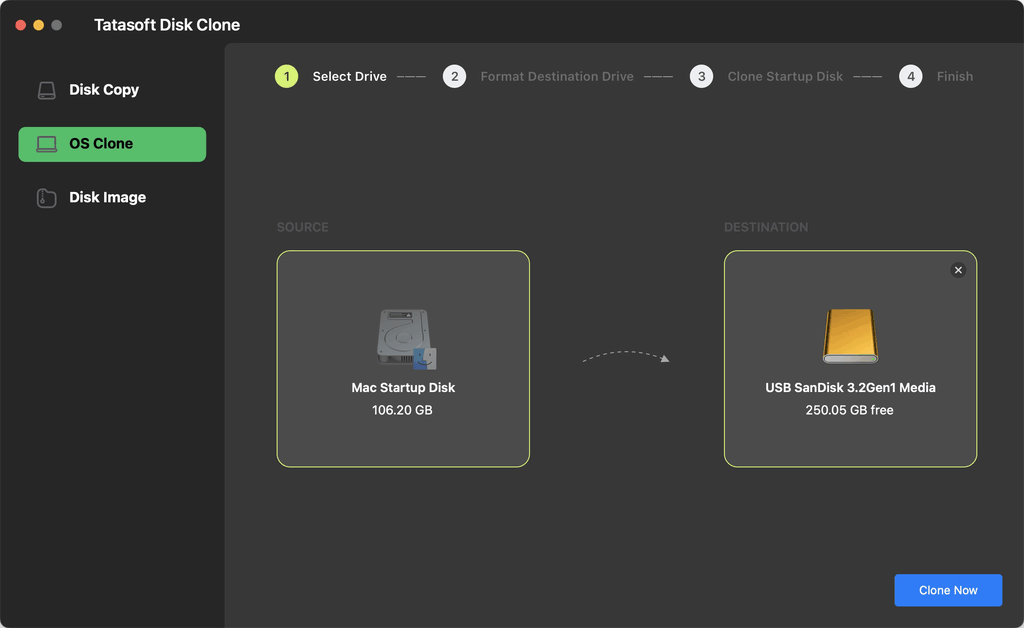
Step 4: Start cloning
Click "Clone Now". The software will format the target drive and efficiently copy all necessary files, applications, and system data from your macOS drive to the SSD. This process may take some time, depending on the amount of data being transferred.
Pros
- Highly automated
- superior boot success rate compared to other methods
- intelligently selects the source drive
- creates an exact 1:1 bootable copy
Cons
- Requires a one-time permission setup in macOS settings
Best Usage Scenarios
- Users who want a guaranteed bootable result without troubleshooting "disk not found" errors.
- Professionals who need to clone a Mac hard drive quickly and reliably for work.
Method 2: Using Free Disk Utility
If you prefer built-in tools, you can use Disk Utility. This is a solid way to create a bootable backup of macOS without third-party help, though it is less intuitive.
Step 1: Boot into Recovery Mode
- For Intel Macs: Restart and immediately hold Command (⌘) + R until the Apple logo appears.
- For Apple Silicon (M1/M2/M3/ M4/M5): Shut down, then press and hold the Power button until "Loading startup options" appears. Select Options and click Continue.
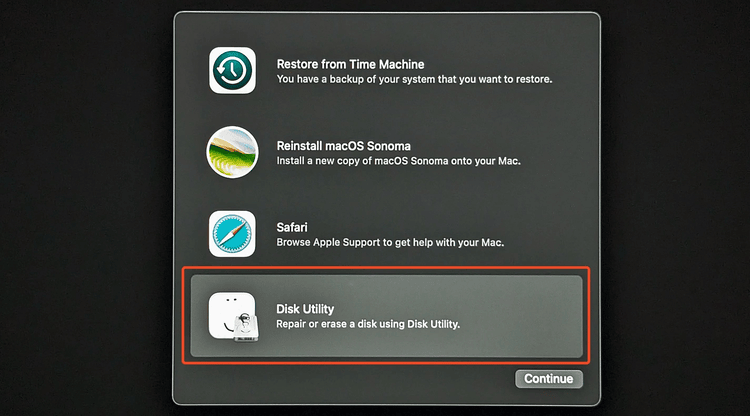
Step 2: Use Disk Utility
Once in Recovery Mode, select "Disk Utility" from the macOS Utilities window.
Step 3: Initiate the "Restore" (cloning) process
- Select your newly formatted SSD volume in the sidebar.
- Click the Restore button at the top of the Disk Utility window.
- In the "Restore from" drop-down menu, select your internal Mac startup disk (usually named Macintosh HD).
- Click Restore to begin the process.
Step 4: Completion & Verification:
Once the process finishes, click Done. Restart your Mac and hold the Option key to see if the drive appears as a bootable volume.
Booting from Your New SSD
Pros
- Uses official Apple utilities
- completely free
- no third-party installation required
Cons
- Significantly lower boot success rate compared to Tatasoft. It often triggers "Destination busy" errors or fails to bless the boot volume, meaning the drive might not show up in the startup menu after cloning. It is also much slower as it lacks optimized data stream technology.
Best Usage Scenarios
- Users who are comfortable navigating the macOS Recovery environment.
- Minimalists who only want to use native Apple software.
Why I Recommend Method 1 Over Method 2
While Disk Utility is "built-in," I’ve found that modern macOS security (SSV - Signed System Volume) makes manual restoration very finicky. Tatasoft Disk Clone provides a much higher boot success rate because it specifically handles the "sealing" of the system volume, ensuring your Mac recognizes the SSD as a trusted boot device on the first try. Whether you need to clone a MacBook Pro hard drive or clone macOS 26 Tahoe, the dedicated software route is simply more reliable.
Successful Transition: Booting Your Mac from the New SSD
Your Mac won't automatically know you want to use the new drive.
- Restart your Mac and hold the Option key (or keep holding the Power button on M1/M2/M3/M4/M5 Macs).
- Select the new SSD icon from the boot menu.
- Once it loads, go to System Settings > General > Startup Disk and set the SSD as the default (optional).
Expert Advice: Post-Cloning Tips from My Experience
- The "Burn-In" Period: When you first boot, Spotlight will re-index your files. It might feel a bit warm or slow for 15 minutes—this is normal.
- Repurpose the Old Drive: Once the SSD is stable, format your old internal HDD. It makes a great secondary storage space, or you can even clone a Mac hard drive to a USB flash drive for emergency backups.
- Future Updates: This process is identical if you need to clone macOS to an external hard drive in the future.
Conclusion
Cloning your macOS to an SSD isn't just about speed; it's about peace of mind. Having a 1:1 bootable copy means you are always prepared for hardware failure. While manual methods are available, Tatasoft Disk Clone offers a significantly higher boot success rate, ensuring your Mac starts up perfectly on the first try. I highly recommend downloading Tatasoft Disk Clone today to experience the speed of SSD performance for yourself!
Related Articles
- Jan 21, 2026The Ultimate Guide to Clone Mac HDD to SSD
- Feb 06, 2026A Step-by-Step Guide on How to Clone Mac Hard Drive to USB Flash Drive
- Feb 20, 2026Top 5 Mac Disk Clone Software
- Feb 13, 2026Easily Clone Your Mac Hard Drive to an External SSD
- Feb 20, 20264 Methods to Clone an External Hard Drive to Another on Mac
- Jan 27, 2026The Effective Solution for Cloning NTFS Drives on Mac

A dedicated technical writer at Tatasoft with over four years of specialized expertise in computing technology. She crafts actionable, user-centric content for tech niches, specializing in disk cloning, data management, and video solutions for Windows and Mac.
Read full bio

This article has been approved by Ben Lee. Ben's dedication to excellence and his comprehensive knowledge of Windows and Mac technologies make him an essential part of any technical writing team. With a career marked by continuous learning and adaptation to new technologies, Ben remains at the forefront of the ever-evolving tech landscape.