Written byJanet BashorunUpdated on Feb 13, 2026
Brief introduction: Cloning your Mac hard drive to an external SSD is essential for a bootable backup, securing data, and facilitating system upgrades. Whether you're migrating to a new SSD, creating a backup, or simply seeking faster storage solutions, cloning lets you transfer everything - macOS, applications, and files - to a more efficient drive. This guide walks you through the steps to clone your Mac using Tatasoft Disk Clone for Mac and free Disk Utility for a seamless experience.
In this article
Why Clone Your Mac Hard Drive to an External SSD?
Clone your Mac hard drive to an external SSD is the easiest way to create a bootable backup, keep your data safe, and upgrade your system without hassle.
- Performance Improvement
SSDs are significantly faster than traditional HDDs. By cloning your Mac hard drive to an external SSD, you'll experience quicker boot times, faster application launches, and overall improved system responsiveness.
- Bootable Backup of your macOS system
A cloned SSD can serve as a bootable backup, allowing you to start your Mac from the external drive if your internal drive fails.
- Data Security
Cloning macOS disk creates a complete backup of your system. In the event of hardware failure, accidental deletion, or corruption, having a cloned drive ensures that your Mac data is safe and can be easily restored.
- Easy System Migration
Unlike reinstalling macOS and applications, cloning hard drive preserves all data, settings, and configurations for instant usability on the new drive
- Space Management
Cloning helps manage disk space effectively by transferring only necessary files and applications to your new SSD.
Preparing for Cloning a Mac Hard Drive
Before you begin the Mac hard drive cloning process, it’s important to prepare adequately. Here are some related subtopics to consider:
- Assessing Your Current Mac Hard Drive
- Check Disk Health: Use Disk Utility to verify the health of your current hard drive. Look for issues such as bad sectors or corruption.
- Free Up Space: Delete unnecessary files or applications to streamline the cloning process and reduce transfer time.
- Choosing the Right SSD
- Storage Capacity: Ensure the external SSD has enough space to accommodate your data. Consider future needs as well.
- Speed Ratings: Look for SSDs with high read/write speeds to maximize performance benefits.
- Compatibility: Confirm that the SSD is compatible with macOS, including support for APFS.
- Backup Important Data on destination SSD
- Create a Time Machine Backup: Before proceeding, create a Time Machine backup of your important files especially on the target SSD (which will be erased during cloning) to safeguard against data loss during the cloning process.
2 Methods to Clone Your Mac Hard Drive to an External SSD
Method 1: Clone Mac Hard Drive Using Tatasoft Disk Clone for Mac
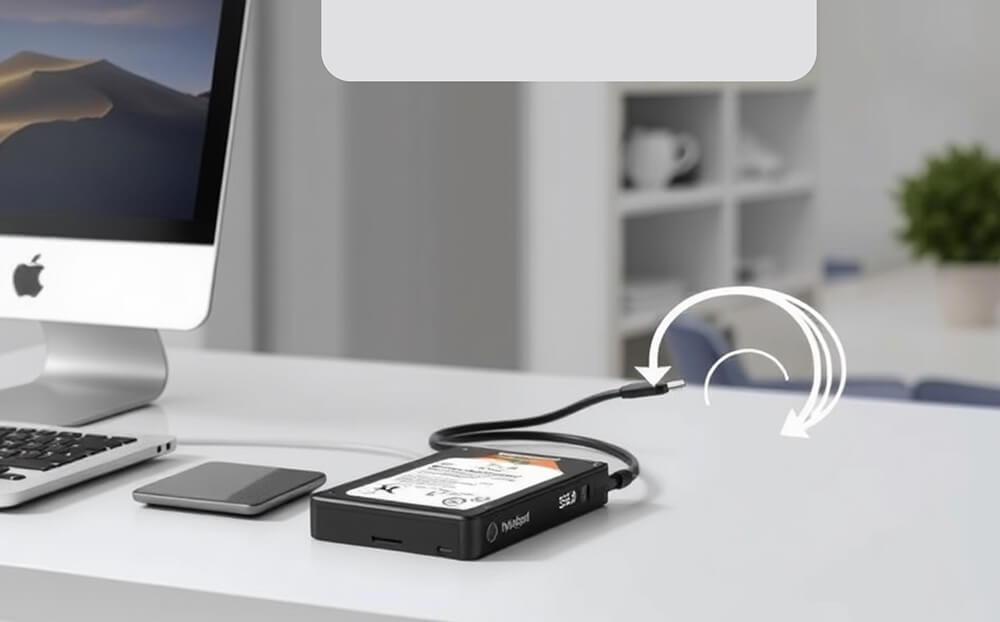
Step 1: Connect Your External SSD to Mac computer
Step 2: Download and Install Tatasoft Disk Clone for Mac
- Download Tatasoft Disk Clone for Mac
- Install the software by following the on-screen instructions:
- Open the downloaded file.
- Drag the Tatasoft icon to your Applications folder.
- Launch the application once installation is complete.
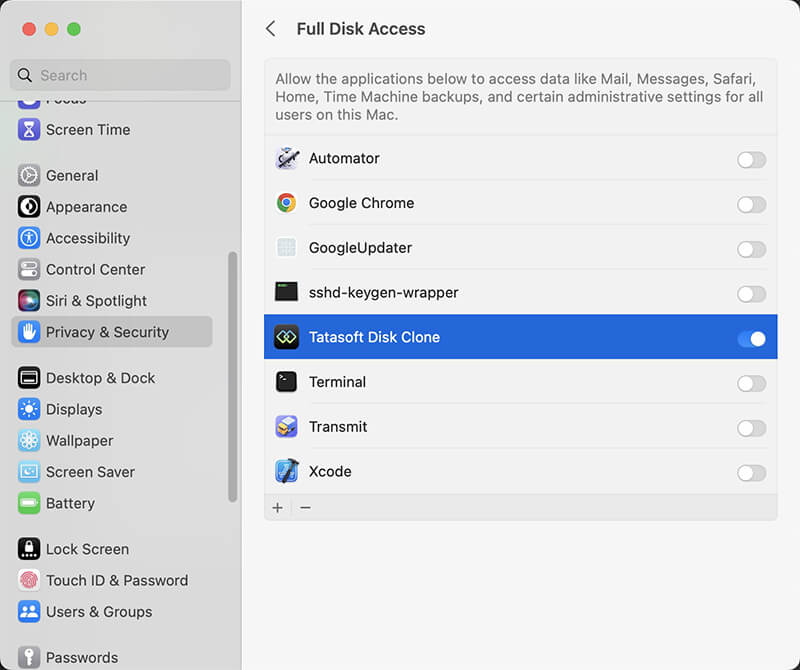
Step 3: Launch Tatasoft Disk Clone
When you first run Tatasoft Disk Clone, please enable full disk access permissions for this software in Privacy & Security.
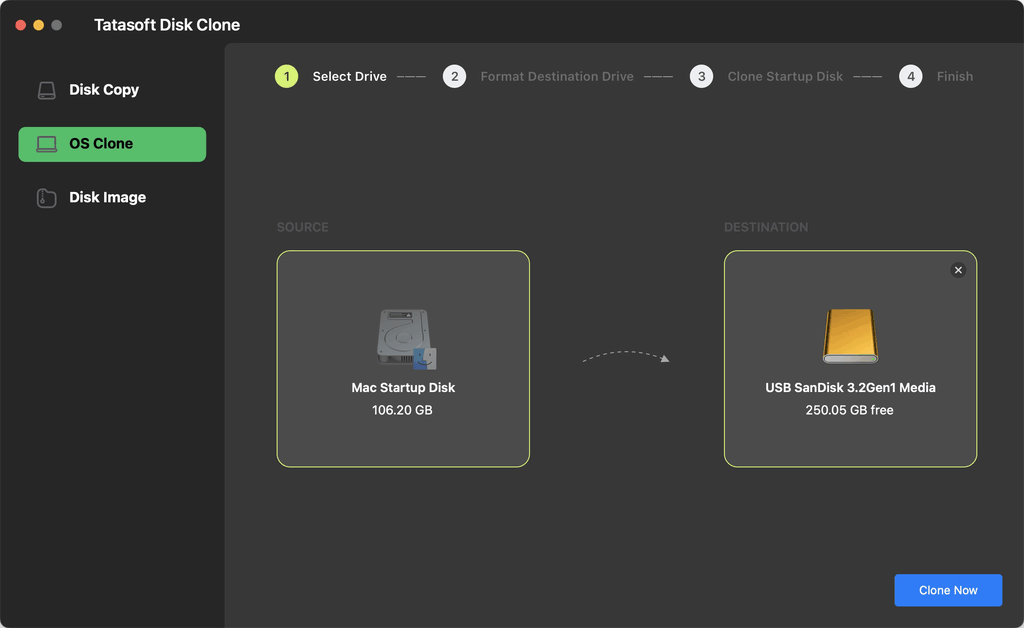
Step 4: Select Source and Destination Drive
- Switch to OS Clone. Your internal Mac startup hard dive that you want to clone will be selected as the source by default.
- Choose your prepared external SSD as the destination for the clone. Make sure it’s the correct drive to avoid accidental data loss.
- Click Clone Now to proceed.
![Select SSD to start cloning Mac hard drive]()
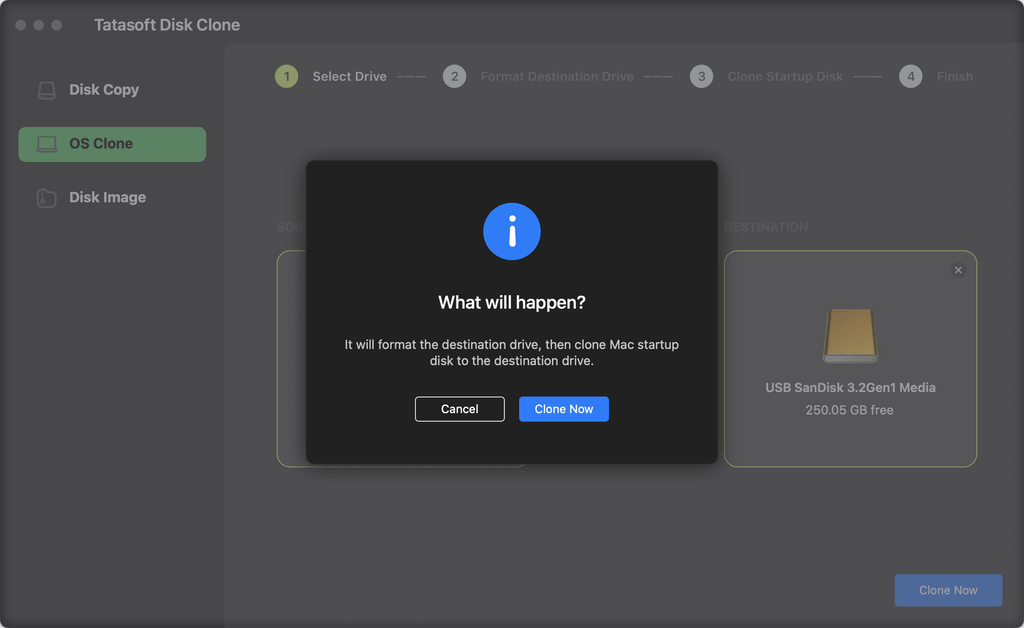
Step 5: Start the Hard Drive Cloning Process
- Click on the Clone Now button to begin the cloning process. The software will format the external SSD and copy all data from your Mac hard drive to the external SSD. This may take some time, depending on the amount of data being transferred.
- Monitor the cloning progress. Observe the progress indicator in Tatasoft. It will show you the percentage of the cloning process completed, allowing you to track the progress.
Once the cloning process is complete, check the destination SSD that all data has been copied accurately. This step is crucial to confirm that your clone is an exact replica of the original hard drive.
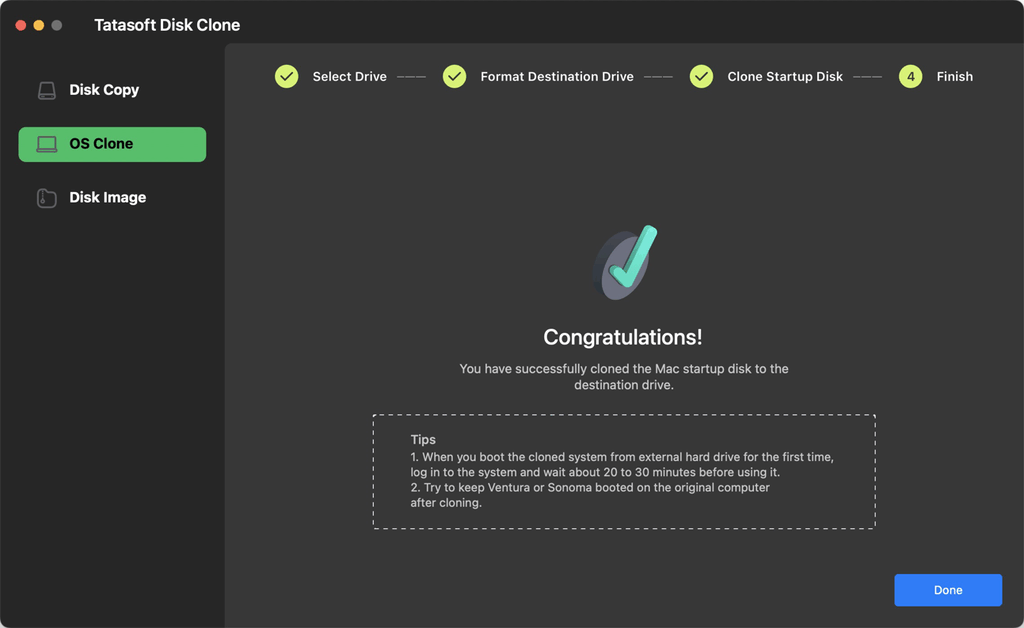
Use Your Cloned SSD After Cloning
After successfully cloning your hard drive, you can use the external SSD as a bootable drive or for additional storage. To set it as the startup disk:
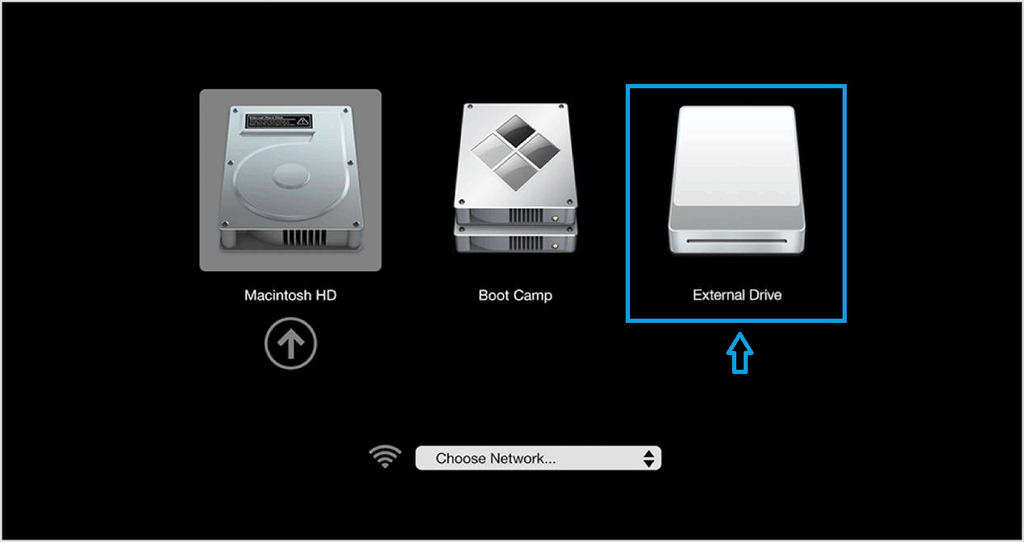
Intel-based Macs:
- Restart your Mac and hold Option (⌥) during startup.
- Select the SSD from the list and press Enter to boot.
![Select external SSD to boot]()
Apple Silicon Macs
- Restart your Mac and hold the Power button until Loading startup options appears.
- Select the SSD from the boot options screen.
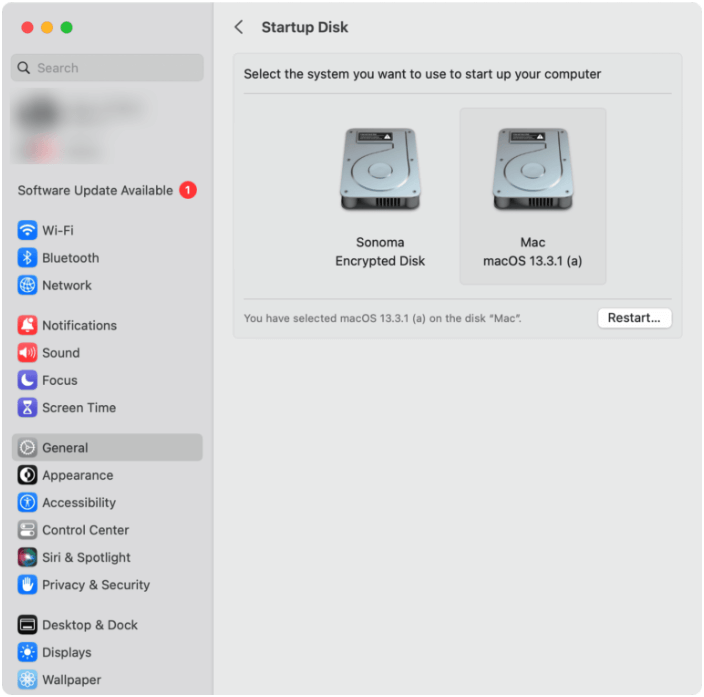
Alternatively, to set the external SSD as default, go to choose Apple menu > System Settings > General > Startup Disk, choose the SSD, and click Restart.
Method 2: Clone Mac Hard Drive for Free Using Apple’s Disk Utility
Apple’s Disk Utility is a built-in tool that allows you to clone your Mac hard drive to an external SSD for free. Follow these detailed steps:
Step 1: Connect Your External SSD
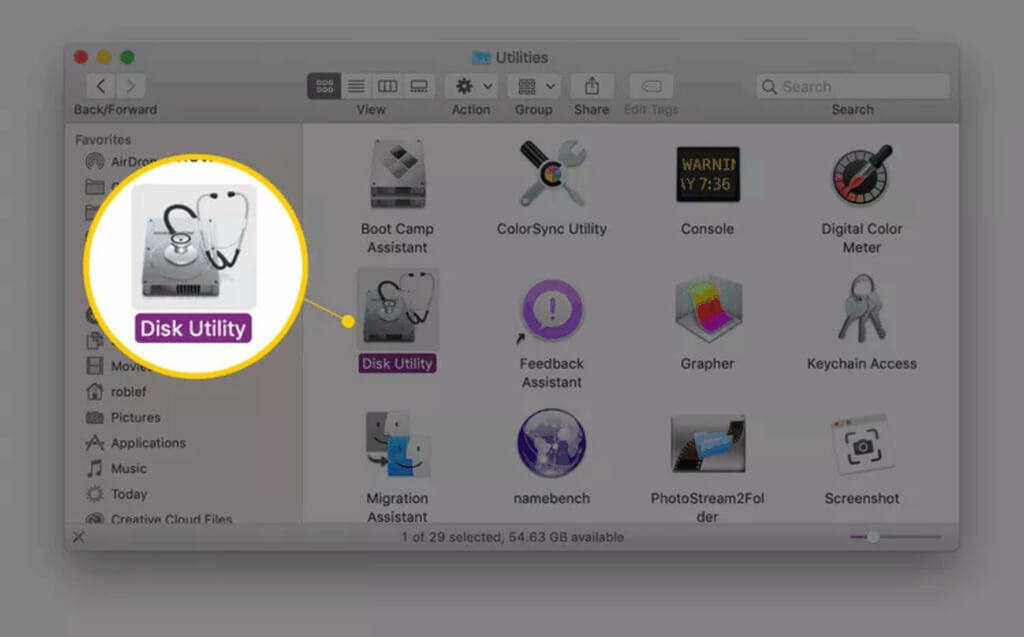
Step 2: Launch Disk Utility
Open Disk Utility again (if closed) from Applications > Utilities > Disk Utility.
Step 3: Select the Hard Drives to Clone
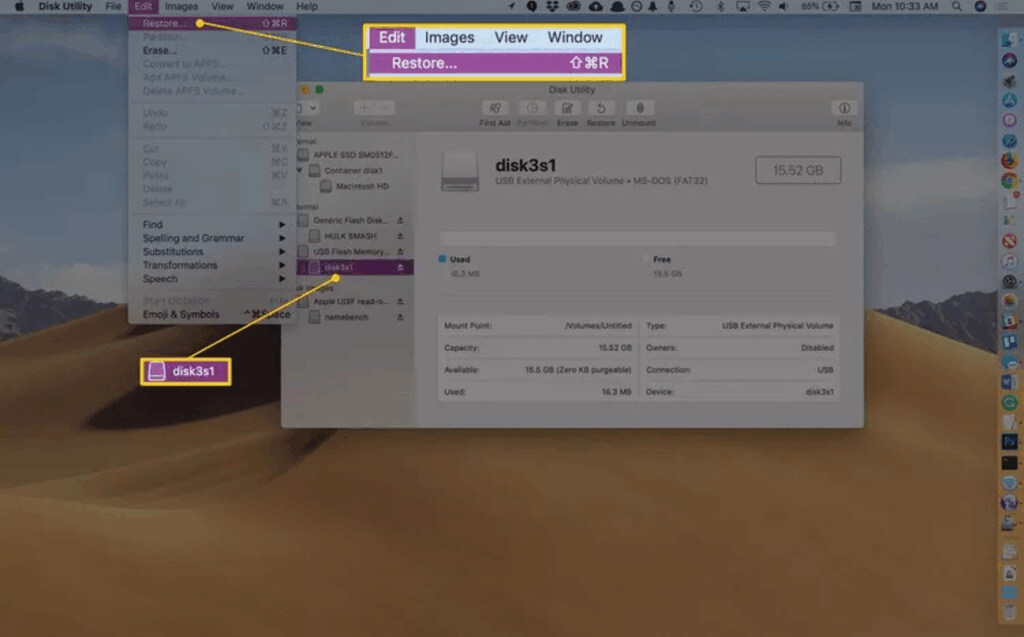
- Click on your internal hard drive (usually labeled "Macintosh HD").
- Select the Restore tab at the top or click Edit in the top-left menu > Restore.
- Drag your internal drive to the Source field.
- Drag your external SSD to the Destination field.
![Select Restore to clone Mac hard drive]()
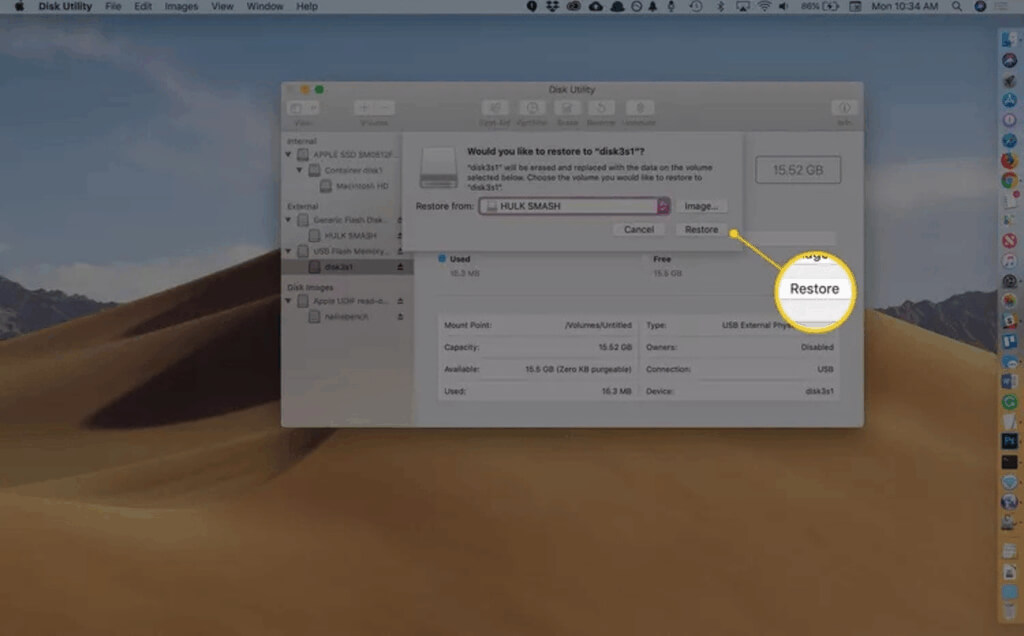
Step 4: Start the Hard Drive Cloning Process
After confirming that both fields are correctly set, click Restore to begin cloning the Mac hard drive.
Step 5. Wait for the Cloning Process to Complete
- Disk Utility will start copying data from your internal hard drive to the external SSD. This may take some time, depending on the amount of data being transferred.
- You can monitor the progress through the progress bar displayed in Disk Utility.
Step 6. Completion Notification
Once the cloning process is complete, Disk Utility will notify you. You can now close the application.
Step 7. Verify the Clone (Optional)
After cloning with Disk Utility, it’s good practice to check that the files were copied correctly. You can do this by opening the external SSD in Finder and checking for your files.
Best Practices for Cloning Mac Hard Drive
- Back Up Important Data: Always back up critical files before starting the cloning process to avoid data loss. Cloning will format the target external SSD (data will be erased). Use Time Machine or another backup solution.
- Check SSD Compatibility: Ensure that your external SSD is compatible with macOS and has sufficient storage capacity for your needs.
- Use a Reliable Power Source: Keep your Mac plugged into power during the cloning process to prevent interruptions, which could corrupt the cloning process.
- Check hard drive's health: Check your internal hard drive's health with Disk Utility before cloning. Look for any errors that might affect Disk Utility’s cloning success rate. Tatasoft Disk Clone for Mac, however, remains unaffected.
Troubleshooting Common Issues for Cloning Mac to SSD
1.Cloning Process Fails
If the cloning process fails, consider:
- Ensuring the external SSD is properly connected and formatted.
- Checking that there’s enough space on the SSD to accommodate the data.
- Restarting Tatasoft and trying again. Sometimes, a simple reboot can resolve issues.
2.Clone Not Bootable
If the cloned SSD is not bootable:
- Make sure you used the OS Clone option in Tatasoft.
- Check your Mac’s startup disk settings to select the external SSD correctly.
3.Data Mismatch
If the data on the cloned SSD doesn’t match:
- Double-check that the cloning process completed successfully. Check the logs in Tatasoft to ensure all files were copied.
- If discrepancies persist, consider performing the cloning process again.
Conclusion
Cloning your Mac hard drive to an external SSD is a smart investment for enhancing your system's performance, ensuring data security, and enjoying portability. By leveraging Tatasoft Disk Clone for Mac, you can simplify Mac HDD cloning process, making it not only efficient but also user-friendly. This powerful tool provides the reliability you need for seamless data transfer, ensuring that your system remains fast and responsive. Start today and experience the difference an SSD can make for your Mac!
FAQs
Q: Is it safe to clone my Mac hard drive to an external SSD?
Yes, cloning your hard drive to an external SSD is generally safe. However, it’s essential to ensure that your data is backed up your destination SSD before starting the cloning process in case of any data loss.
Q: Will the cloned SSD be bootable?
Most Mac disk cloning software, including Tatasoft Disk Clone for Mac, allows you to create a bootable clone of your Mac hard drive and make it bootable. This means you can start your Mac from the external SSD if needed.
Q: How long does it take to clone a Mac hard drive to an external SSD?
The time required to clone your hard drive depends on the amount of data being transferred and the speed of your external SSD. Typically, it can take anywhere from a few minutes to several hours, so plan accordingly.
Q: What should I do if the Mac hard drive cloning process fails?
If the cloning process fails, check the following:
- Ensure the external SSD is properly formatted and connected.
- Verify that there’s enough space on the SSD for the data.
- Restart the cloning software and try again. If issues persist, consult the software’s support resources for troubleshooting assistance.
Q: Can I use the cloned SSD as my primary drive on Mac?
Yes, once the cloning process is complete, you can use the external SSD as your primary drive by booting your Mac from it. You may need to adjust your system preferences to set the external SSD as the startup disk: Apple menu > System Settings > General > Startup Disk, choose the SSD, and click Restart.
Related Articles
- Jan 29, 2026How to Clone Your MacBook Pro Hard Drive?
- Jan 21, 2026The Ultimate Guide to Clone Mac HDD to SSD
- Feb 23, 20263 Methods to Clone a Mac OS Drive
- Feb 27, 2026The Effective Solution for Cloning NTFS Drives on Mac
- Feb 20, 2026Top 5 Mac Disk Clone Software
- Mar 04, 2026How to Clone macOS to SSD for Ultimate Performance

A dedicated technical writer at Tatasoft with over four years of specialized expertise in computing technology. She crafts actionable, user-centric content for tech niches, specializing in disk cloning, data management, and video solutions for Windows and Mac.
Read full bio

This article has been approved by Ben Lee. Ben's dedication to excellence and his comprehensive knowledge of Windows and Mac technologies make him an essential part of any technical writing team. With a career marked by continuous learning and adaptation to new technologies, Ben remains at the forefront of the ever-evolving tech landscape.