Written byJanet BashorunUpdated on Jan 14, 2026
Brief introduction: YouTube to WAV conversion is more than a simple file transformation, it’s a process designed to preserve the integrity of sound. WAV keeps sound exactly as it is—no compression like MP3/AAC. It’s great for creators, music work, podcasts, or saving audio forever. To turn YouTube into WAV, you need a safe, accurate video downloading tool like Tatasoft Video Tool that doesn’t ruin the sound quality.
In this article
Efficient Methods to Convert YouTube to WAV

There are multiple approaches to converting YouTube videos into WAV files. Some YouTube video downloaders are convenient, others more advanced.
1. Online Conversion Websites
These platforms allow quick conversion but often compress files and limit download size. They’re ideal for casual use but not for professional needs.
2. Browser Extensions
Some add-ons claim to convert directly, but most are unstable, slow, or violate YouTube’s service terms.
3. Desktop Applications
Dedicated software like Tatasoft Video Tool is the safest option to download YouTube Videos and convert to WAV for consistent performance. It provides direct access to YouTube’s stream data and converts efficiently while preserving original sound detail.
If you care about precision, privacy, and offline capability, desktop-based solutions are the clear winner.
How to Convert YouTube to WAV?
Here’s how to convert YouTube videos into WAV quickly and safely using Tatasoft Video Tool:
Step 1: Download and Install the Software
Download the Tatasoft Video Tool for Windows or Mac from the official website.
Step 2: Select Format and Quality
Choose "Audio.WAV" as your preferred output option. Also, the software offer the LQ (Lossless Quality) option for the WAV audio file.

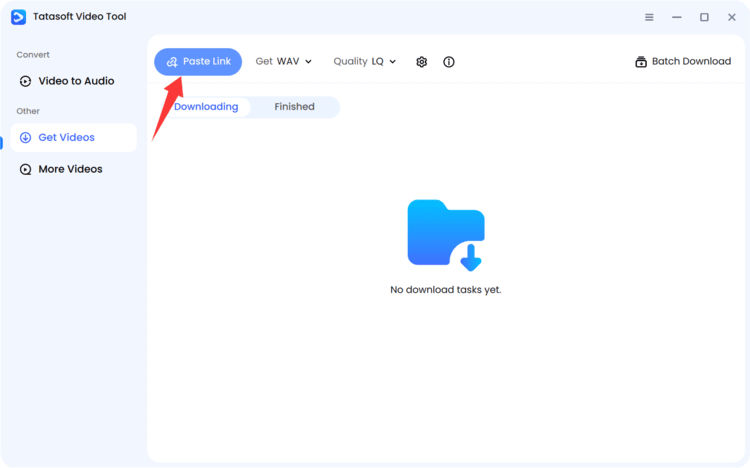
Step 3: Copy and Paste the YouTube Video Link
Navigate to the video you want and copy its URL. Turn to the app and paste the URL in the software by clicking the Paste Link button.
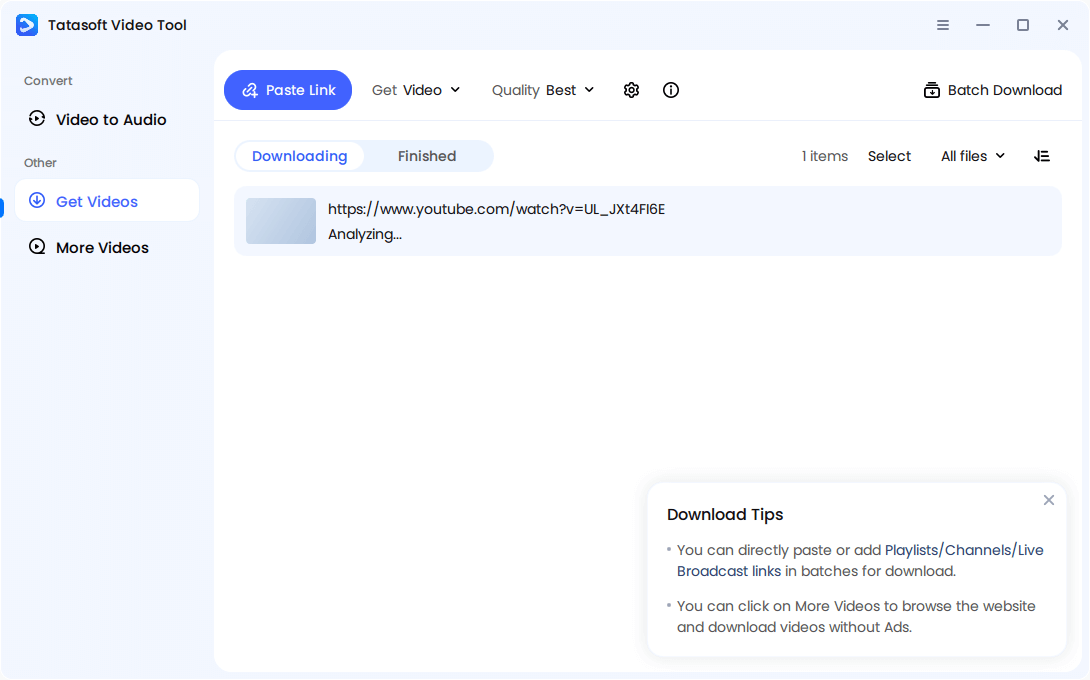
Step 4: Analyze Video
The software will start to analyze the video first and scan the video to extract available qualities.
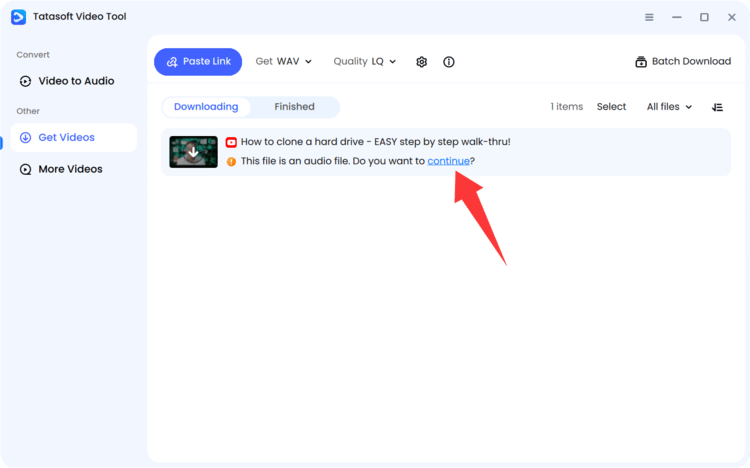
Step 5. Confirm the Conversion
The software will ask if you want to download it as audio file. If so, just click continue to convert.
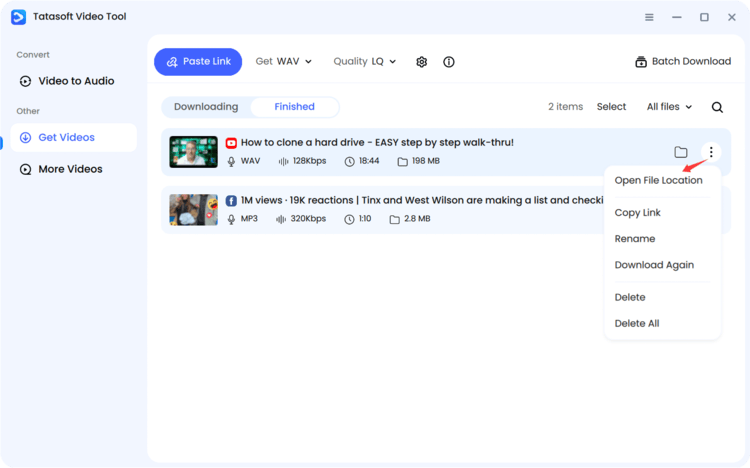
The software will automatically convert and save the WAV file directly to your computer. This seamless process takes minutes and provides an uncompressed, studio-quality output - ready for editing, mastering, or playback. After the downloading process is done, the online YouTube video is converted to WAV file. Click Open File Location to check and play the audio file.
Tools and Techniques for YouTube to WAV Conversion
The conversion process is simple once you have the right tool. For effective YouTube to WAV conversions:
- Use Reliable Software: Choose trusted tools like Tatasoft Video Tool for fast, secure downloads.
- Check File Resolution: Ensure the original video is at least 720p to maintain decent audio capture.
- Set Conversion Preferences: Adjust output quality and select WAV as the desired format.
- Avoid Web-Based Tools for Long Videos: They often have file size or time restrictions.
- Keep Software Updated: This ensures compatibility with YouTube’s frequent format changes.
These steps guarantee each YouTube to WAV conversion delivers studio-quality precision without glitches.
YouTube to WAV Conversion: Key Bitrate & Quality Tips
Bitrate directly influences the quality of your WAV file. It measures how much data is processed per second, expressed in kilobits per second (kbps).
Here’s what to keep in mind when converting YouTube to WAV:
- Higher Bitrate = Better Quality: A 1411 kbps WAV file contains far more detail than a 320 kbps MP3.
- Source Matters: If the original YouTube video is low-quality, conversion alone won’t enhance it. Always start with HD or 4K videos.
- Sample Rate and Bit Depth: For professional use, aim for 44.1 kHz / 16-bit or 48 kHz / 24-bit audio files.
- Avoid Double Compression: Never convert compressed MP3s to WAV expecting improvement—it simply increases file size without real gains.
Understanding bitrate helps you make informed decisions when selecting output settings in Tatasoft Video Tool or any other conversion tool.
Essential Factors When Choosing a YouTube to WAV Converter
Not all converters are made equal. Selecting the right one ensures smooth conversion, accurate audio reproduction, and long-term reliability.
Look for these key factors:
- Legal Safety: Choose converters that comply with copyright policies and don’t bypass restricted content.
- Audio Fidelity: Must retain high bitrates and accurate sampling rates during extraction.
- Speed and Stability: Efficient software minimizes conversion time without freezing or crashing.
- Format Options: A good converter should support multiple formats (WAV, MP3, FLAC) for flexibility.
- Offline Functionality: Desktop apps like Tatasoft offer better consistency than browser-based tools.
- Security: Avoid converters that request unnecessary personal data or redirect through ad-heavy websites.
With these standards in mind, you can confidently select a trustworthy converter that preserves both your data integrity and audio quality.
Why WAV Format Is Ideal for Audio Extraction
The WAV format (Waveform Audio File) is known for its lossless, uncompressed sound—offering studio-level clarity. When you convert YouTube videos to WAV, you capture every tone, echo, and frequency from the original file.
Here’s why WAV stands out:
- Lossless Quality: WAV files store raw, uncompressed audio, ensuring every detail of the sound is preserved.
- Professional Compatibility: It’s the industry standard for editing software like Adobe Audition, Logic Pro, and Audacity.
- Perfect for Re-Editing: Unlike MP3, WAV doesn’t lose detail when reprocessed, making it ideal for remixes and sound engineering.
- High Bitrate Capacity: WAV supports bitrates up to 4,600 kbps, far exceeding most compressed formats.
- Consistent Playback: Works seamlessly across Windows, macOS, and even legacy media players without conversion errors.
If your goal is clarity, precision, and reliability, WAV is the benchmark for serious audio extraction from YouTube videos.
Understanding WAV vs Other Audio Formats
Before converting, it’s important to understand how WAV compares with other common formats. Each serves a purpose, but WAV excels in raw audio fidelity.
| Format | Compression Type | Quality | File Size | Ideal Use |
|---|---|---|---|---|
| WAV | Uncompressed | Studio-grade | Large | Editing, Archiving |
| MP3 | Lossy | Moderate | Small | Streaming, Everyday Listening |
| AAC | Lossy | High (but compressed) | Small | Mobile Devices |
| FLAC | Lossless (compressed) | Excellent | Medium | Audiophile Listening |
| OGG | Lossy | Good | Small | Online Platforms |
While MP3 and AAC dominate for streaming, they remove frequencies the human ear barely detects reducing quality. In contrast, WAV maintains the full sound spectrum, offering true-to-source output ideal for podcasts, film scoring, or audio production.
If your purpose is high-resolution preservation or remixing, WAV outperforms other formats every time.
Challenges in Converting YouTube Videos to WAV
While modern converters simplify the process, users may still face challenges:
- Copyright Restrictions: Not all videos are legally downloadable; respect ownership rights.
- Large File Sizes: WAV files consume more disk space—store them on an external drive if needed.
- Slow Conversions: High-quality audio processing takes longer than compressed formats.
- Browser Security Warnings: Some online tools trigger pop-up alerts or install add-ons.
- Inconsistent Quality: Poor converters may distort sound or misalign audio frequencies.
Awareness of these issues helps you troubleshoot effectively and choose more dependable tools for consistent output.
Optimizing File Size without Losing Quality
Since WAV files are uncompressed, managing their size without degrading sound is essential.
Here’s how to optimize efficiently:
- Use 16-Bit Instead of 24-Bit Depth: It’s still professional quality and reduces file size by nearly 40%.
- Trim Unnecessary Segments: Use audio editors like Audacity to remove silent or unused portions.
- Convert Long Projects to FLAC: For archiving, FLAC offers lossless compression with smaller size.
- Store on External Drives: Keep large WAV collections on SSDs or cloud drives to free local storage.
- Avoid Over-Editing: Frequent exporting and re-saving can add noise artifacts if mishandled.
Following these steps ensures your WAV collection remains high-quality yet space-efficient.
Conclusion
Converting YouTube to WAV allows creators, educators, and sound enthusiasts to preserve the best possible audio quality from online videos. By understanding formats, bitrates, and safe conversion practices, you can enjoy professional-grade sound clarity that compressed formats can’t match.
If you’re seeking a dependable tool for this purpose, Tatasoft Video Tool stands out for its reliability, accuracy, and efficiency. It effortlessly handles YouTube to WAV, YouTube to MP3, and YouTube to MP4 conversions, saving YouTube videos for offline use and ensuring crystal-clear results while maintaining respect for content integrity.
Take control of your audio today, download and convert confidently, knowing your WAV files are captured in their purest form.
Related Articles
- Feb 12, 2026Three Methods to Download Facebook Reels
- Dec 29, 2025How to Download Video from Any Website Easily?
- Dec 17, 2025Download YouTube Videos In Easy and Secure Way
- Dec 27, 2025How to download TikTok video without watermarks?
- Jan 04, 2026Step-by-Step Guide to Download Video from Link Securely
- Jan 08, 2026Convert YouTube to MP4 for High Quality Video Downloads

A dedicated technical writer at Tatasoft with over four years of specialized expertise in computing technology. She crafts actionable, user-centric content for tech niches, specializing in disk cloning, data management, and video solutions for Windows and Mac.
Read full bio

This article has been approved by Ben Lee. Ben's dedication to excellence and his comprehensive knowledge of Windows and Mac technologies make him an essential part of any technical writing team. With a career marked by continuous learning and adaptation to new technologies, Ben remains at the forefront of the ever-evolving tech landscape.